
Paket 11
BAUANLEITUNG
Anleitung zum Bau Ihres U.S.S. Constitution Modellschiffs
Ihr Modell der U.S.S. Constitution ist in 12 Pakete unterteilt.
Sie müssen den schrittweisen Montagefotos, den Plänen und den erläuternden Texten unten folgen.
Bitte bewahren Sie das übrig gebliebene Material aus jedem Paket auf, um es zu verwenden, wenn Sie später in der Bauanleitung dazu aufgefordert werden.
Die unten angezeigten IP-Blätter sind Zeichnungen von lasergeschnittenen Teilen und fotoätzten Messingteilen und dienen als Leitfaden zur Identifikation einiger Teile.
Verwenden Sie die TEILEVERWEIS-Tabelle, um die Teile zu lokalisieren.
Die in jedem Paket enthaltenen PL-00 Schablonen (im Maßstab 1/1 gedruckt) dienen als Leitfaden für den Bau der Spanten.
Bitte überprüfen Sie die untenstehende Liste, um sicherzustellen, dass Sie alle Werkzeuge haben, die Sie zum Bau Ihres Holzschiffs benötigen.
Beim Entfernen eines Teils schneiden Sie die Rippen, die das Teil mit der Holzplatte verbinden, mit einem Cutter.
Entfernen Sie die Teile vorsichtig, um sie nicht zu brechen.
Bewahren und lagern Sie die Teile in ihren Spanten. Entfernen Sie nur die Teile, an denen Sie in jedem Schritt arbeiten.
Zusätzliche Unterstützung finden Sie in unserem Forum oder auf der Expertenverzeichnis-Seite unserer Website.
TEILELISTE
| Material | Menge | |
| Holzstäbe | ||
| ø3 x 400 mm | Mahagoni | 6 |
| ø4 x 400 mm | Mahagoni | 7 |
| ø5 x 400 mm | Mahagoni | 6 |
| ø6 x 400 mm | Mahagoni | 7 |
| ø8 x 400 mm | Mahagoni | 6 |
| Holzleisten | ||
| 1 x 5 x 600 mm | Lindenholz | 5 |
| 3 x 3 x 400 mm | Lindenholz | 3 |
| 2 x 5 x 600 mm | Lindenholz | 5 |
| 2 x 2 x 600 mm | Mahagoni | 5 |
| 2 x 3 x 600 mm | Lindenholz | 1 |
| 2 x 2 x 600 mm | Lindenholz | 1 |
| 1 x 3 x 600 mm | Lindenholz | 10 |
| Faden | ||
| ø0,15 x 25.000 mm (natur) | Baumwolle | 18 |
| ø0,15 x 25.000 mm (braun) | Baumwolle | 4 |
| ø0,5 x 15.000 mm (braun) | Baumwolle | 10 |
| ø0,8 x 10.000 mm (braun) | Baumwolle | 8 |
| Weitere Teile | ||
| Masten- und Takelzeichnungen (22 A3-Blätter) | 1 |
Werkzeuge, die Sie benötigen: Schneidematte, Bleistift, Modellbaumesser, feines Schleifpapier oder Schleifschwamm, Feile, Weißleim, Sekundenkleber (Zyanoakrylatkleber), Abdeckband, Winkel, Metallsäge, Schleifklotz, 30 cm Stahl-Lineal, Klemmen, Profilziehwerkzeug
TEILEVERWEIS
TEILE-NR. | IP-BLATTSTANDORT | TEILE-NR. | IP-BLATTSTANDORT | TEILE-NR. | IP-BLATTSTANDORT |
| MT4 | 2001-24 | MT74 | 2001-11 | MT130 | 2001-31 |
| MT5 | 2001-31 | MT80 | 2001-11 | MT144 | 2001-24 |
| MT18 | 2001-11 | MT88 | 2001-31 | MT147 | 2001-31 |
| MT30 | 2001-31 | MT89 | 2001-31 | MT148 | 2001-31 |
| MT31 | 2001-31 | MT100 | 2001-24 | MT149 | 2001-31 |
| MT45 | 2001-24 | MT103 | 2001-31 | MT150 | 2001-31 |
| MT48 | 2001-31 | MT104 | 2001-31 | MT151 | 2001-24 |
| MT50 | 2001-31 | MT105 | 2001-31 | MT169 | 2001-11 |
| MT51 | 2001-31 | MT106 | 2001-31 | MT174 | 2001-11 |
| MT52 | 2001-24 | MT107 | 2001-24 | ||
| MT64 | 2001-38 | MT129 | 2001-31 |
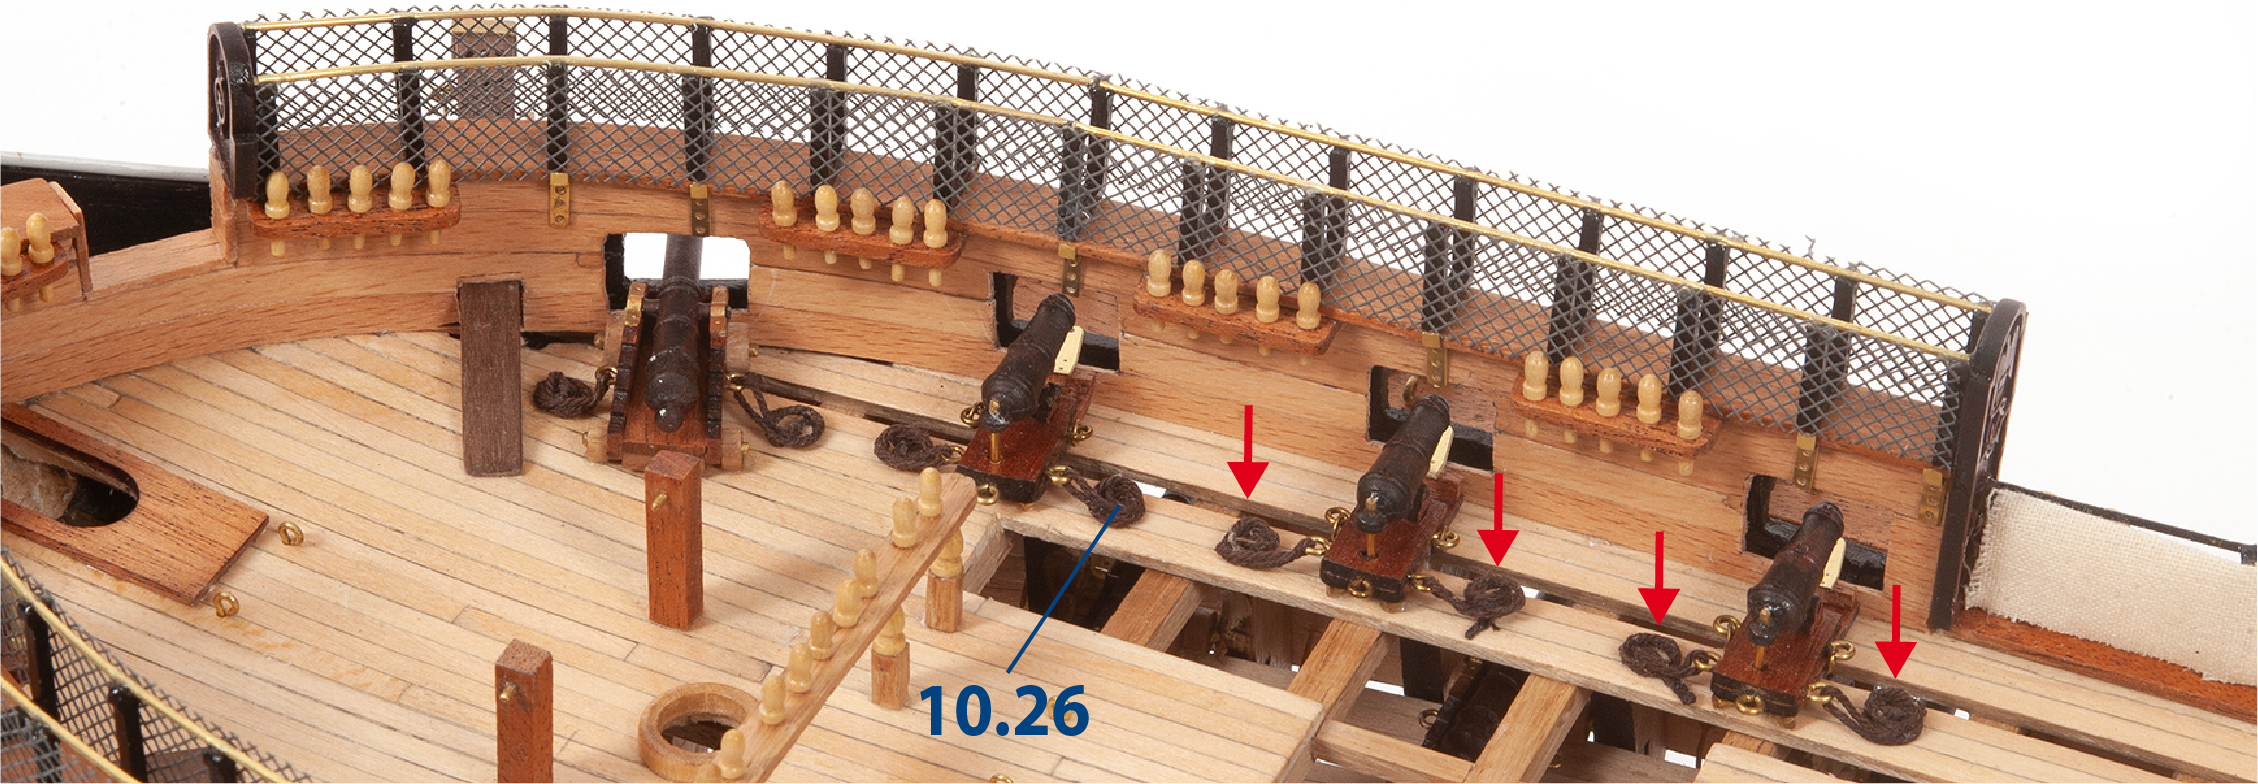
Schritt 1
Schneiden Sie 10.26 Fäden (ø0,5 x 125 mm braun) auf Länge zu, befestigen Sie sie an den Kanonen und der Karonade und kleben Sie sie wie gezeigt auf das Deck.
Die Kanonen und Karonaden sollten ebenfalls auf das Deck geklebt werden.
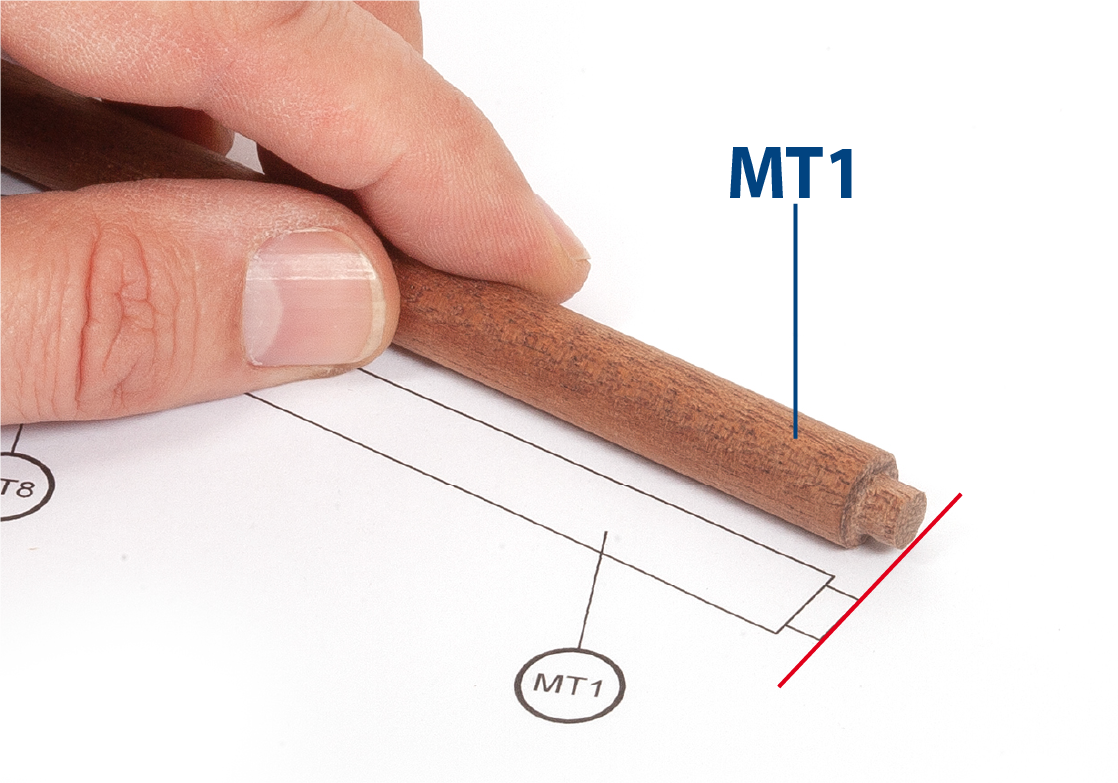
Schritt 2
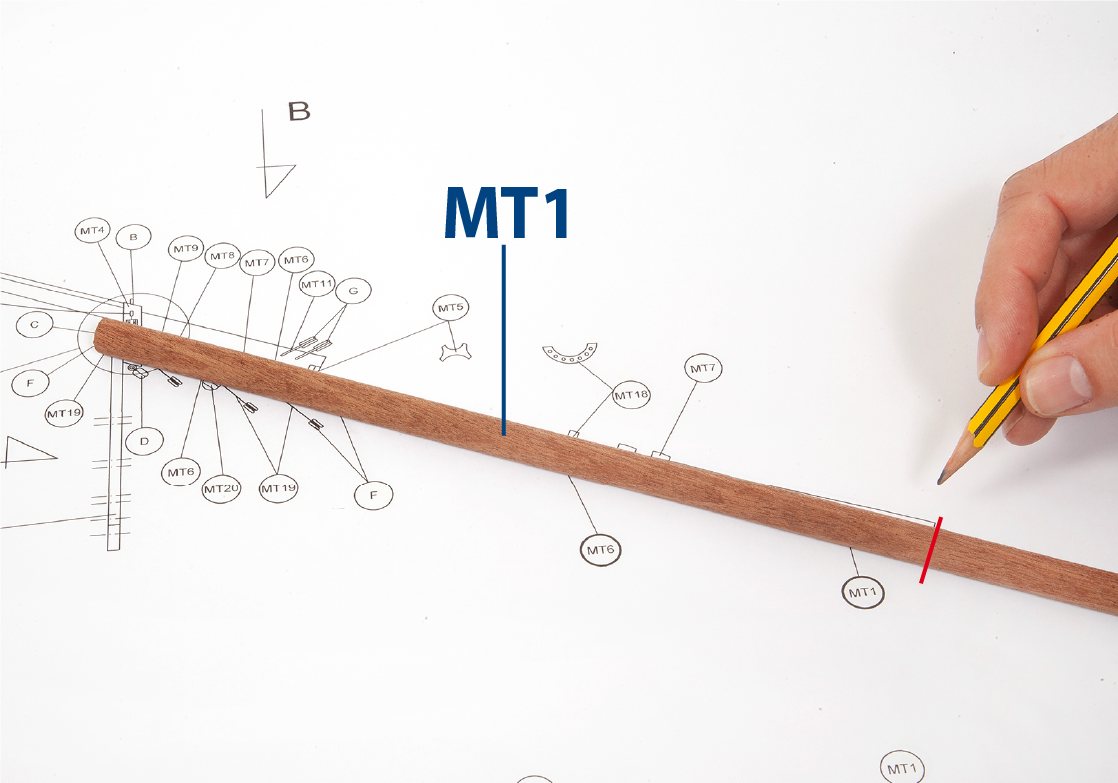
Bau des Bugspriets
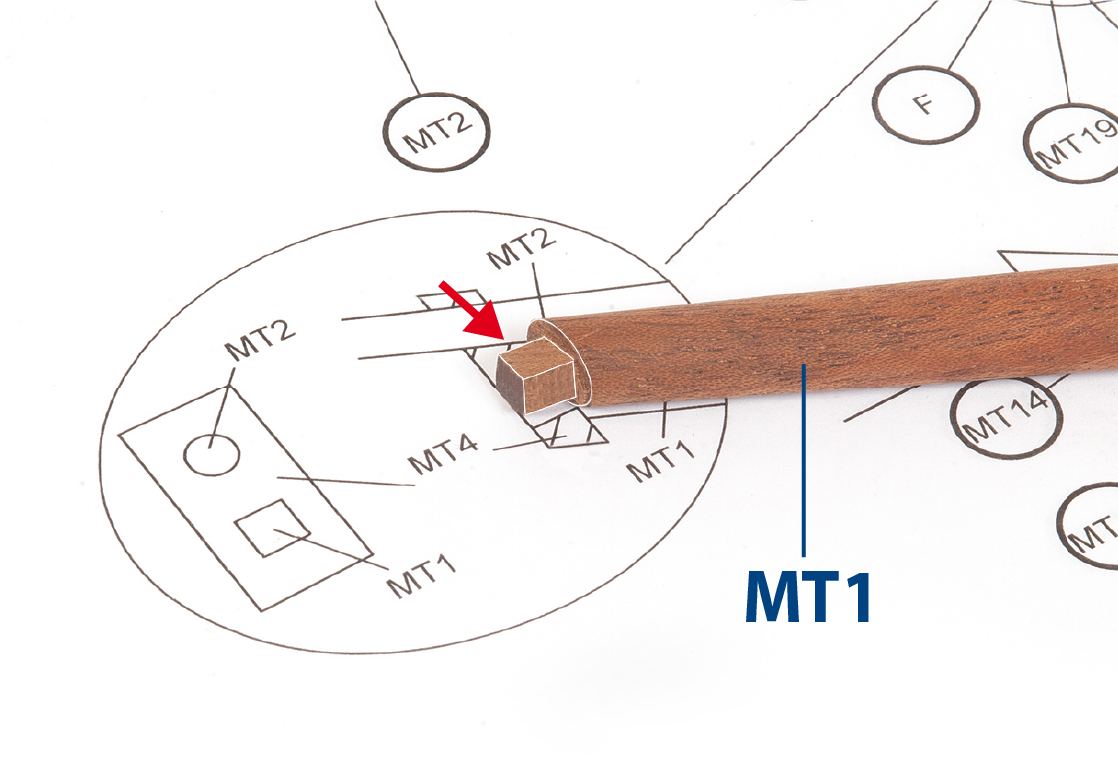
Beziehen Sie sich auf die 1/1-Maßstab Mast- und Takelagezeichnungen für dieses Paket.
Legen Sie Teil MT1 (ø10 x 230 mm) auf die Zeichnung des Bugspriets und markieren Sie die erforderliche Länge auf der Stange.
![]() Sehen Sie sich unser Video an, um zusätzliche Anleitungen zu erhalten.
Sehen Sie sich unser Video an, um zusätzliche Anleitungen zu erhalten.
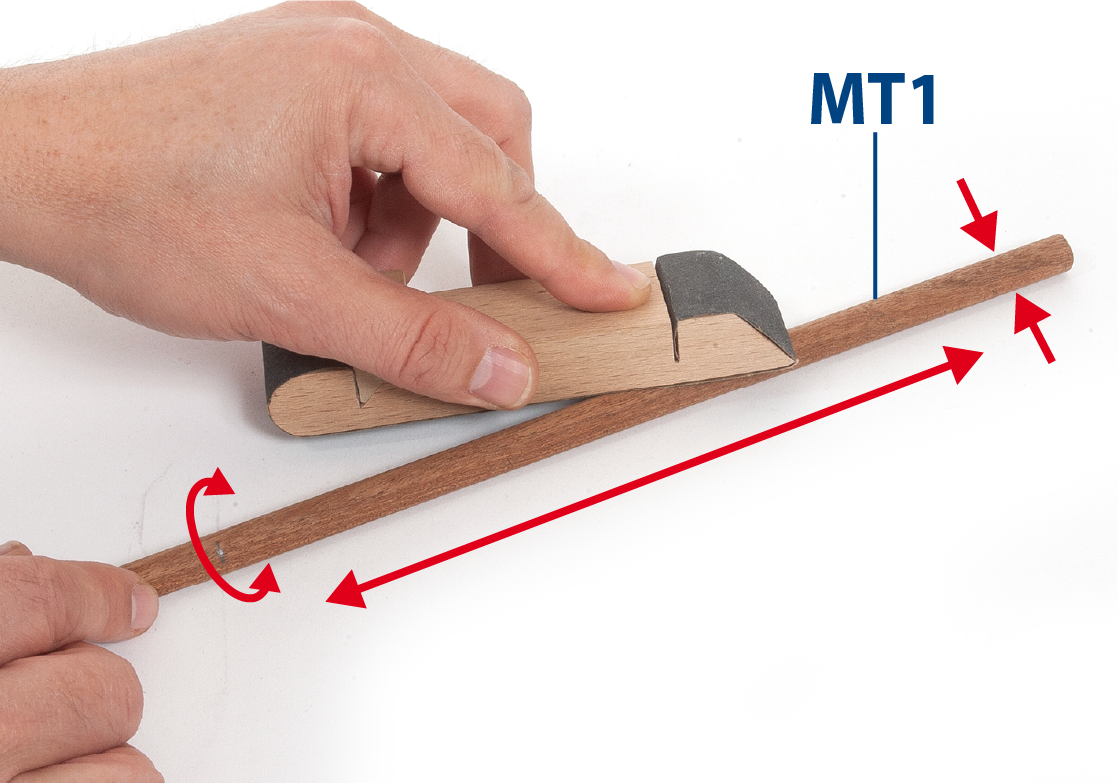
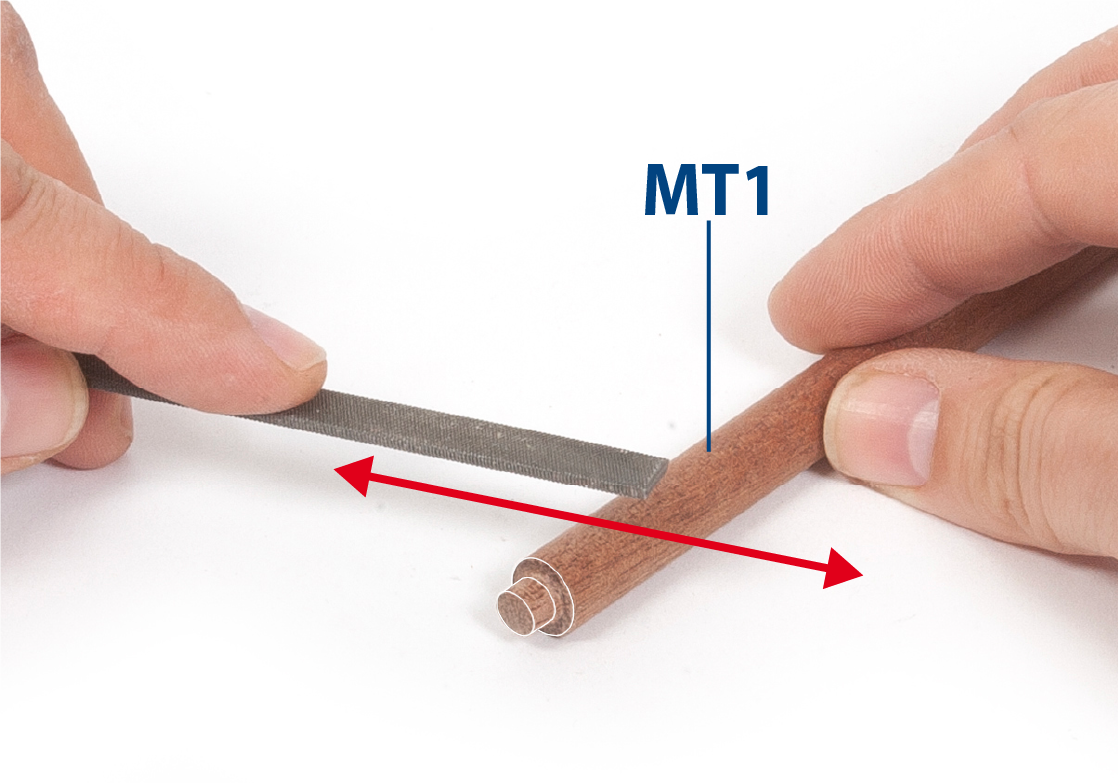
Schritt 3
Verjüngen Sie das Teil MT1 mit einem Schleifklotz, um das im Plan gezeigte Profil zu erreichen.
Schritt 4
Schneiden Sie das Teil MT1 auf die markierte Länge zu.
Schritt 5
Reduzieren Sie den Durchmesser an der Basis des Teils MT1 mit einer Feile oder einem Cutter.
Schritt 6
Platzieren Sie das Teil MT1 auf der Zeichnung, um seine Länge und sein Profil zu überprüfen.
Schritt 7
Trimmen Sie das obere Ende des Teils MT1 unter Verwendung der Zeichnung als Referenz.
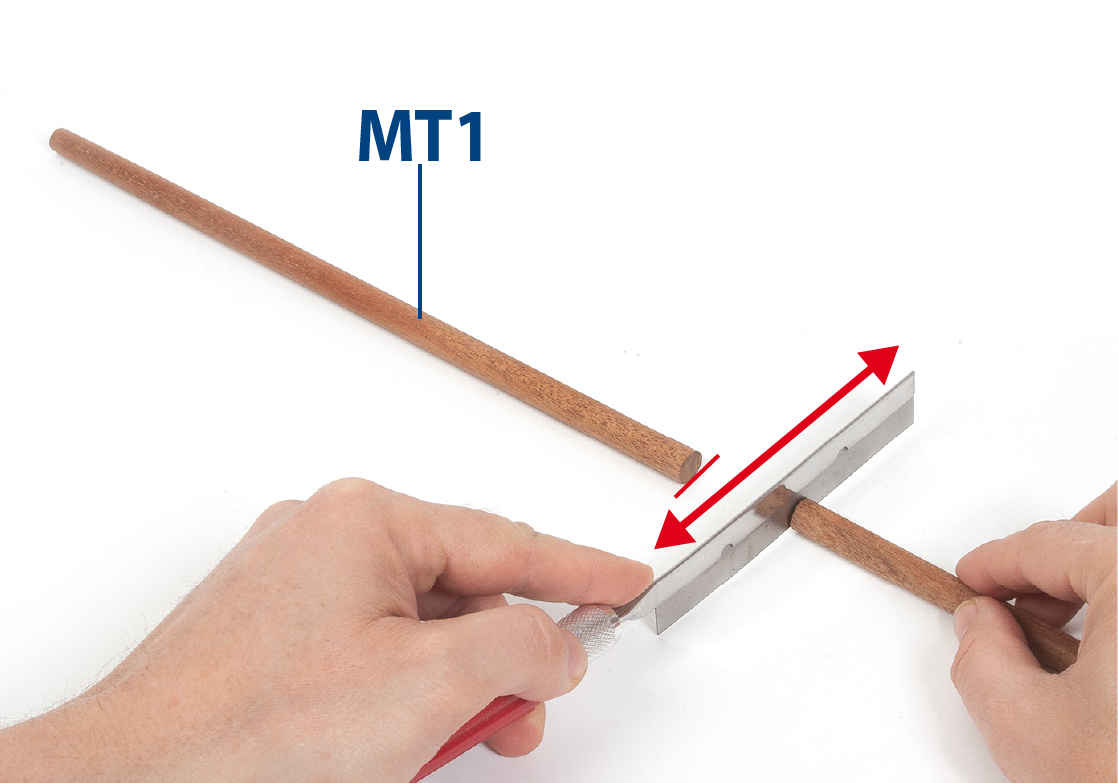
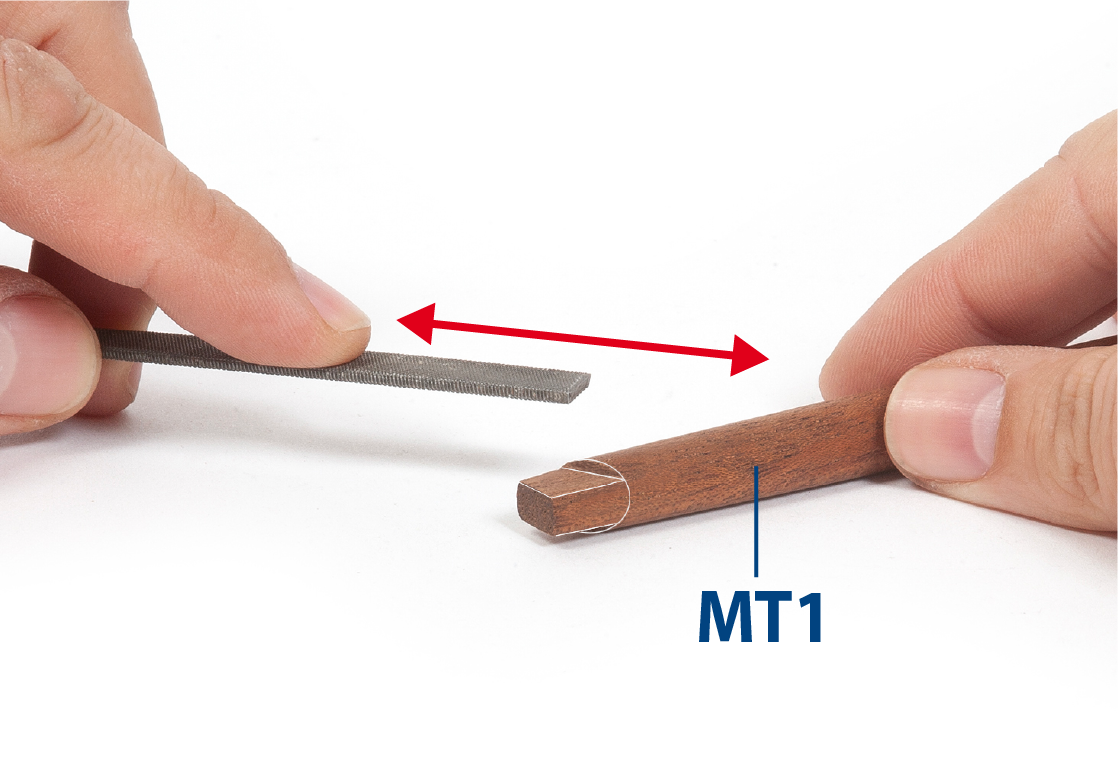
Schritt 8
Glätten Sie das Ende mit einer Flachfeile.
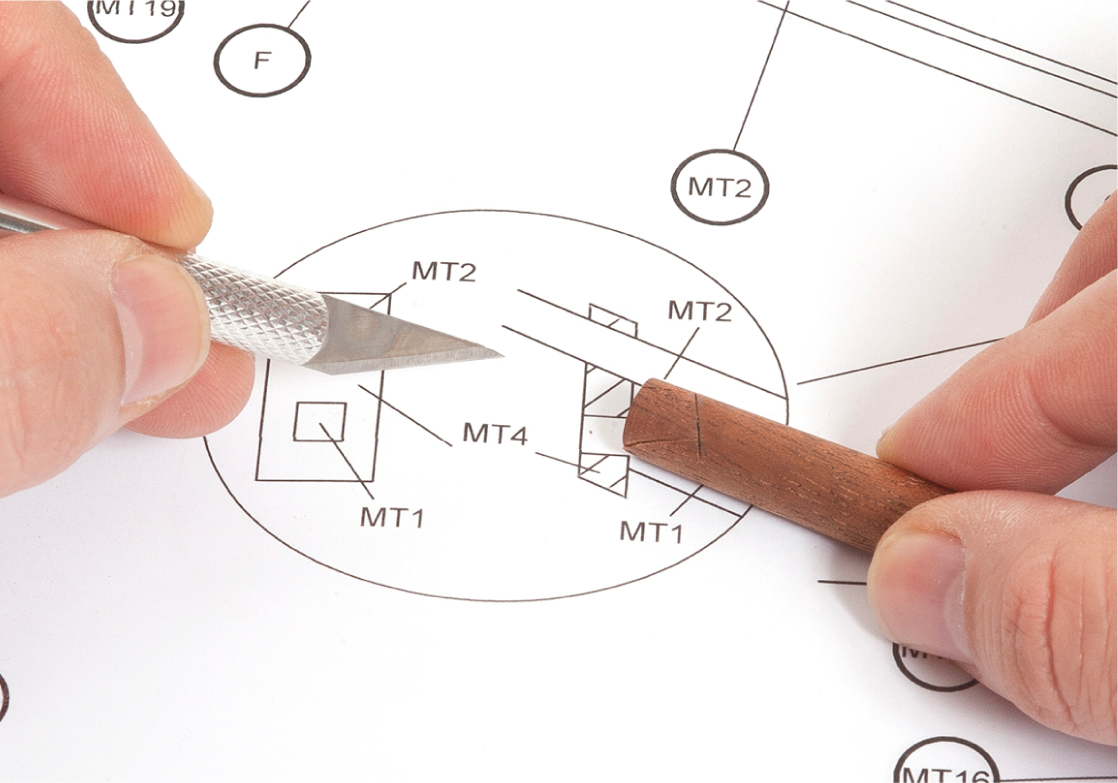
Schritt 9
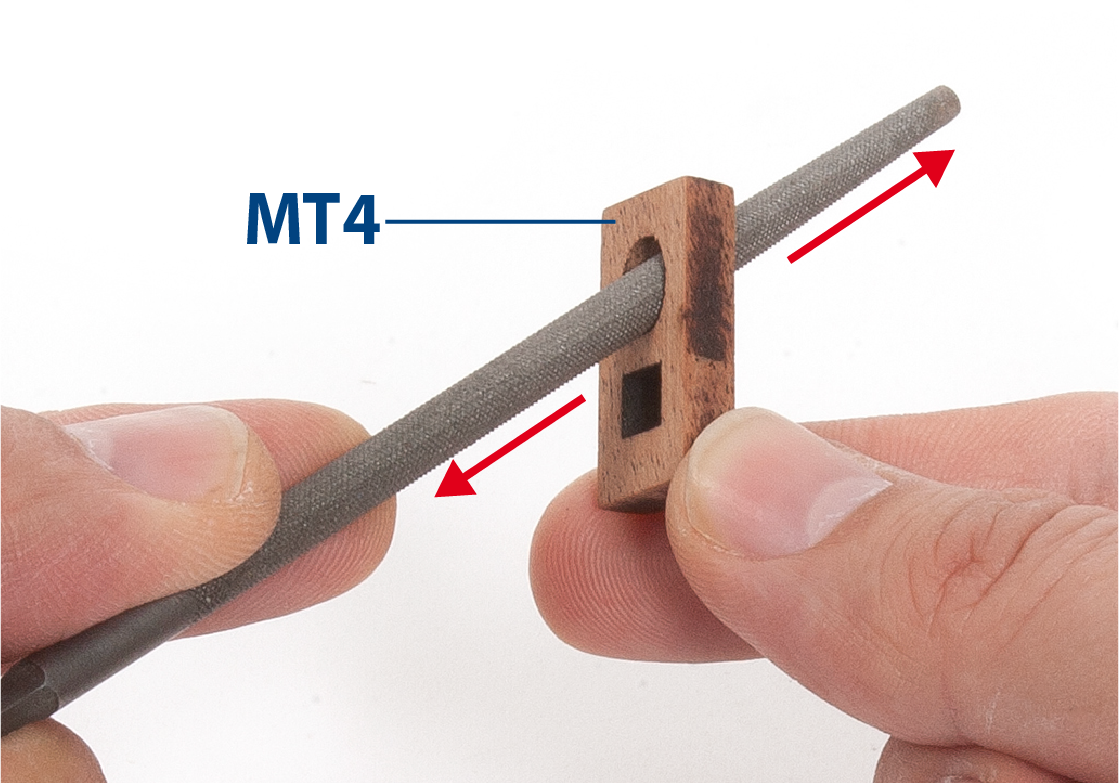
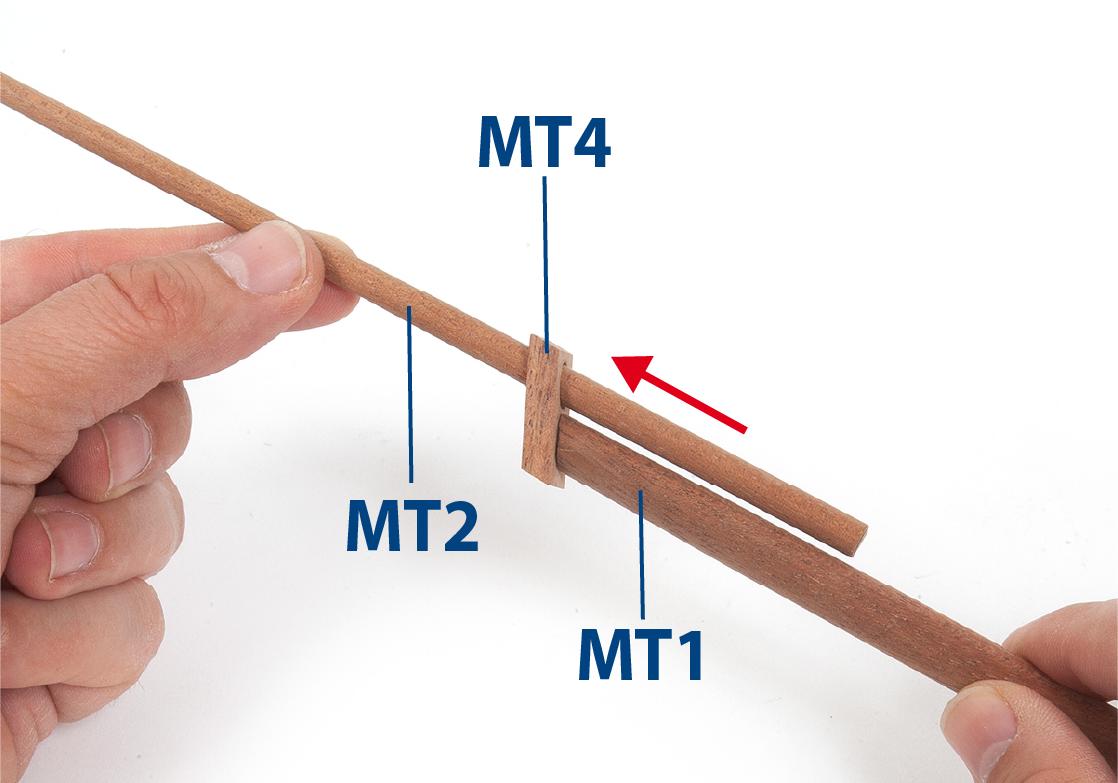
Formen Sie das Ende von Teil MT1 so, dass es in das quadratische Loch von Teil MT4 passt, wie in der Zeichnung dargestellt.
Schritt 10
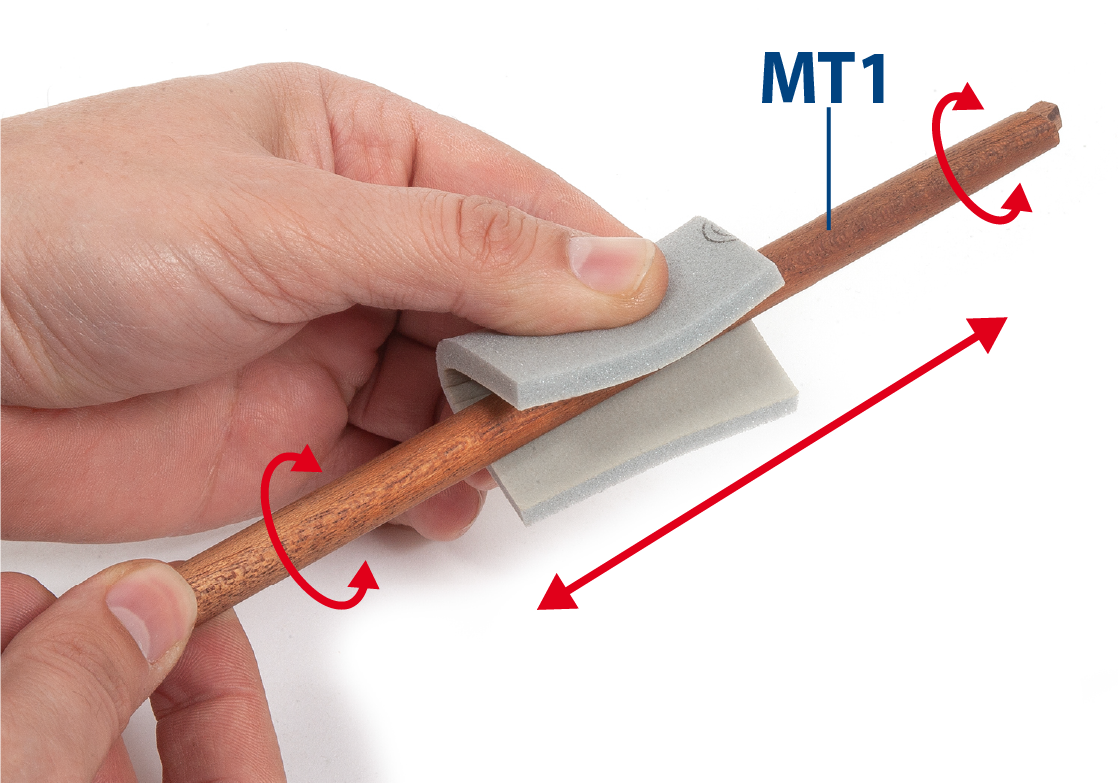
Schleifen Sie das Teil MT1 mit einem Feinkorn-Schleifschwamm.
Schritt 11
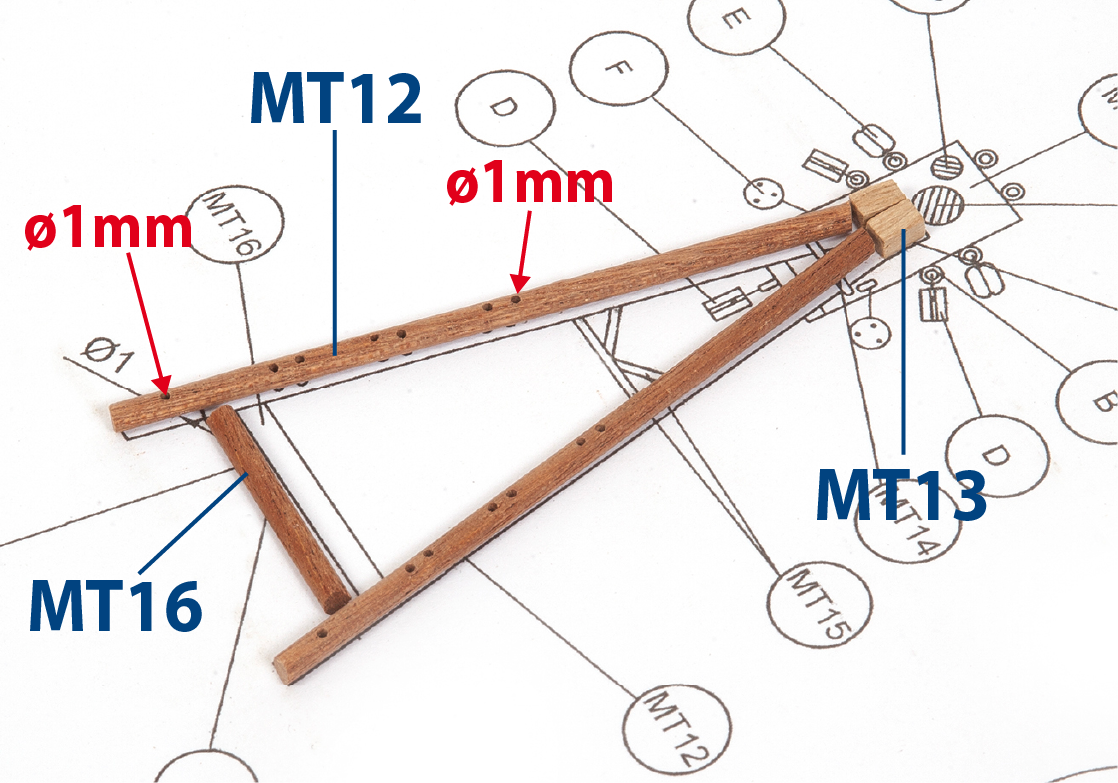
Bauen Sie die Teile MT12 (ø3 x 78 mm Mahagoni), MT13 (3 x 3 x 5 mm Lindenholz) und MT16 (ø3 x 26 mm Mahagoni) zusammen und erstellen Sie die Struktur gemäß der Zeichnung.
Schritt 12
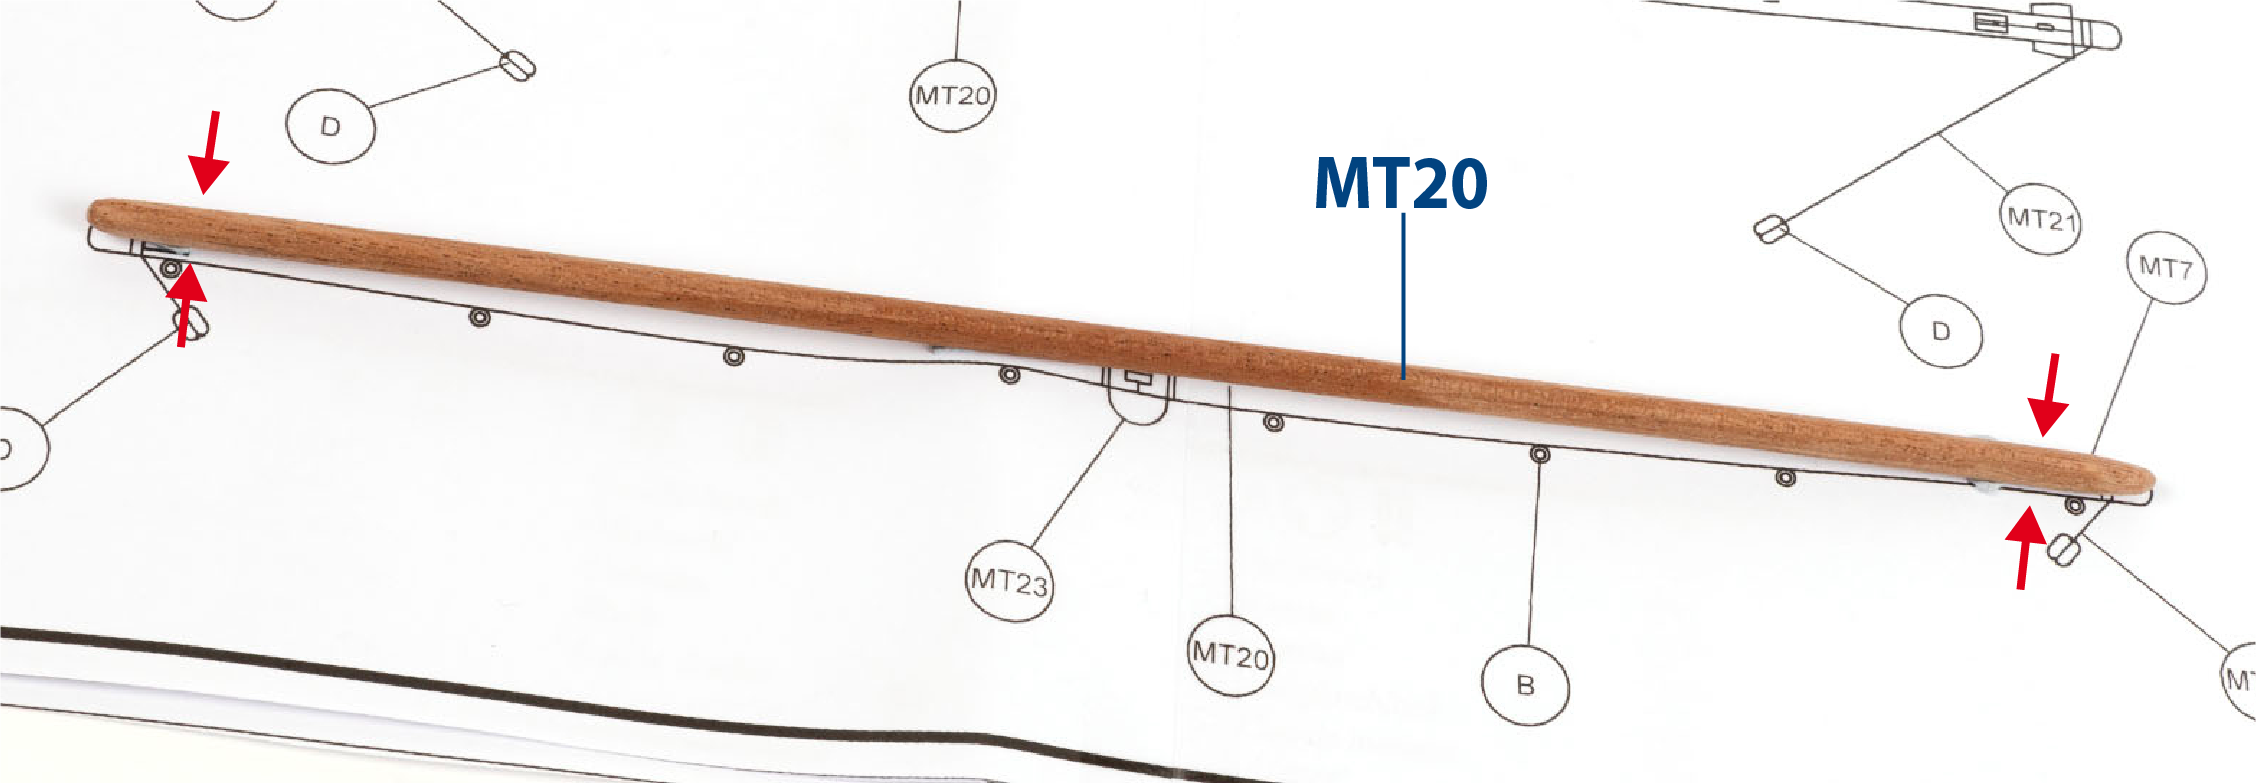
Fertigen Sie Teil MT20 (ø5 × 240 mm Mahagoni) mit abgeschrägten Enden gemäß der Zeichnung an.
Schritt 13
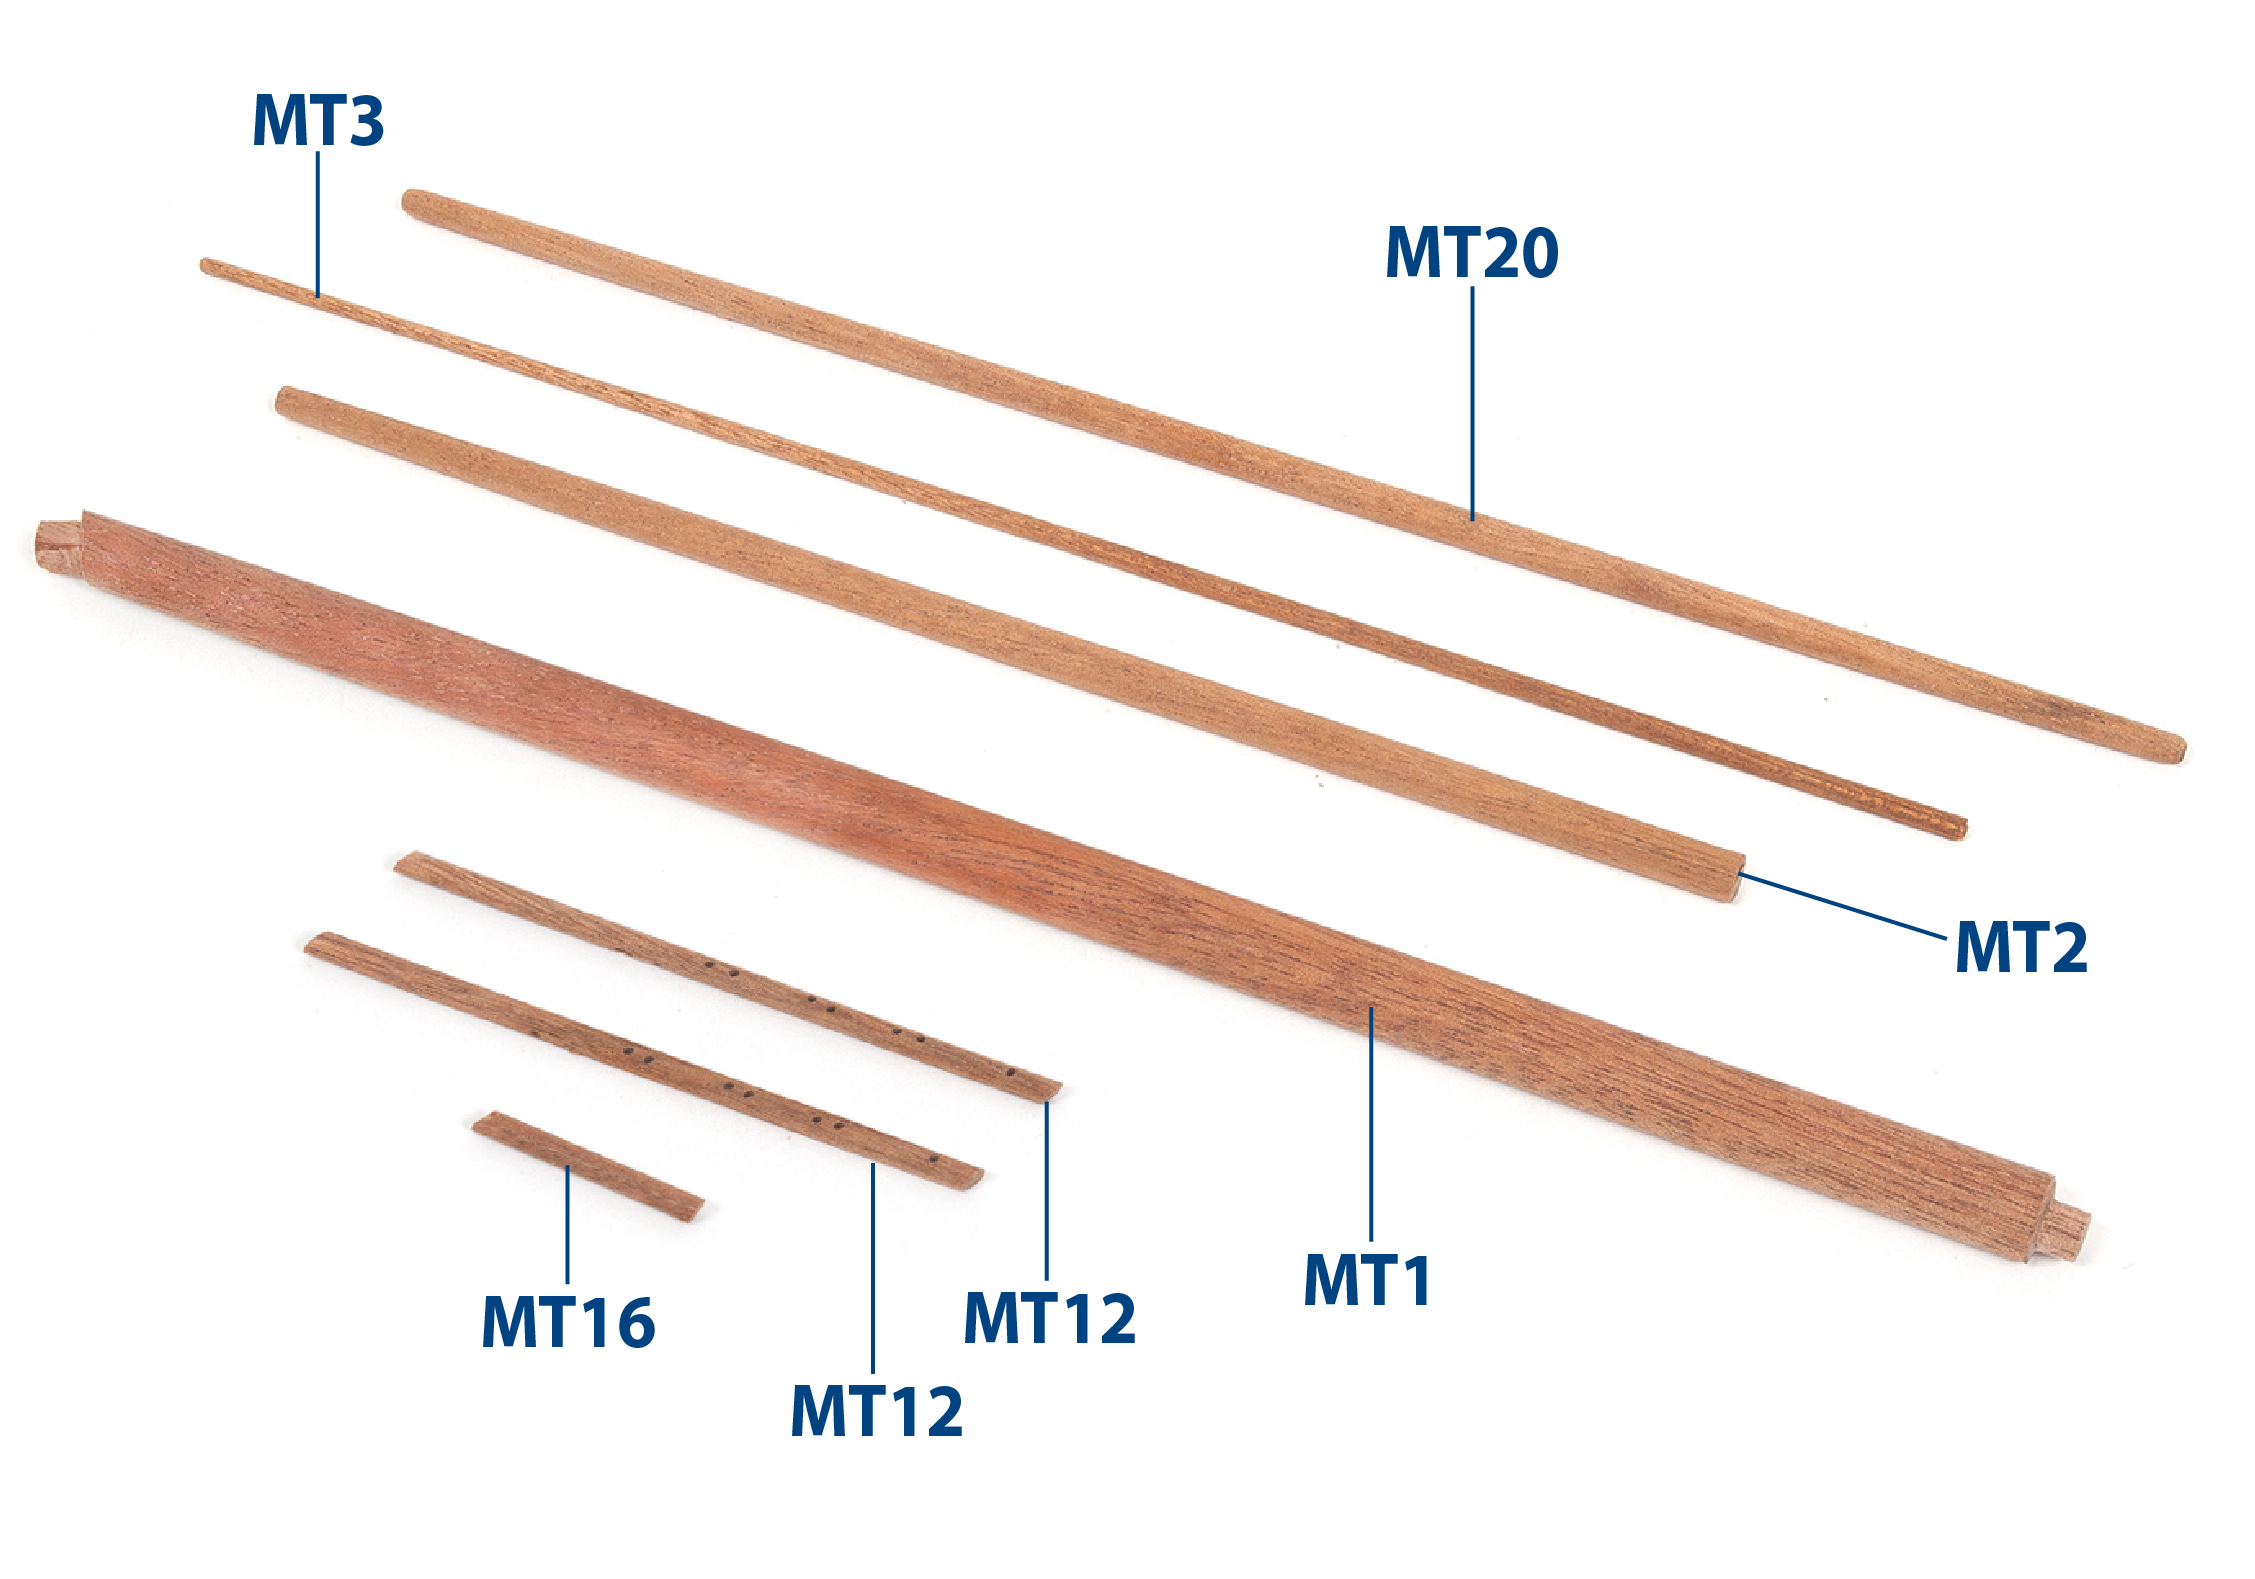
Überprüfen Sie, ob die im Bild dargestellten Bugspriet-Teile gemäß der Zeichnung und der untenstehenden Tabelle vorbereitet wurden.
| MT1 | ø10 x 230 mm Mahagoni |
| MT2 | ø6 x 193 mm Mahagoni |
| MT3 | ø3 x 231 mm Mahagoni |
| MT12 | ø3 x 78 mm Mahagoni |
| MT16 | ø3 x 26 mm Mahagoni |
| MT20 | ø5 x 240 mm Mahagoni |
Schritt 1
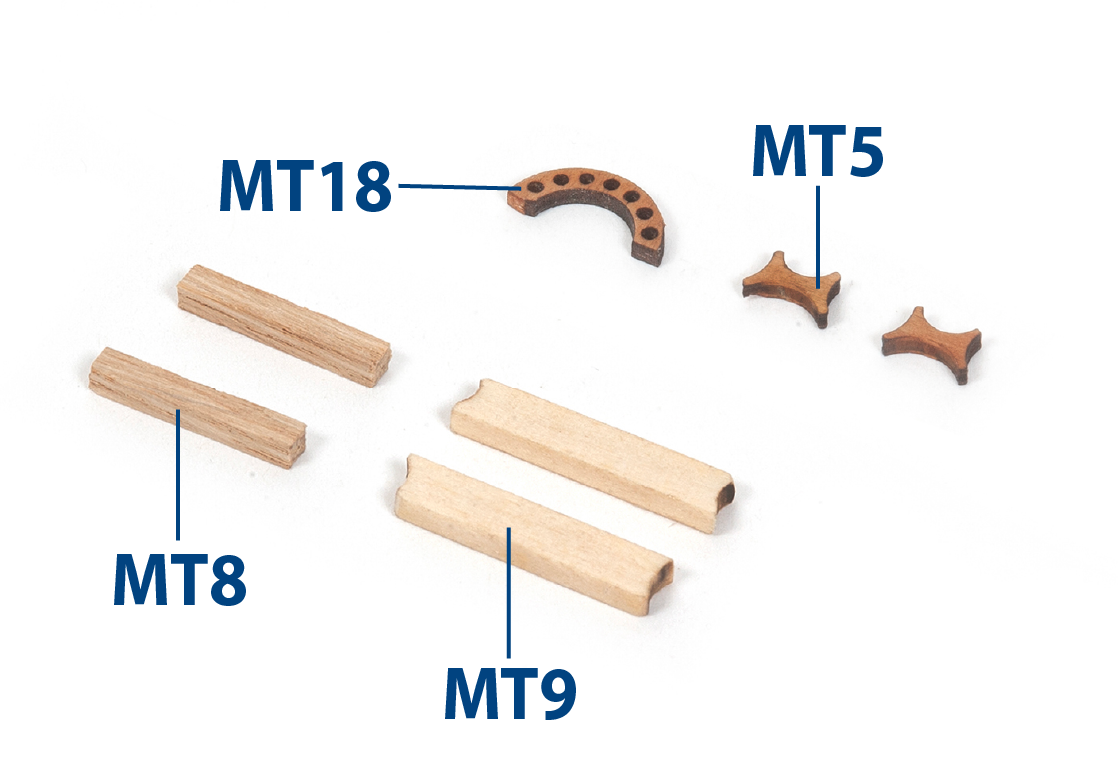
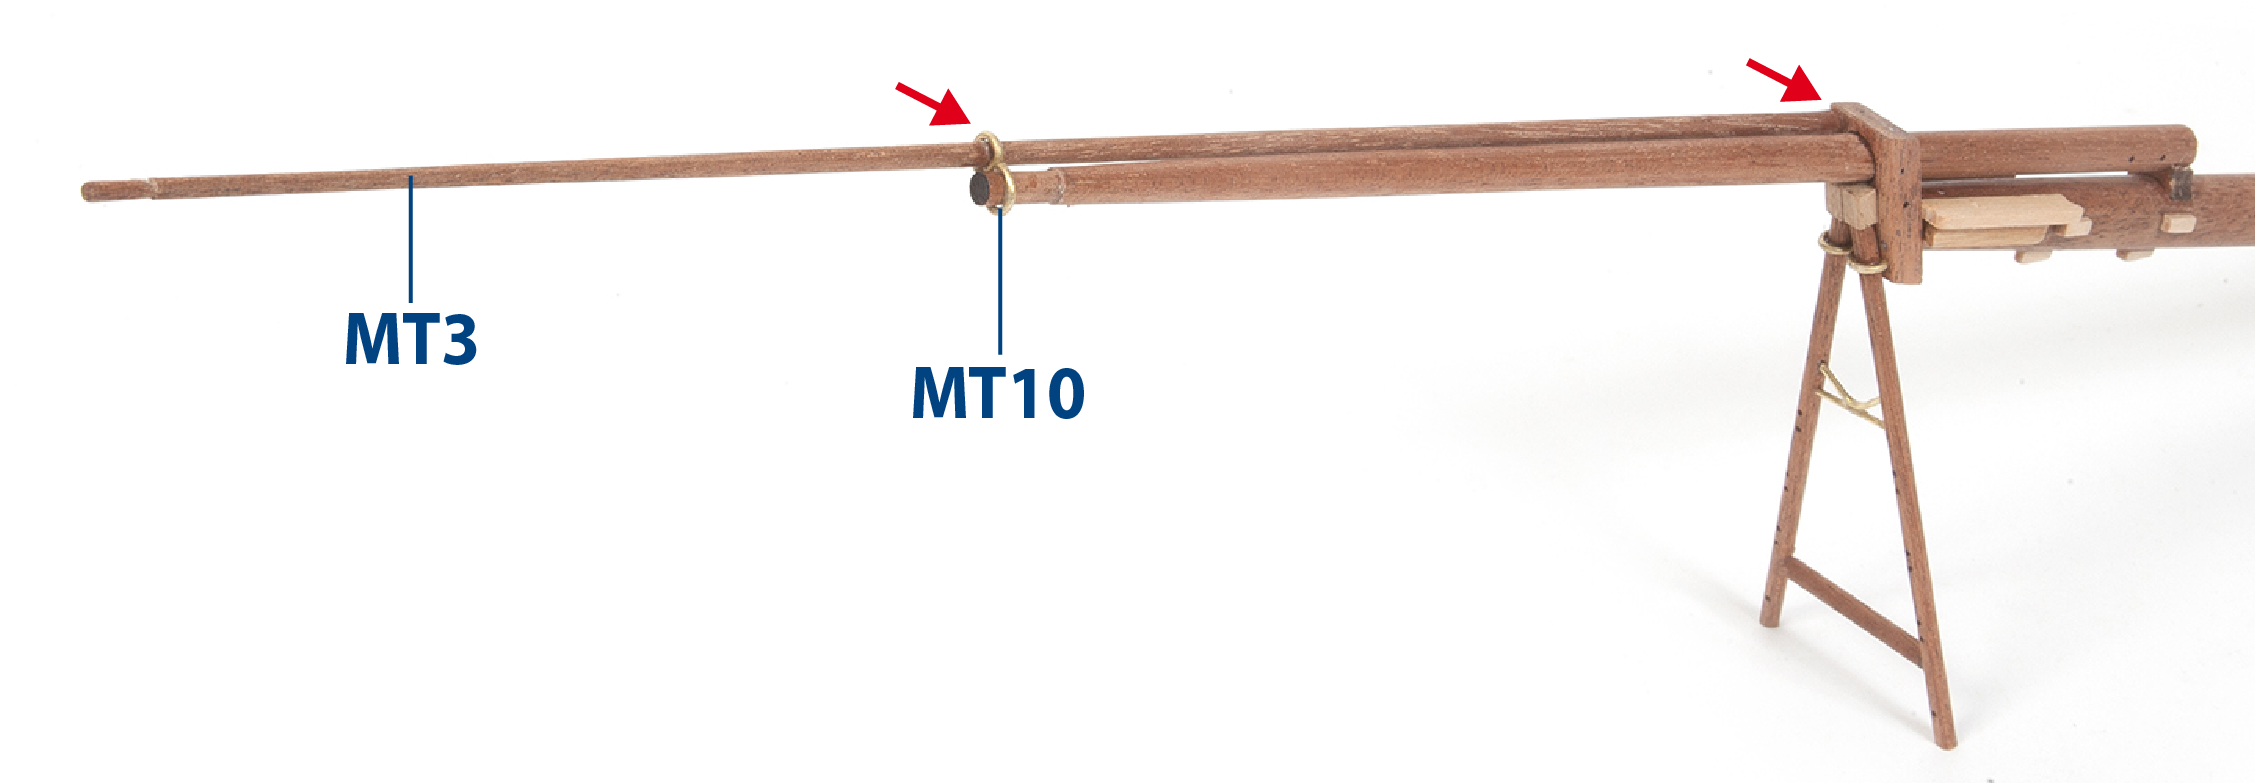
Fertigen Sie Teile MT8 (3 x 3 x 20 mm Lindenholz) und MT9 (2 x 5 x 26 mm Lindenholz). Schneiden Sie Teile MT5 (Paket 07) und MT18 (Paket 02) aus.
Schritt 2
Feilen Sie das obere Loch in Teil MT4, damit später Teil MT2 eingefügt werden kann.
Schritt 3
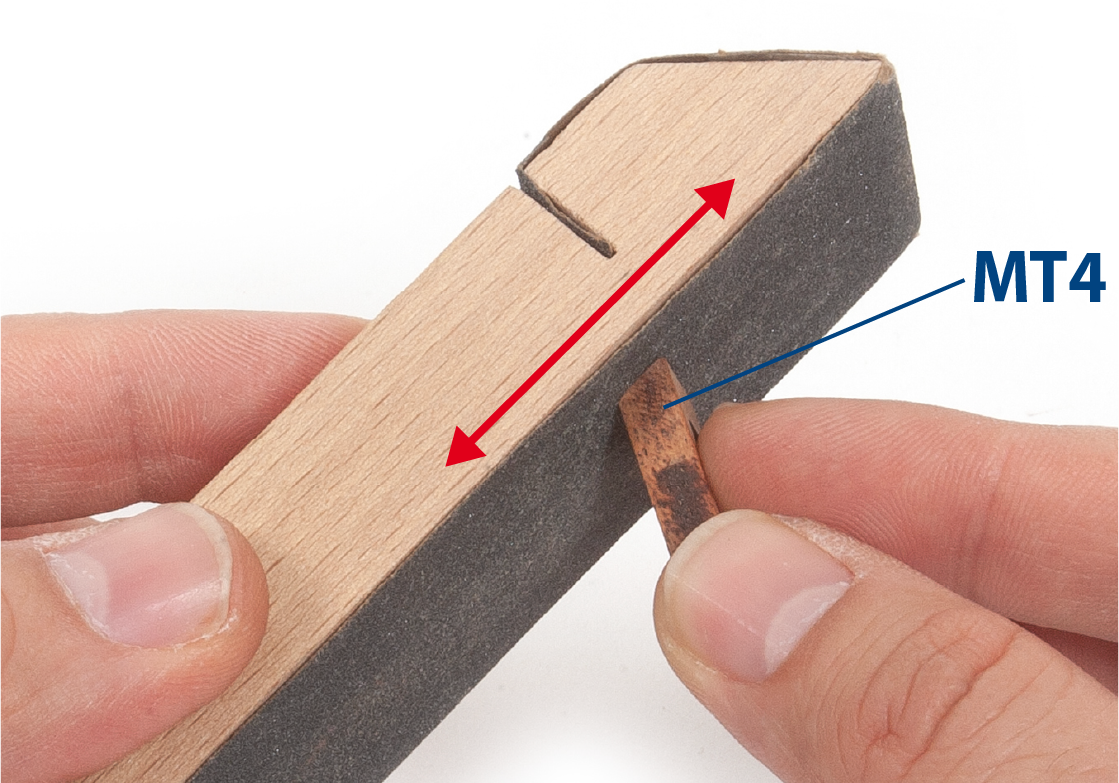
Passen Sie die Form des Teils MT4 an die Zeichnung an.
Schritt 4
Fügen Sie die Teile MT1 und MT2 bis Teil MT4 ein.
Schritt 5
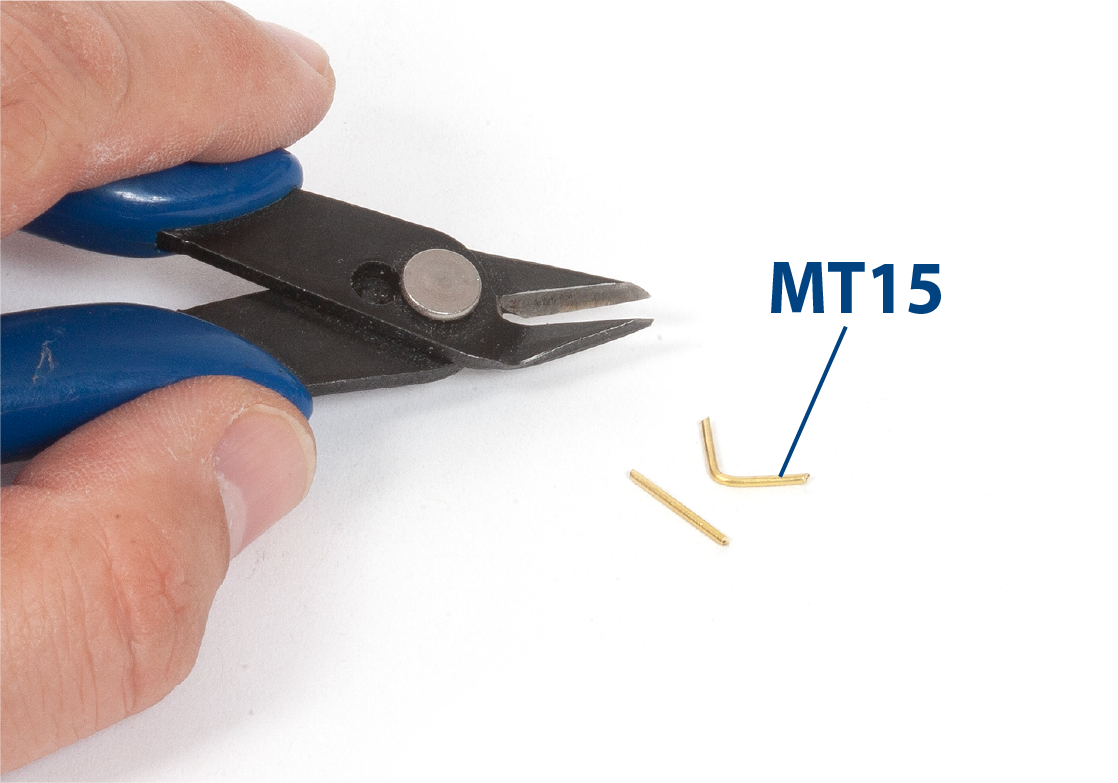
Schneiden Sie zwei Teile MT15 (ø1 x 14 mm Messing) auf Länge zu und verwenden Sie dann eine Zange, um eines der Teile wie gezeigt zu biegen.
Schritt 6
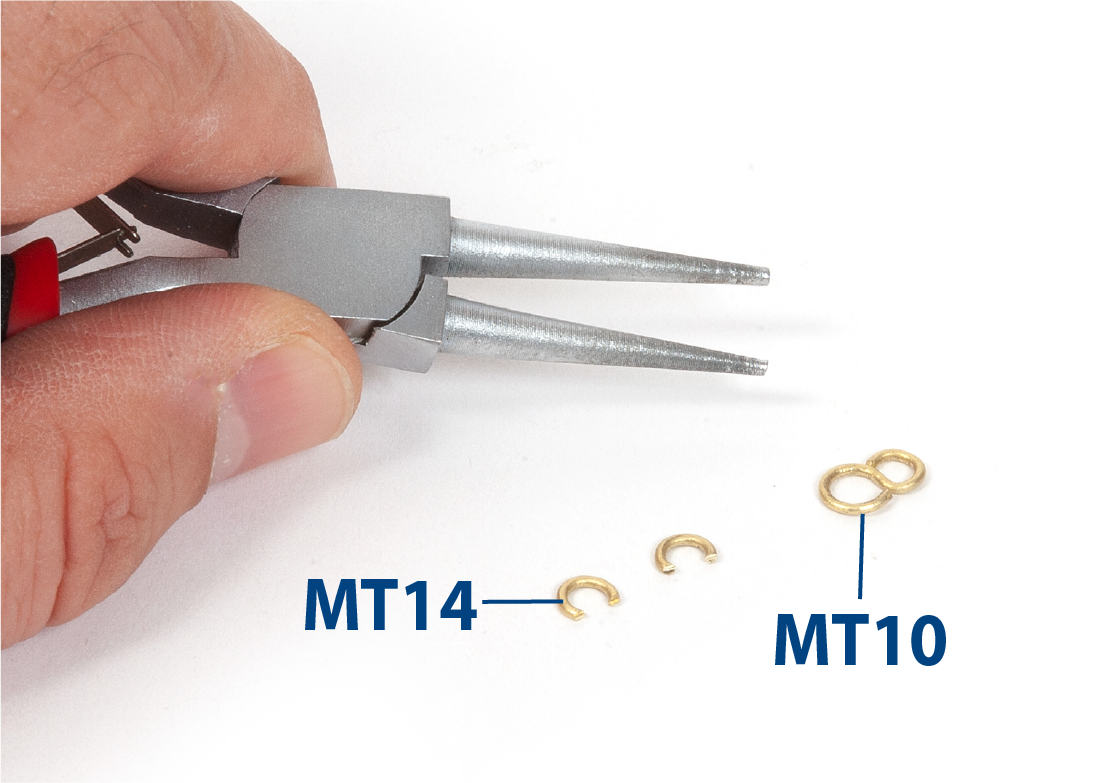
Schneiden Sie die Teile MT10 (ø1 x 30 mm Messing) und MT14 (ø1 x 16 mm Messing) auf Länge zu und verwenden Sie dann eine Zange, um die Teile zu biegen und zu formen.
Schritt 7
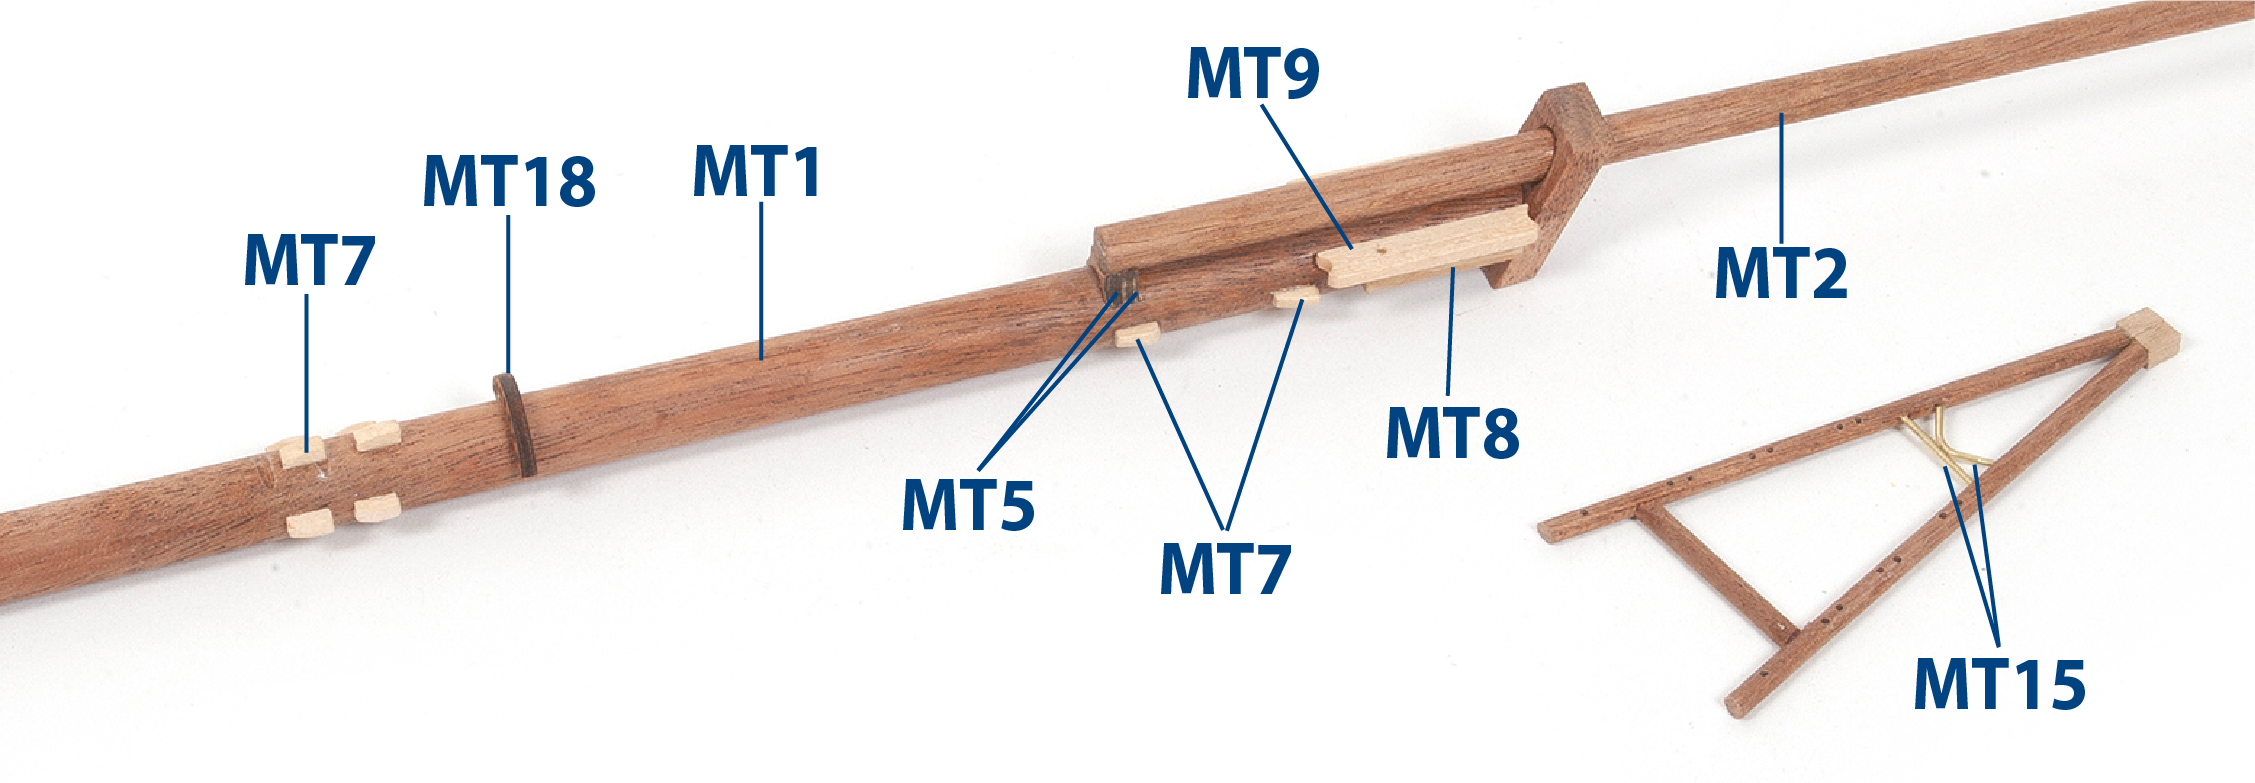
Kleben Sie die in der Abbildung gezeigten Teile an die Baugruppen.
| MT7 | 2 x 2 x 5 mm Lindenholz |
| MT8 | 3 x 3 x 20 mm Lindenholz |
| MT9 | 2 x 5 x 26 mm Lindenholz |
Schritt 8
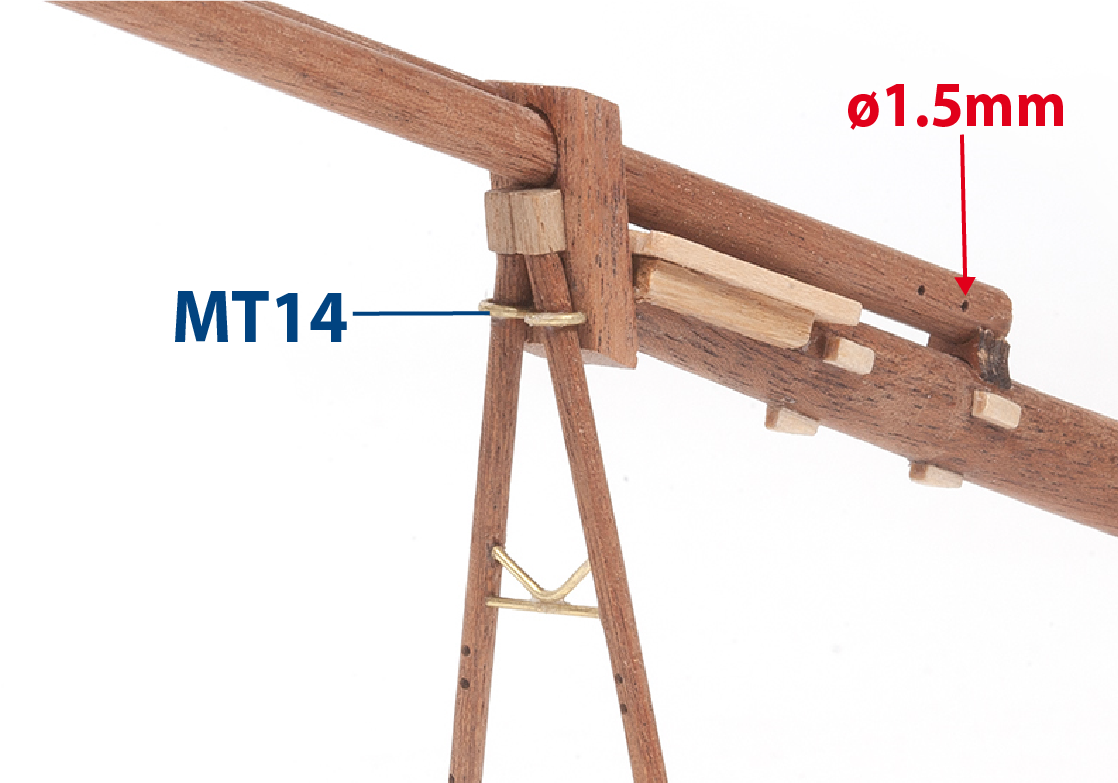
Bohren Sie Löcher mit einem Durchmesser von 1,5 mm in den Bugspriet, setzen Sie dann die Teile MT14 ein und kleben Sie die beiden Baugruppen zusammen.
Schritt 9
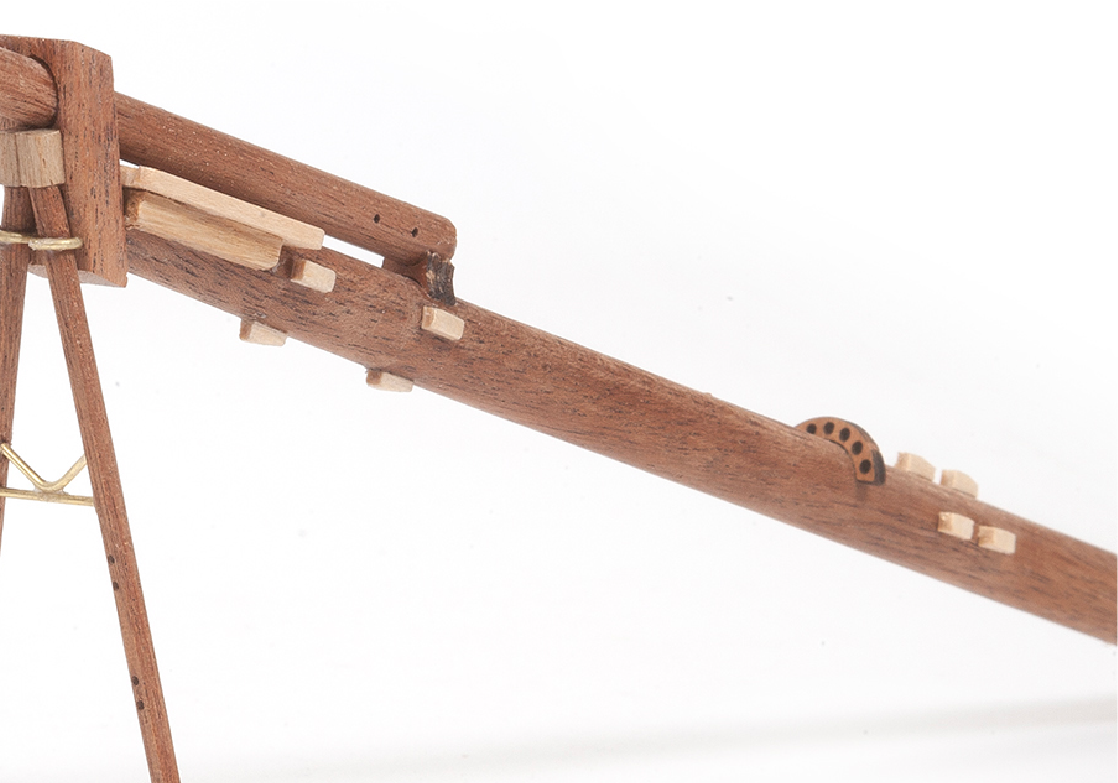
Kleben Sie die Teile, die im Bild gezeigt werden.
Schritt 10
Dieses Bild zeigt die Ausrichtung der Holzteile aus einem anderen Winkel.
Schritt 11
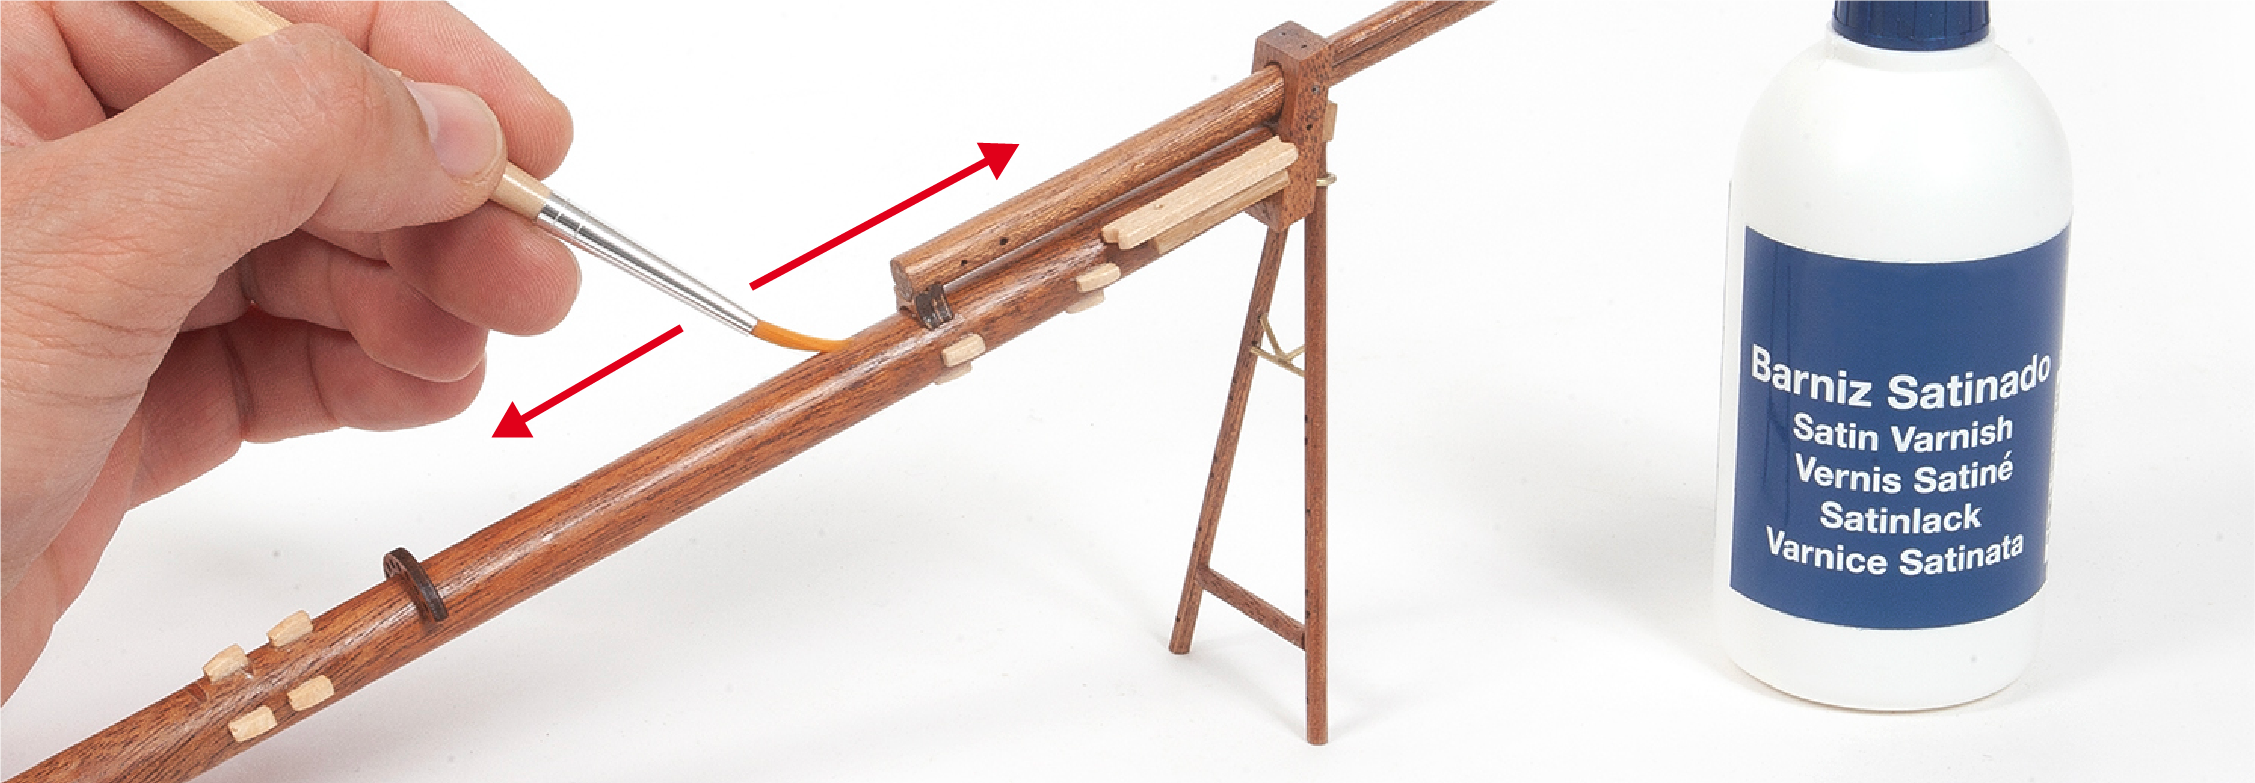
Lackieren Sie alle Holzteile in der Baugruppe.
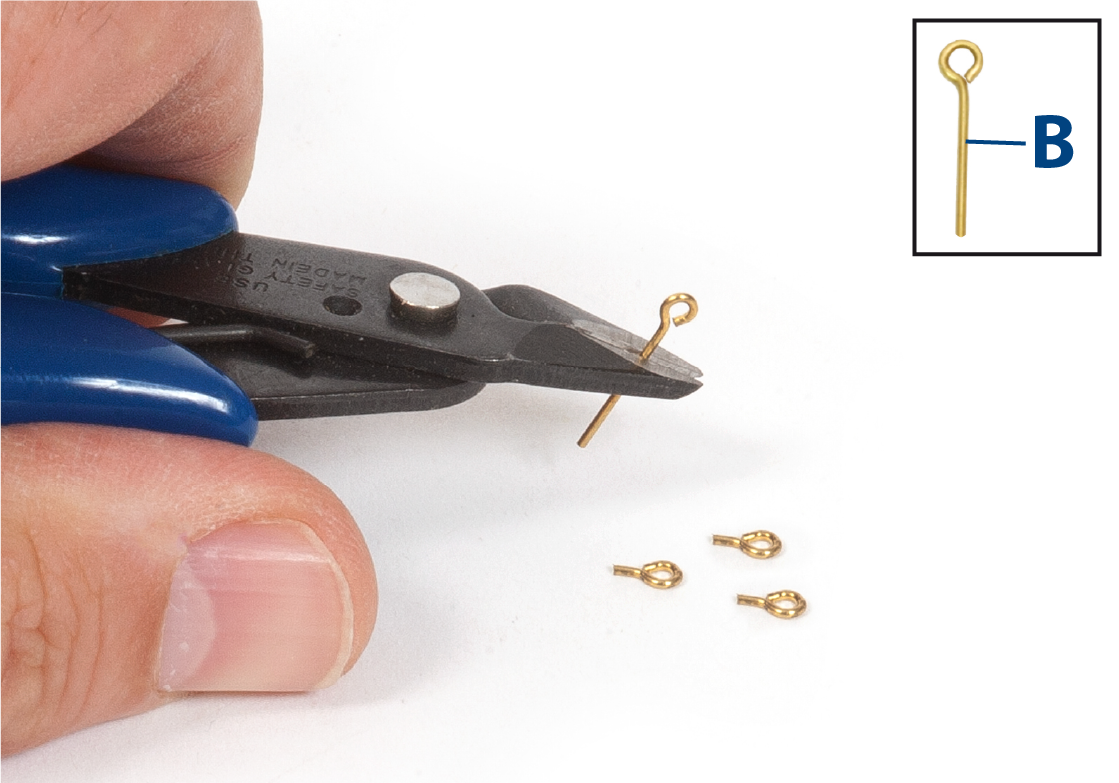
Schritt 1
Schneiden Sie die Enden der Ringschrauben (B) wie gezeigt ab.
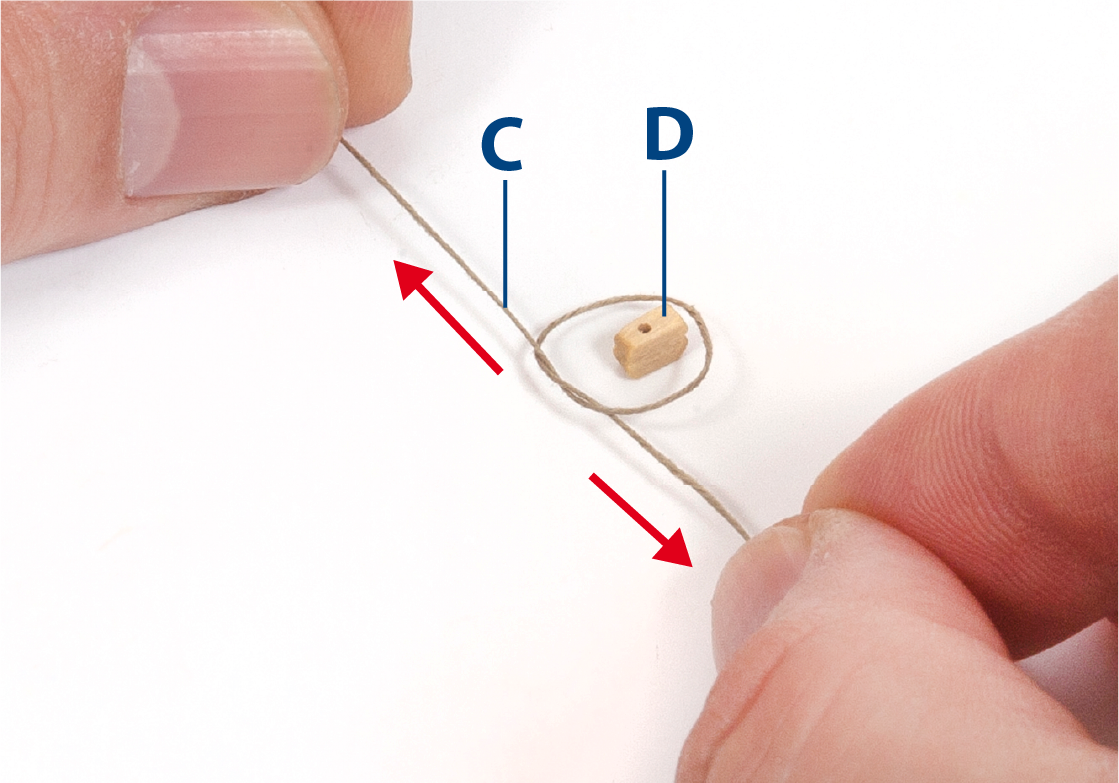
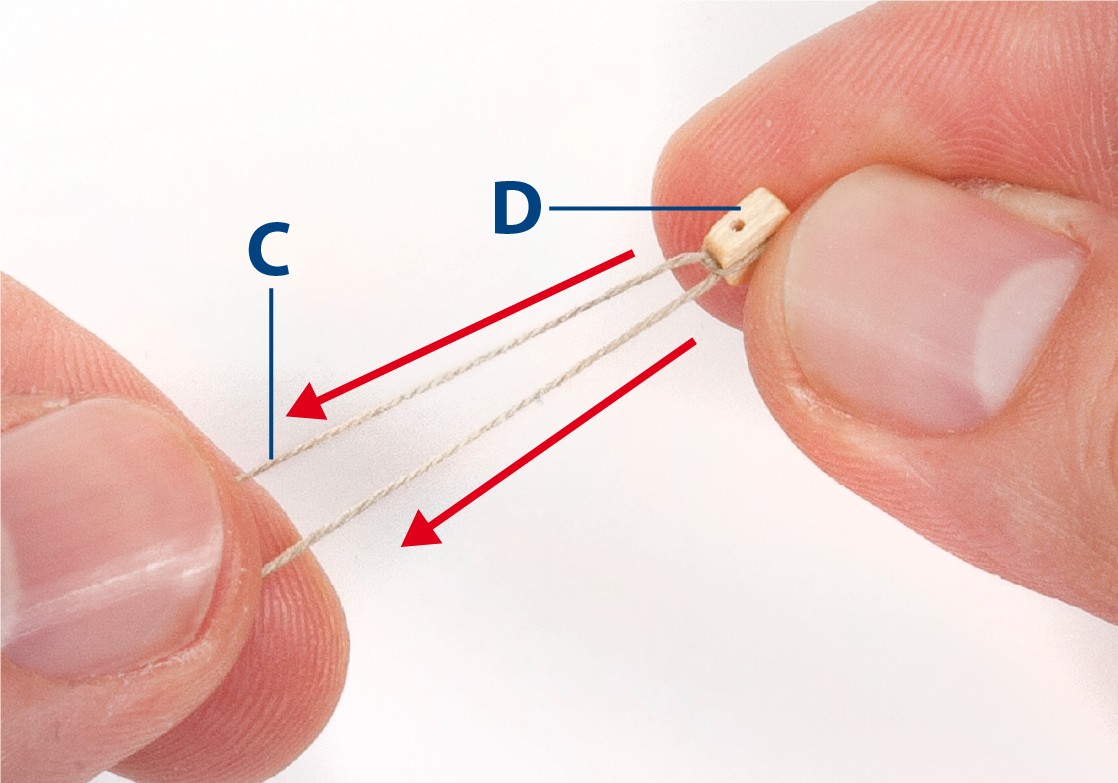
Schritt 2
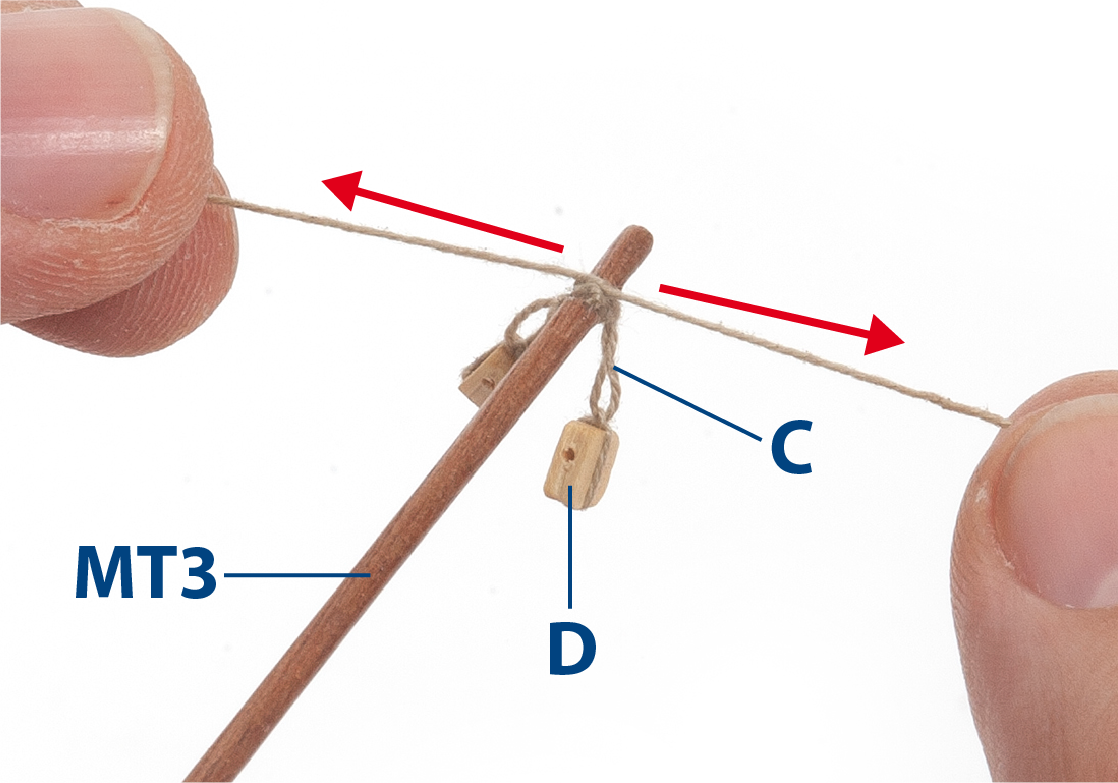
Sie müssen verschiedene Fäden verwenden, um die Blöcke D, E, F und G an den Masten zu befestigen. Binden Sie einen Knoten um Block D mit Faden C (ø0,15 mm), und tragen Sie dann Kleber auf den Knoten auf.
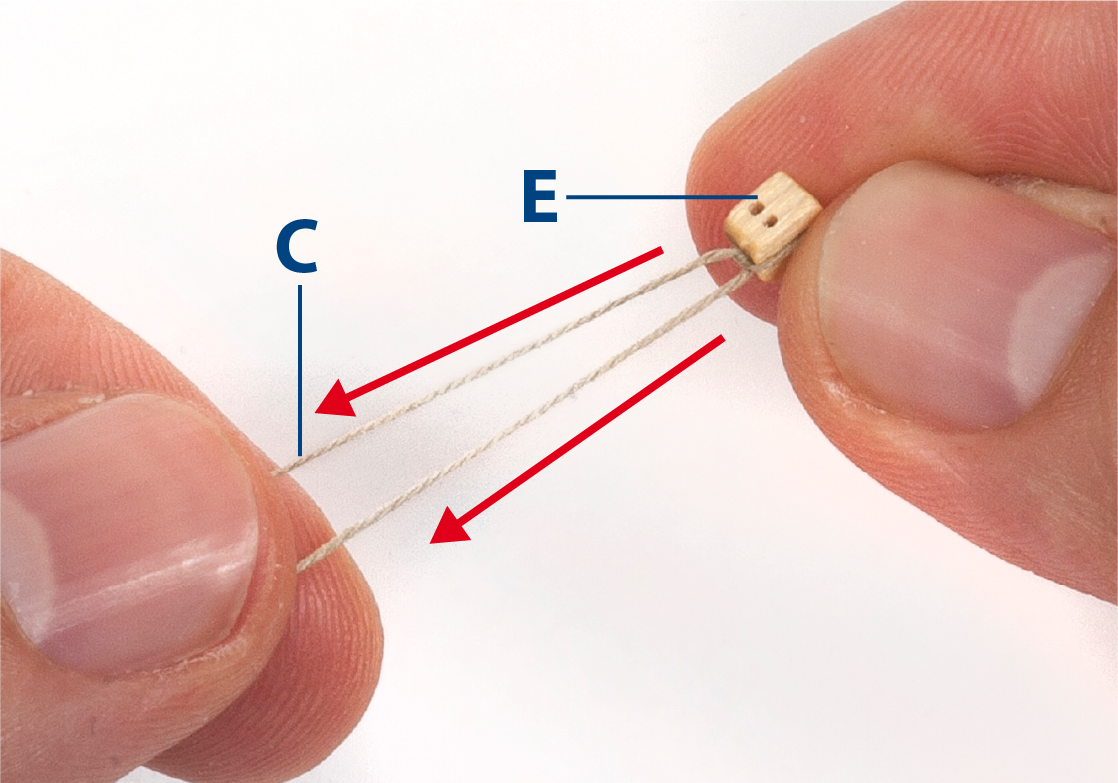
Schritt 3
Wiederholen Sie diesen Vorgang, um den Faden um Block E zu binden.
Schritt 4
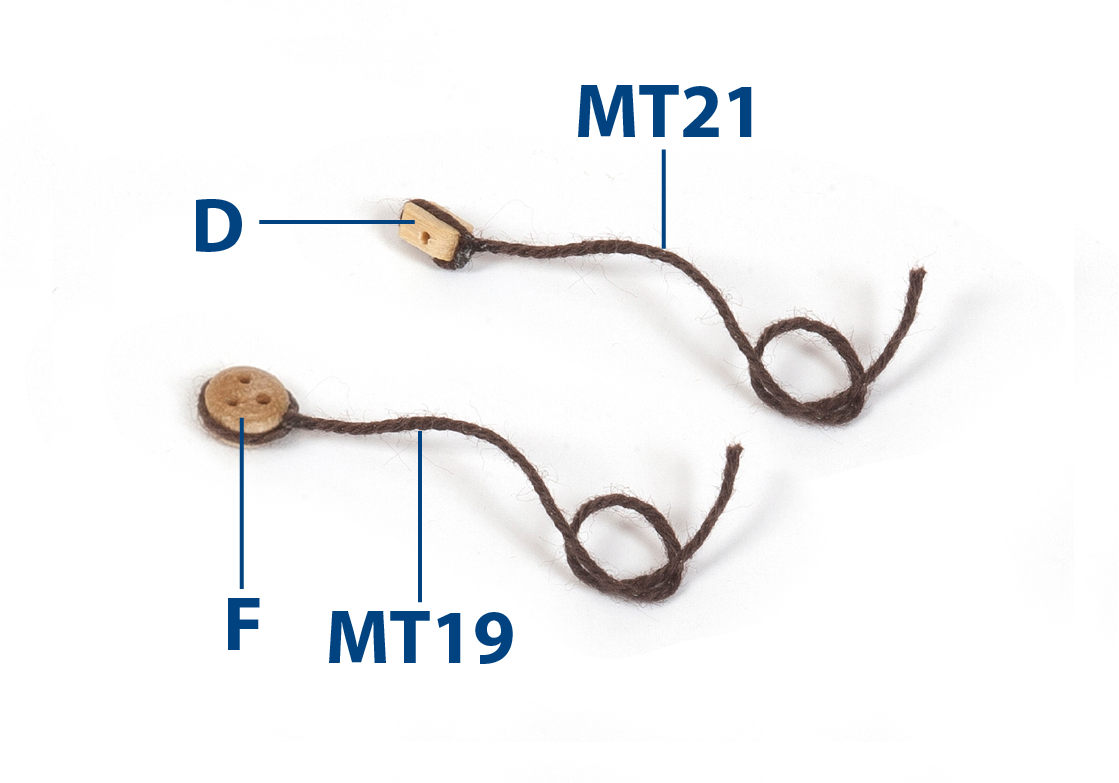
Schneiden Sie braunen Faden auf Länge und binden Sie ihn an Jungfer F und Block D.
| MT19 | ø0,5 x 100 mm brauner Faden |
| MT21 | ø0,5 x 150 mm brauner Faden |
Schritt 5
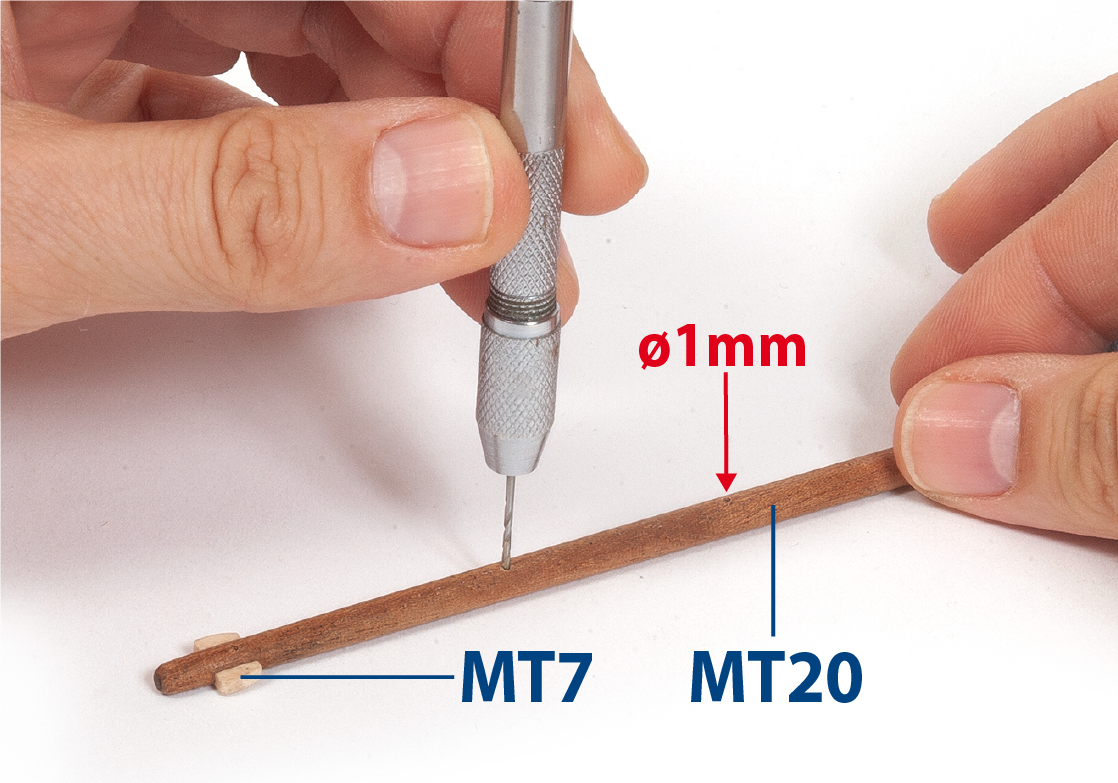
Kleben Sie die Teile MT7 und bohren Sie Löcher in Teil MT20, wie in der Zeichnung dargestellt.
Schritt 6
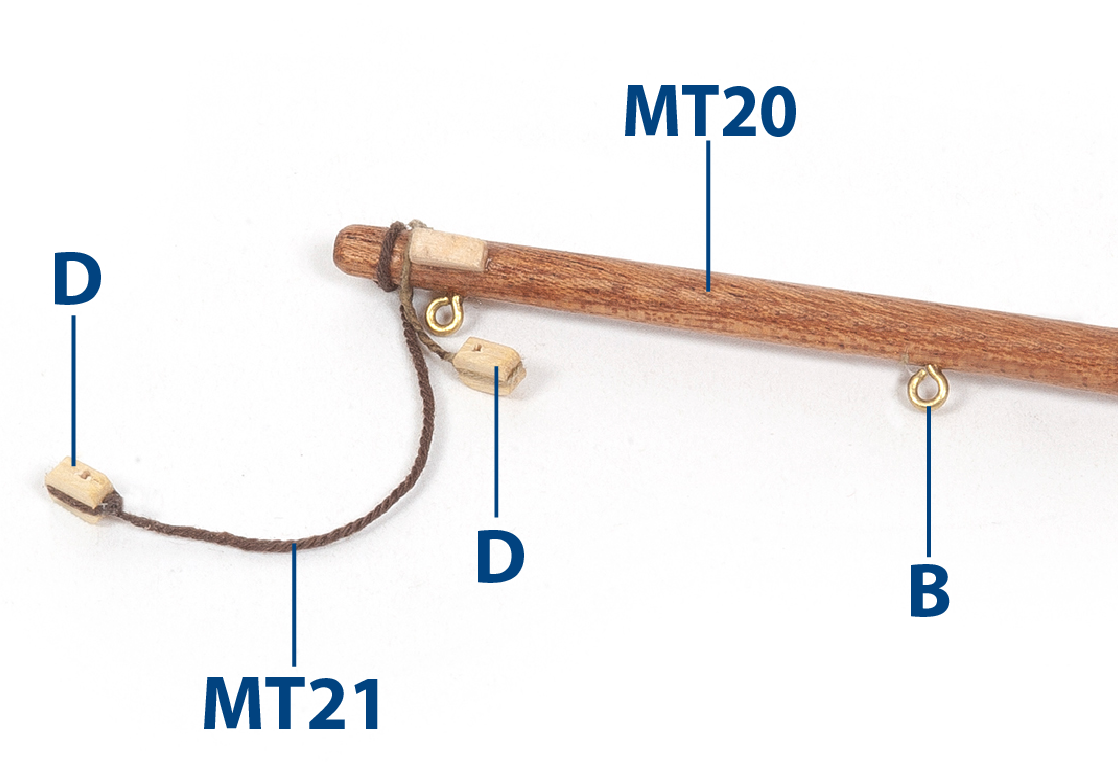
Montieren Sie alle Teile B, D und MT21, die im Bild gezeigt werden, und beziehen Sie sich auf die Zeichnung und Schritt 7 unten.
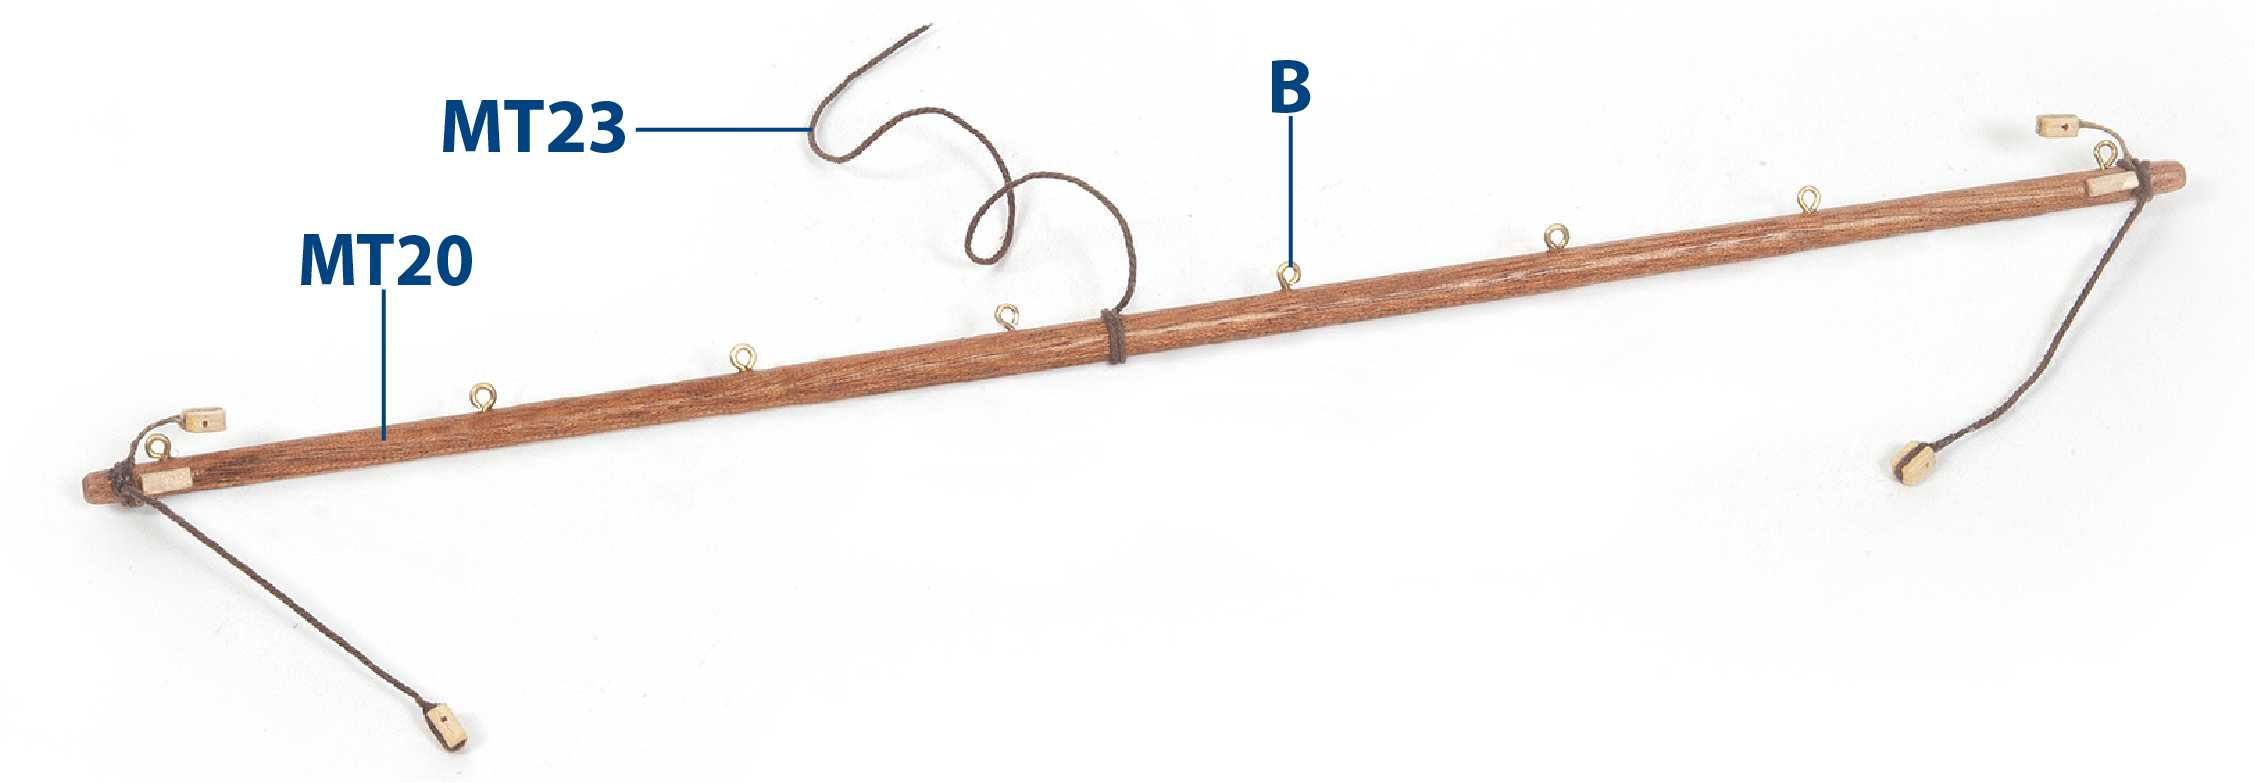
Schritt 7
Binden Sie das Teil MT23 (ø0,5 x 125 mm brauner Faden) wie gezeigt. Lassen Sie ein Ende des Teils MT23 ungesichert, damit es später am Mast befestigt werden kann.
Schritt 8
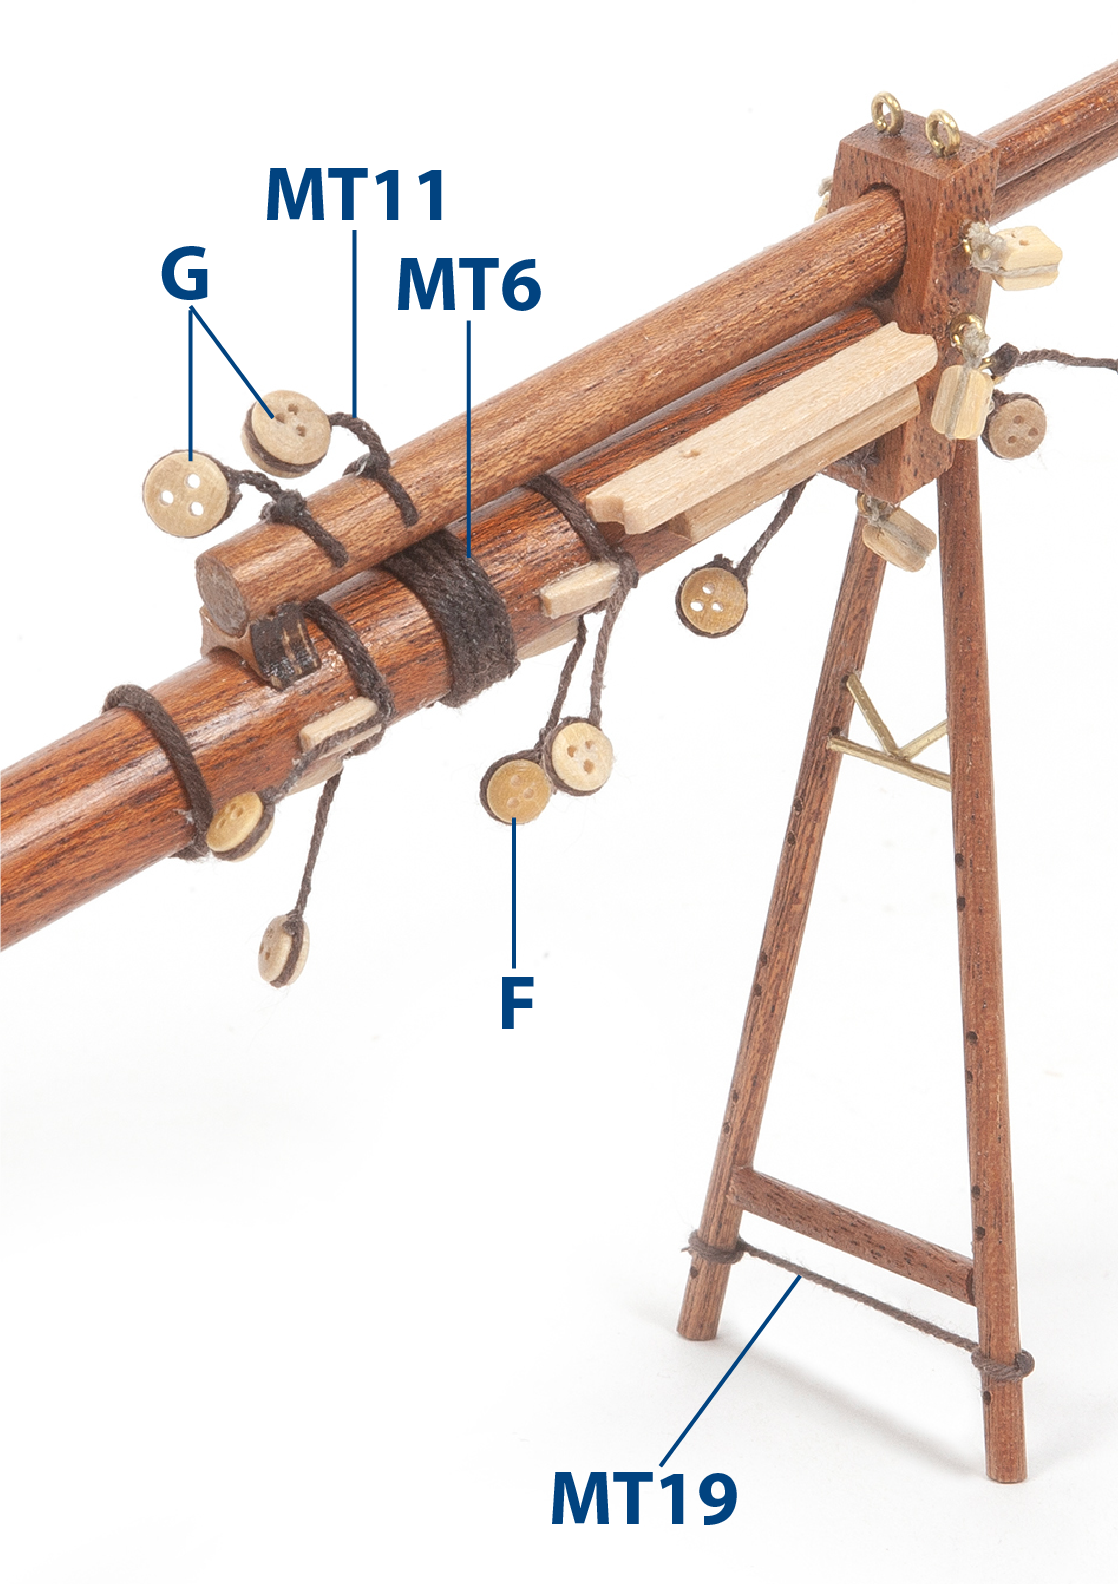
Binden Sie alle ein- und mehrscheibigen Blöcke gemäß den Darstellungen in den Zeichnungen fest.
Schritt 9
Fahren Sie fort, alle in den Zeichnungen dargestellten Teile am Bugspriet anzubringen.
| MT6 | ø0,5 x 100 mm braunes Garn |
| MT11 | ø0,5 x 75 mm braunes Garn |
| MT19 | ø0,5 x 100 mm braunes Garn |
Schritt 10
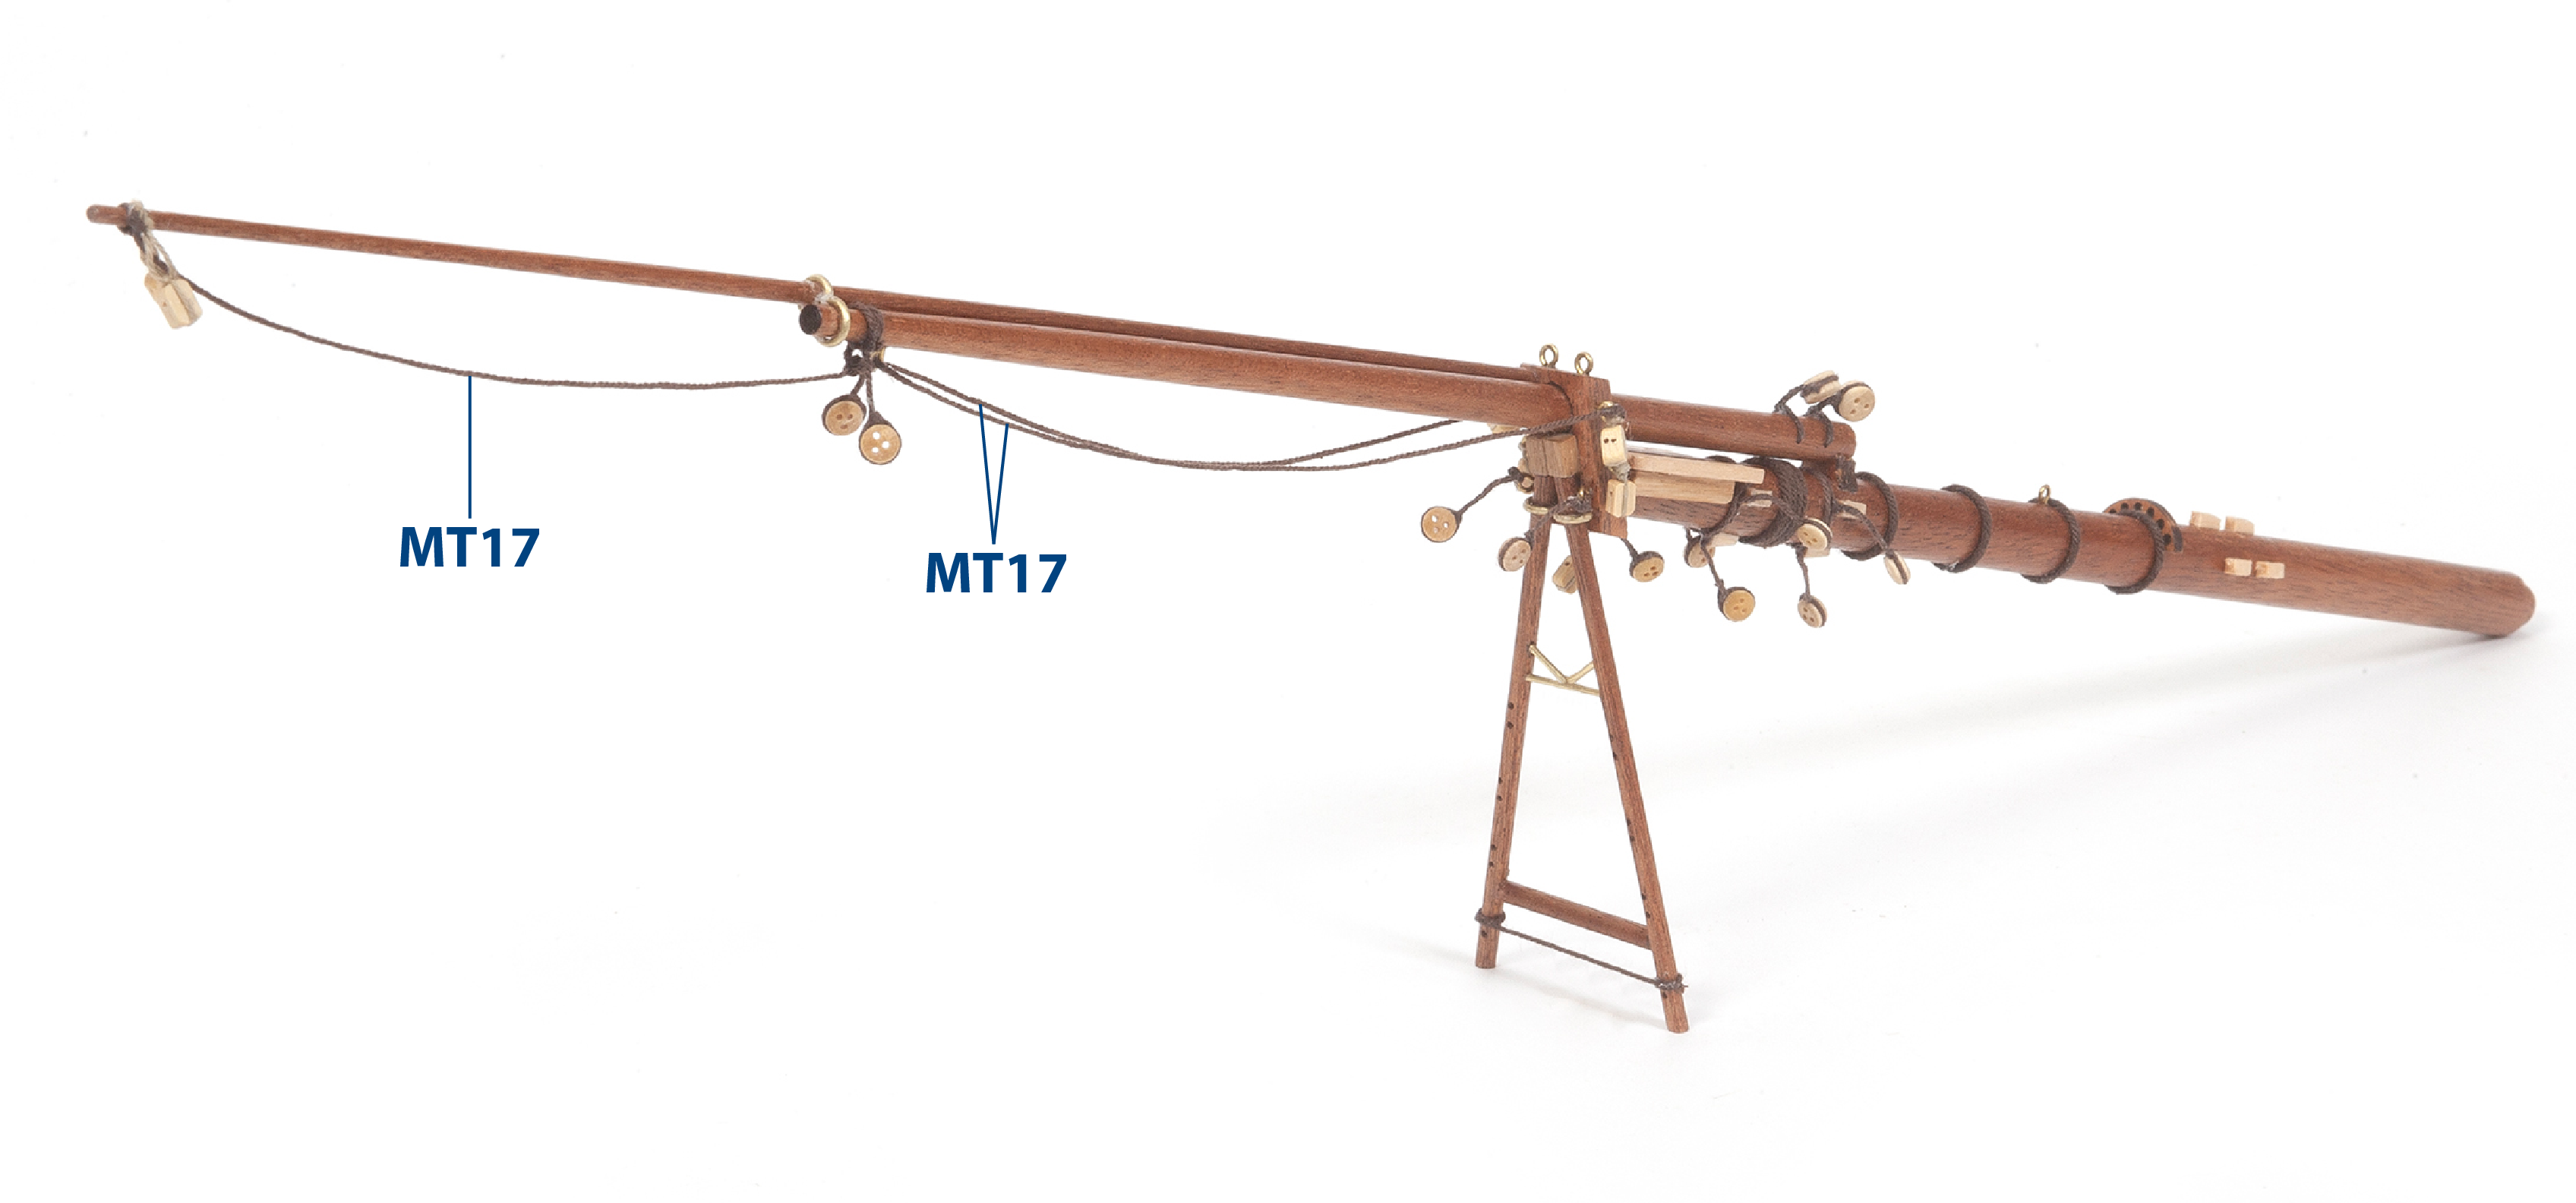
Montieren Sie das Teil MT17 (ø0,5 x 250 mm braunes Gewinde), um den Bugspriet zu vervollständigen.
Schritt 1
Bugmast
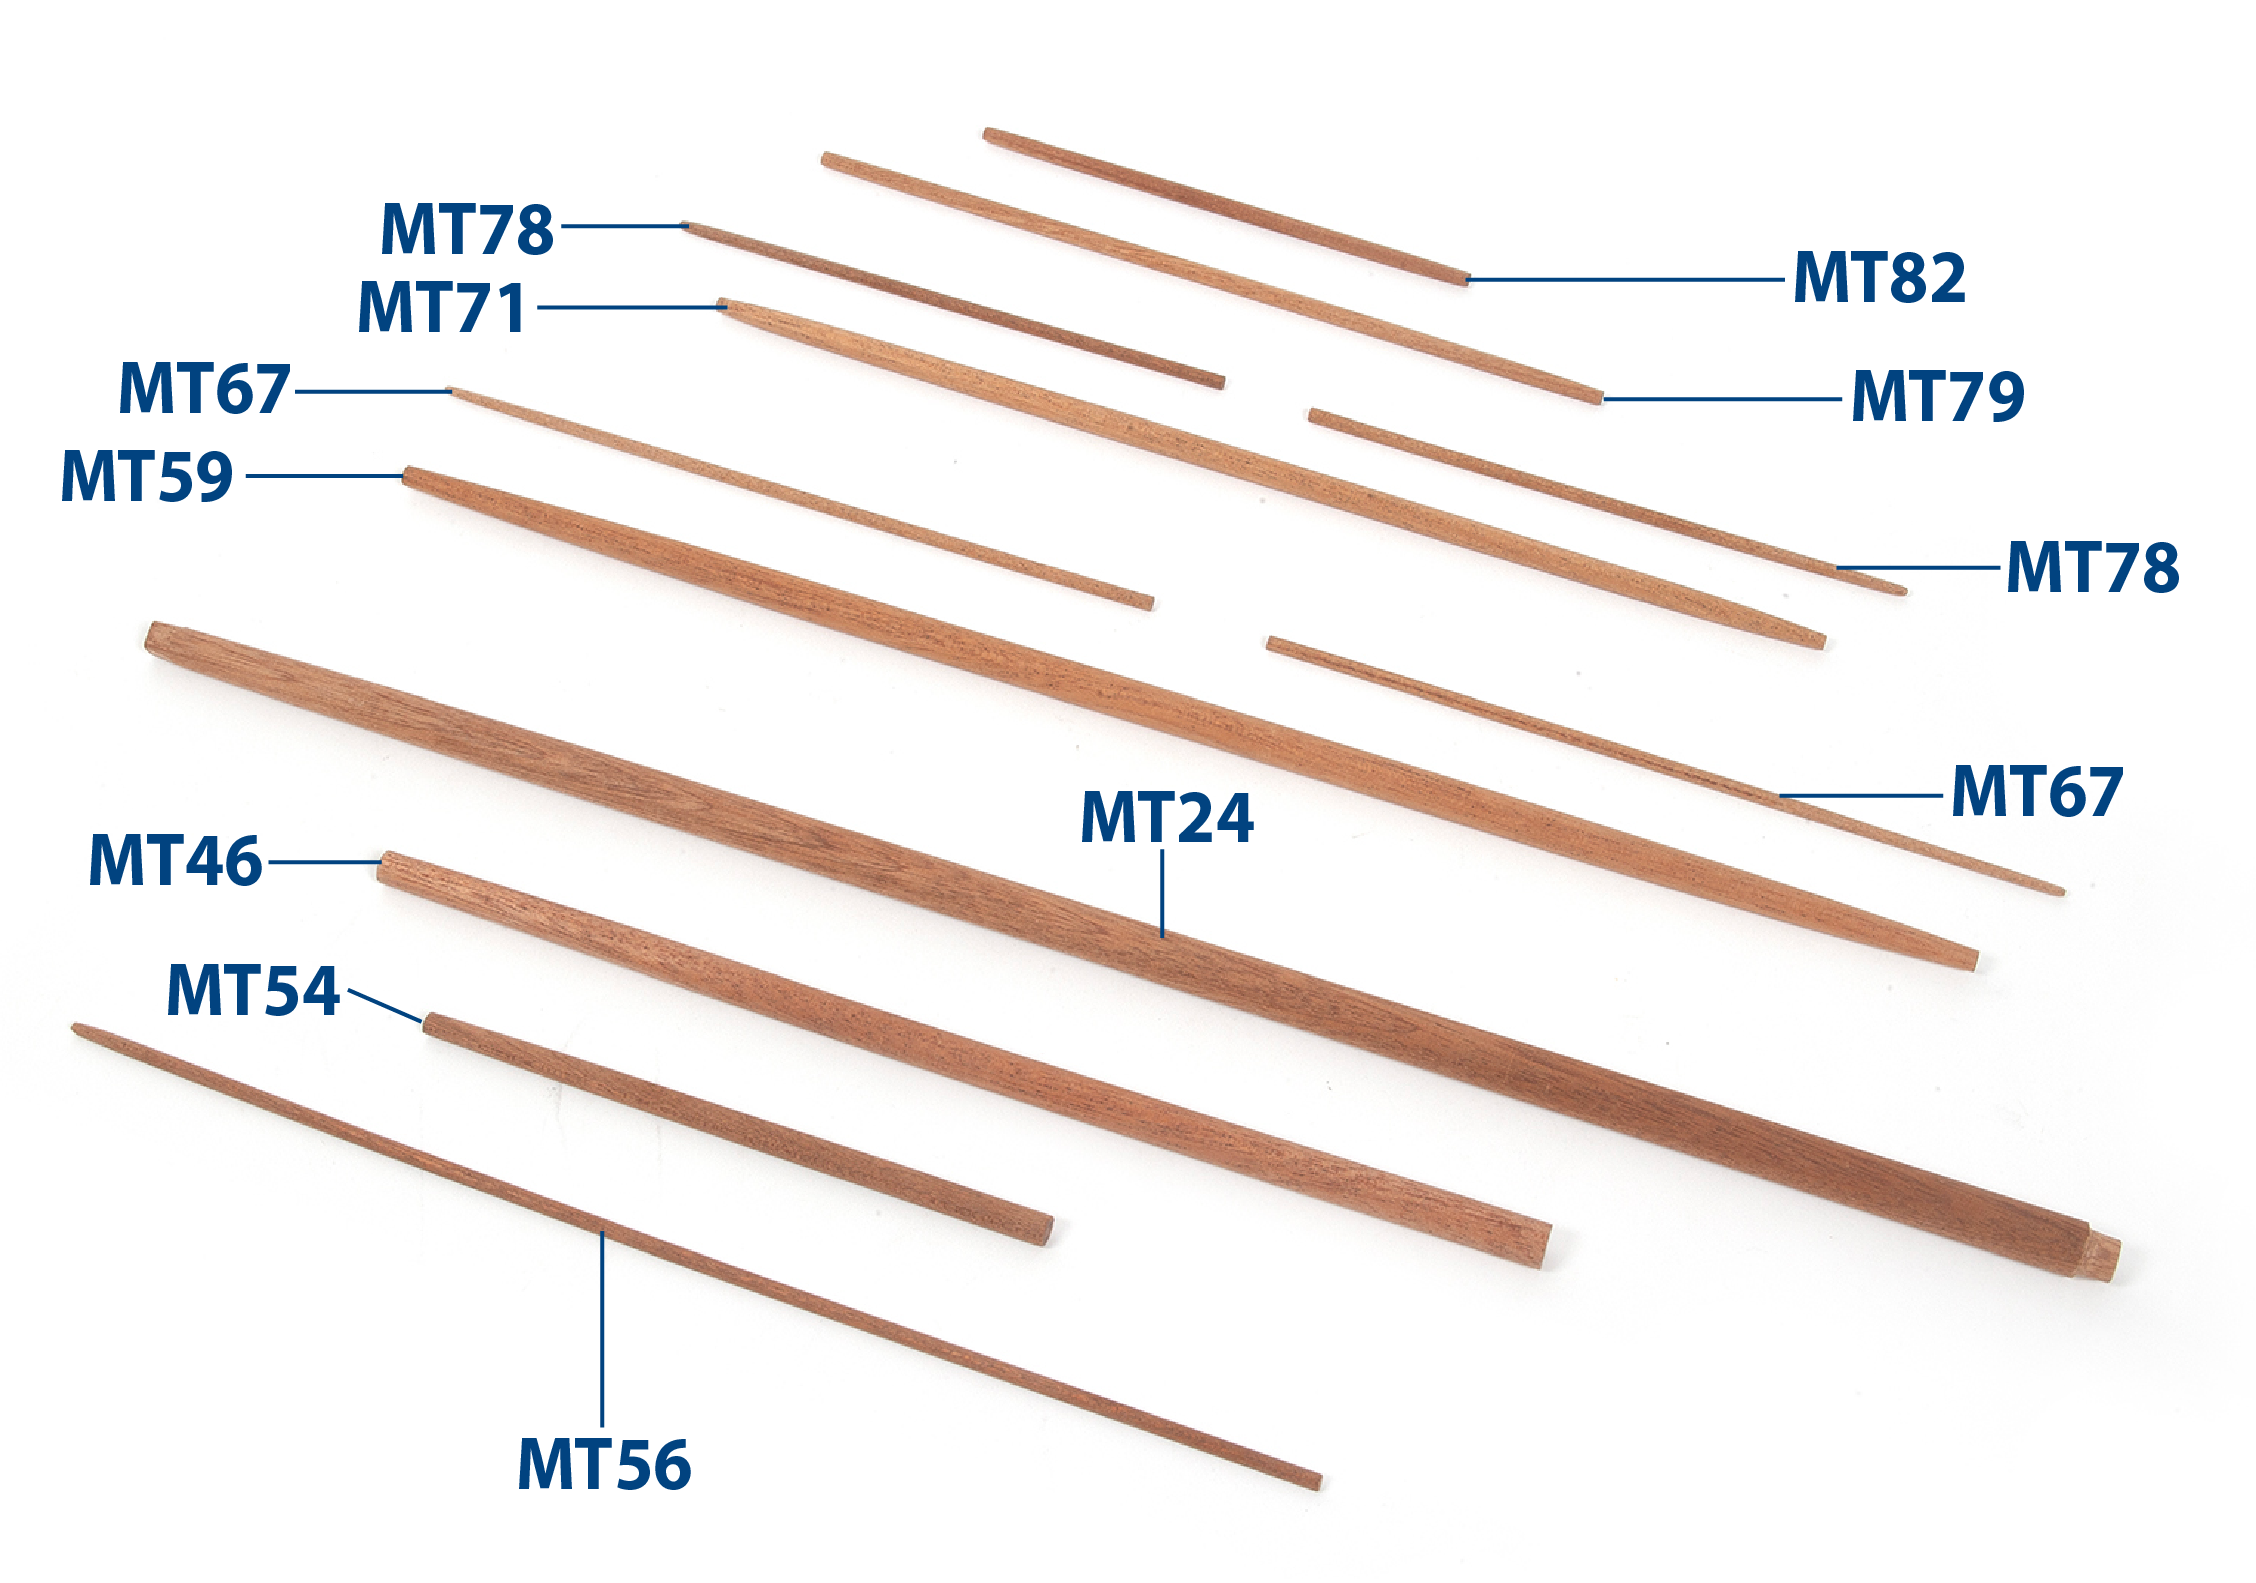
Fertigen Sie die in der Abbildung gezeigten Teile anhand der Zeichnungen an. Teil MT24 wurde im Paket 3 vorbereitet.
| MT24 | ø10 x 387 mm Mahagoni | MT67 | ø3 x 160 mm Mahagoni |
| MT46 | ø8 x 227 mm Mahagoni | MT71 | ø6 x 243 mm Mahagoni |
| MT54 | ø6 x 125 mm Mahagoni | MT78 | ø3 x 128 mm Mahagoni |
| MT56 | ø3 x 242 mm Mahagoni | MT79 | ø5 x 182 mm Mahagoni |
| MT59 | ø8 x 326 mm Mahagoni | MT82 | ø4 x 115 mm Mahagoni |
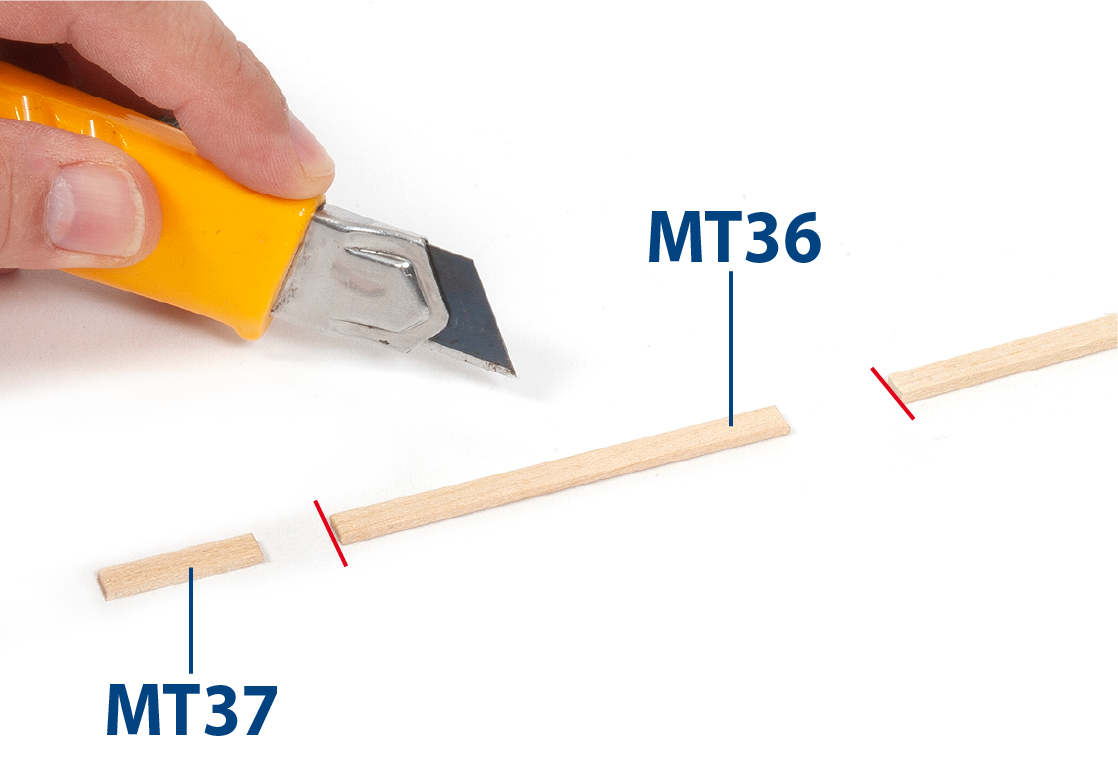
Schritt 2
Schneiden Sie sieben Teile MT36 (2 x 5 x 73 mm Lindenholz) und acht Teile MT37 (2 x 5 x 22 mm Lindenholz) auf Länge.
Schritt 3
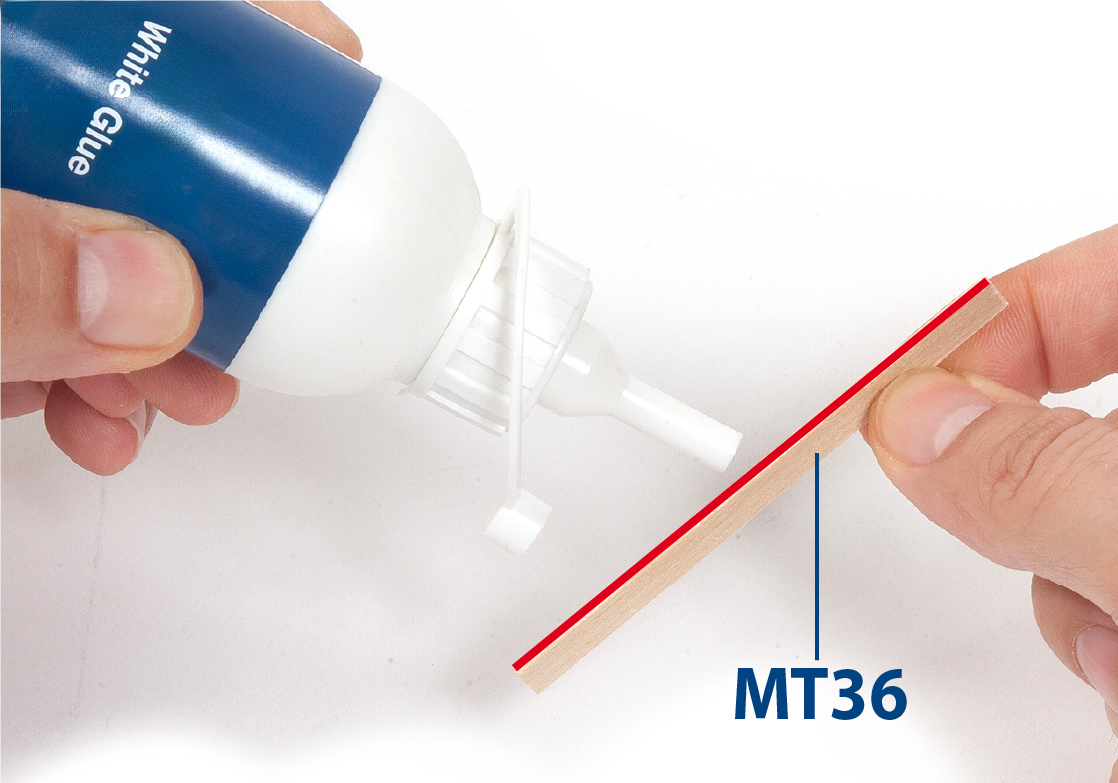
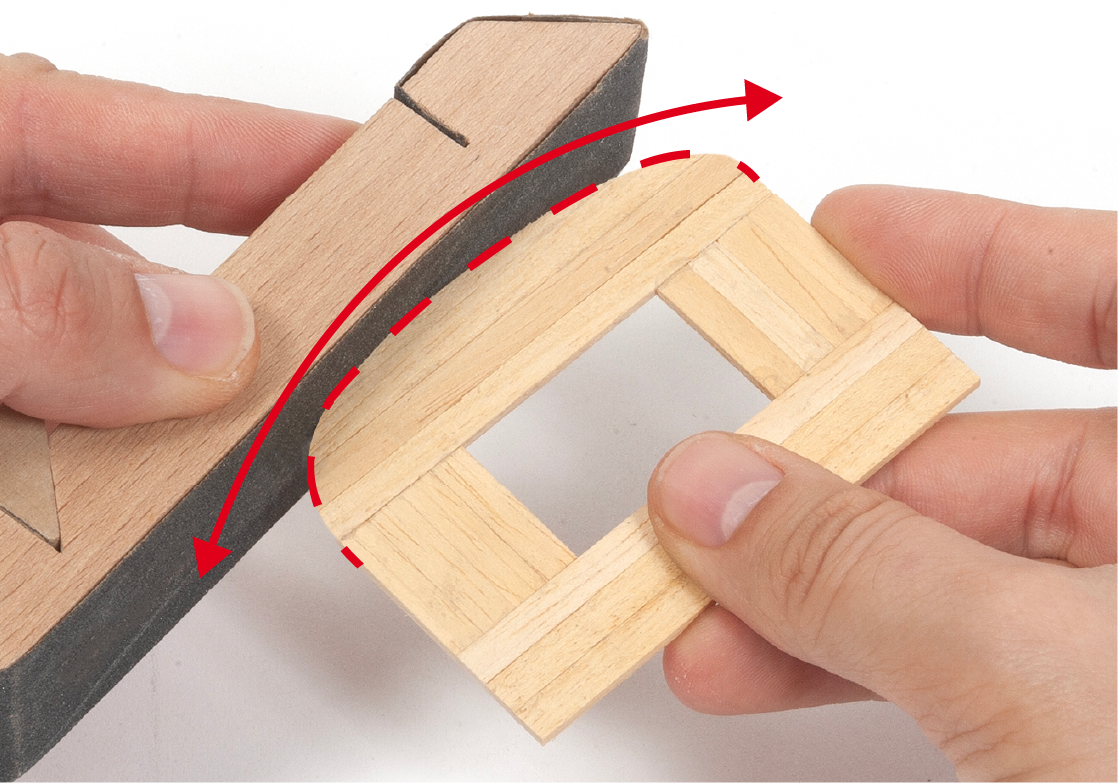
Kleben Sie die Ränder der Teile und fügen Sie sie dann zusammen, wie gezeigt.

Schritt 4
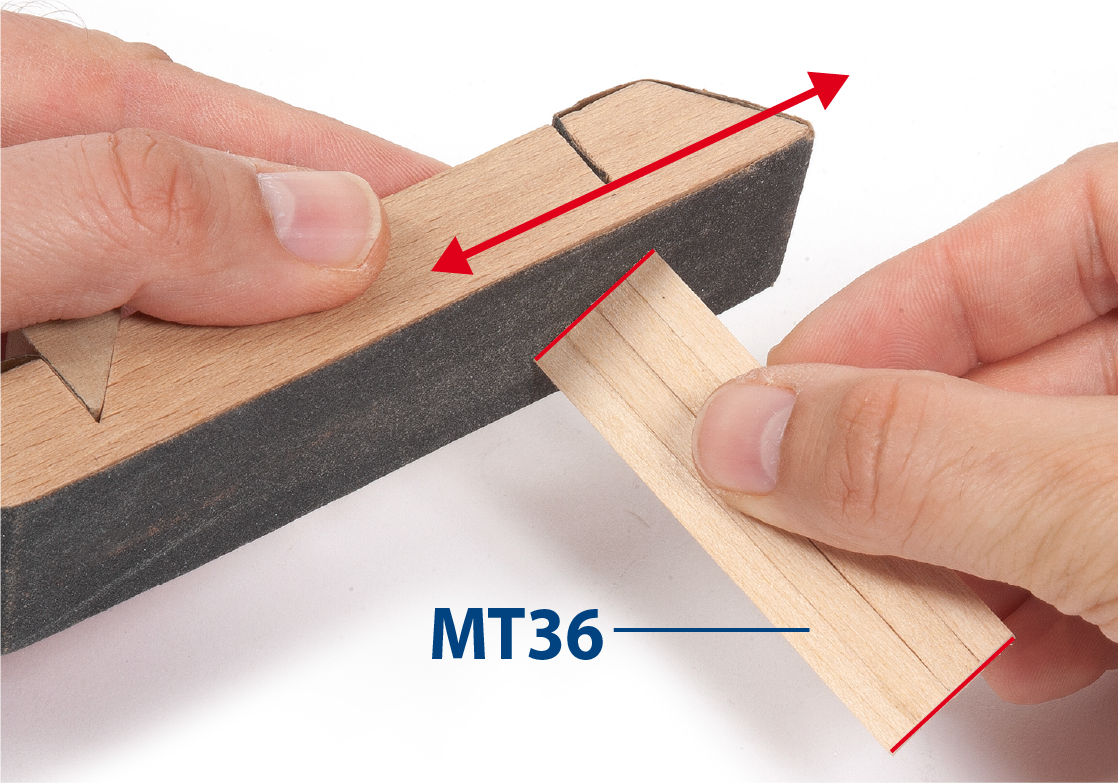
Nachdem der Leim getrocknet ist, schleifen Sie die Kanten mit einem Schleifklotz.
Schritt 5
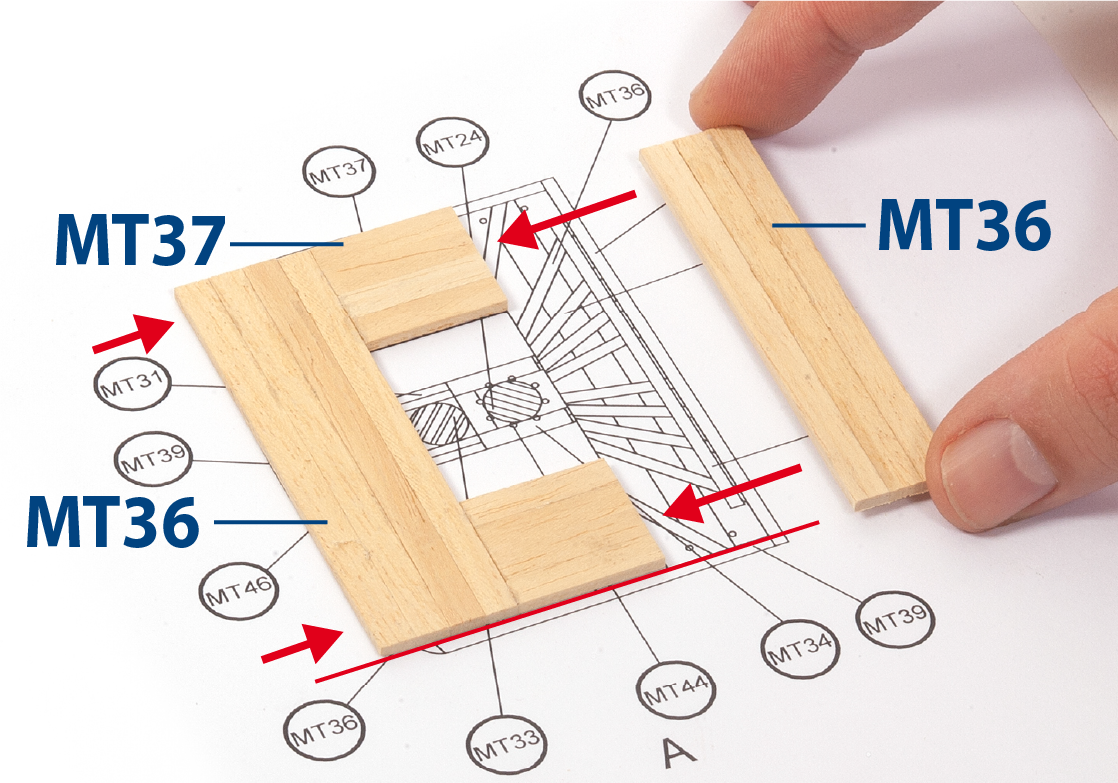
Kleben Sie die Teile zusammen, um den Mars des Fockmasts zu montieren, wie in der Zeichnung dargestellt.
Schritt 6
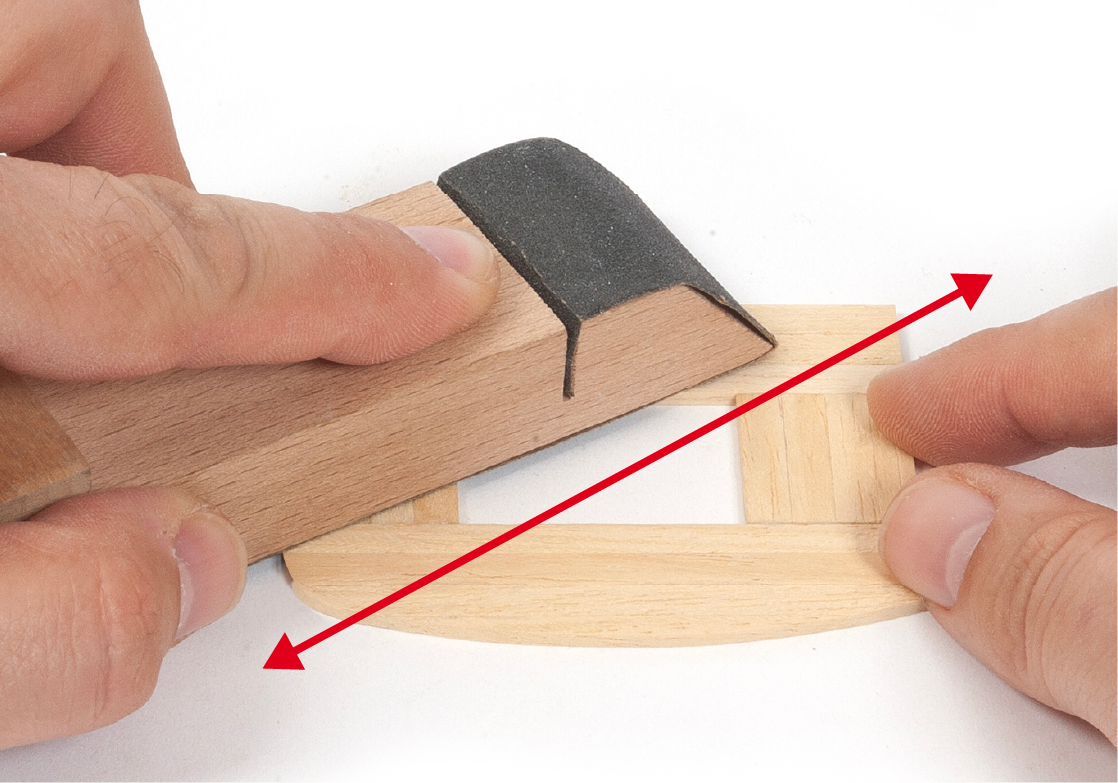
Formen Sie das Masttop mit einem Schleifklotz, um es dem Profil in der Zeichnung anzupassen.
Schritt 7
Glätten Sie den Masttop wie gezeigt.
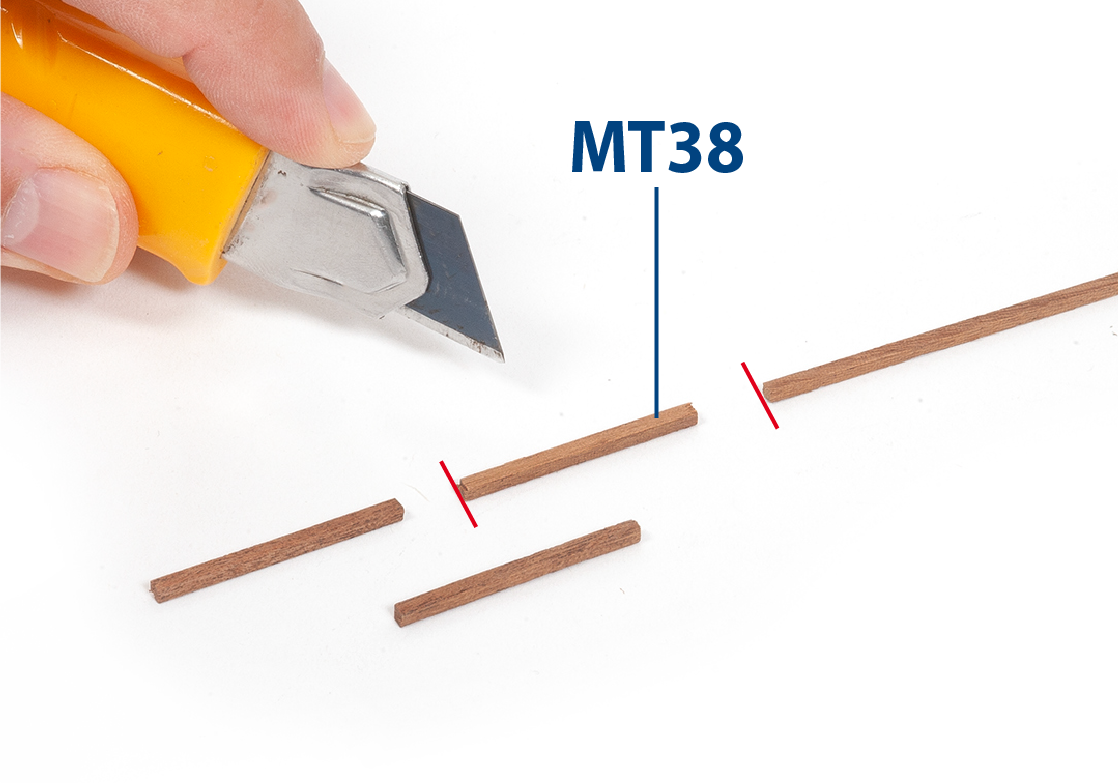
Schritt 8
Schneiden Sie zwanzig Teile MT38 auf Länge (2 x 2 x 25 mm Mahagoni).
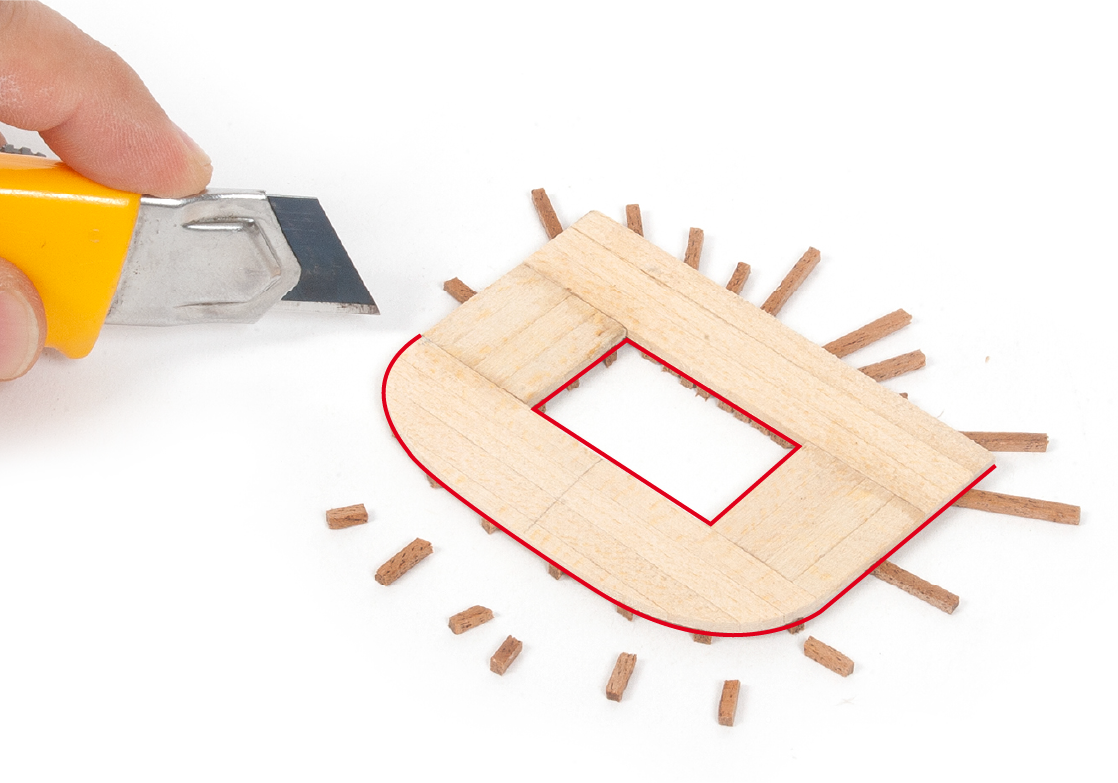
Schritt 9
Kleben Sie die Teile MT38 wie in der Zeichnung gezeigt auf die Mastspitze.

Schritt 10
Schneiden Sie das Überflüssige ab.
Schritt 11
Bohren Sie Löcher in das Masttop, wie in der Zeichnung gezeigt.
Schritt 12
Glätten Sie die Enden der Teile mit einem Schleifklotz.

Schritt 1
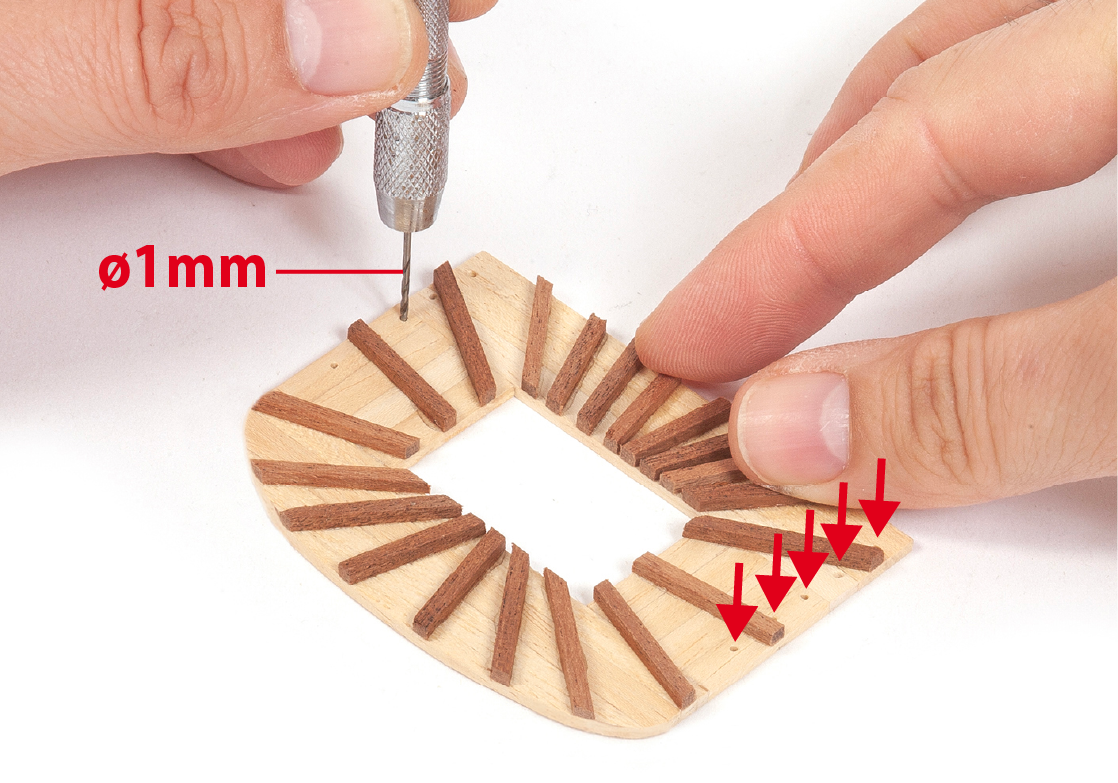
Machen Sie ein Loch in die Mars des Fockmasts, dann verwenden Sie eine Feile, um das Loch wie im Bild gezeigt zu formen.
Schritt 2
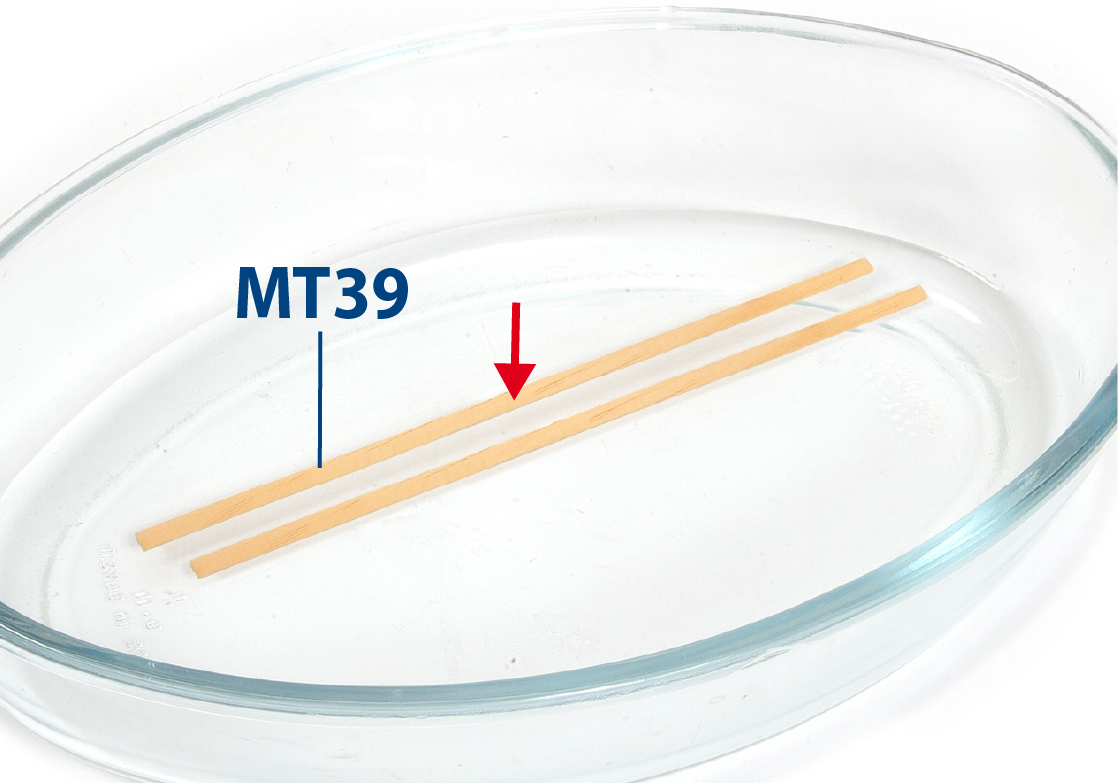
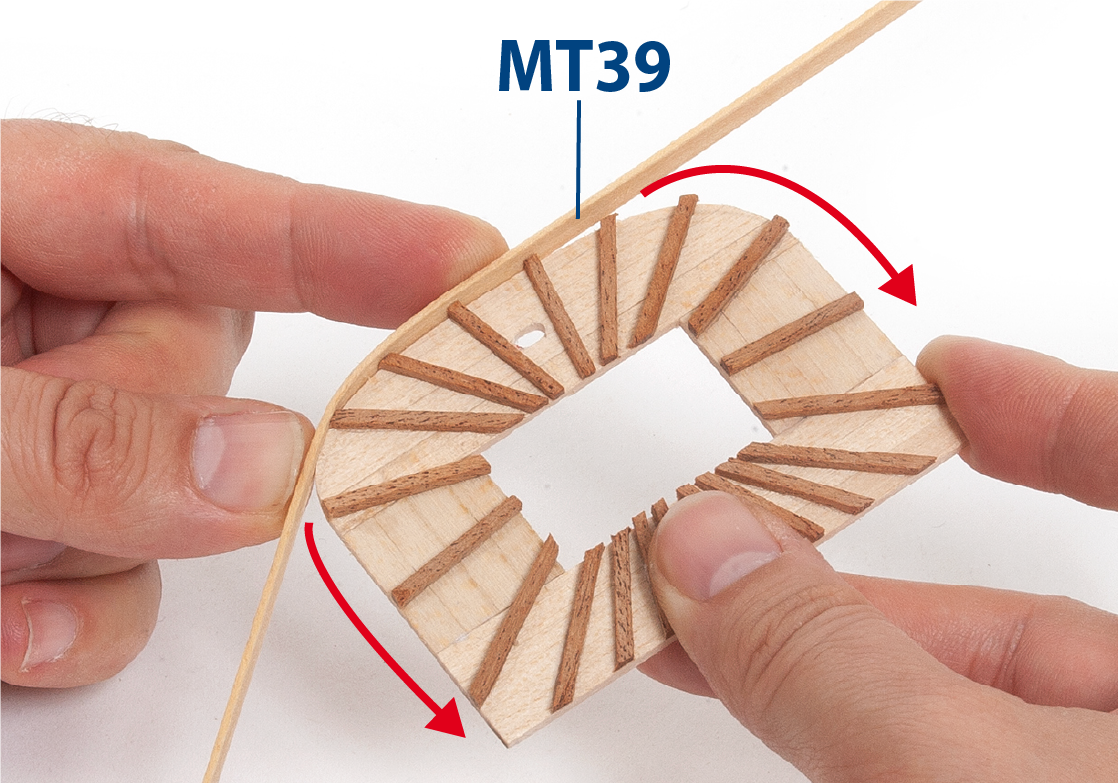
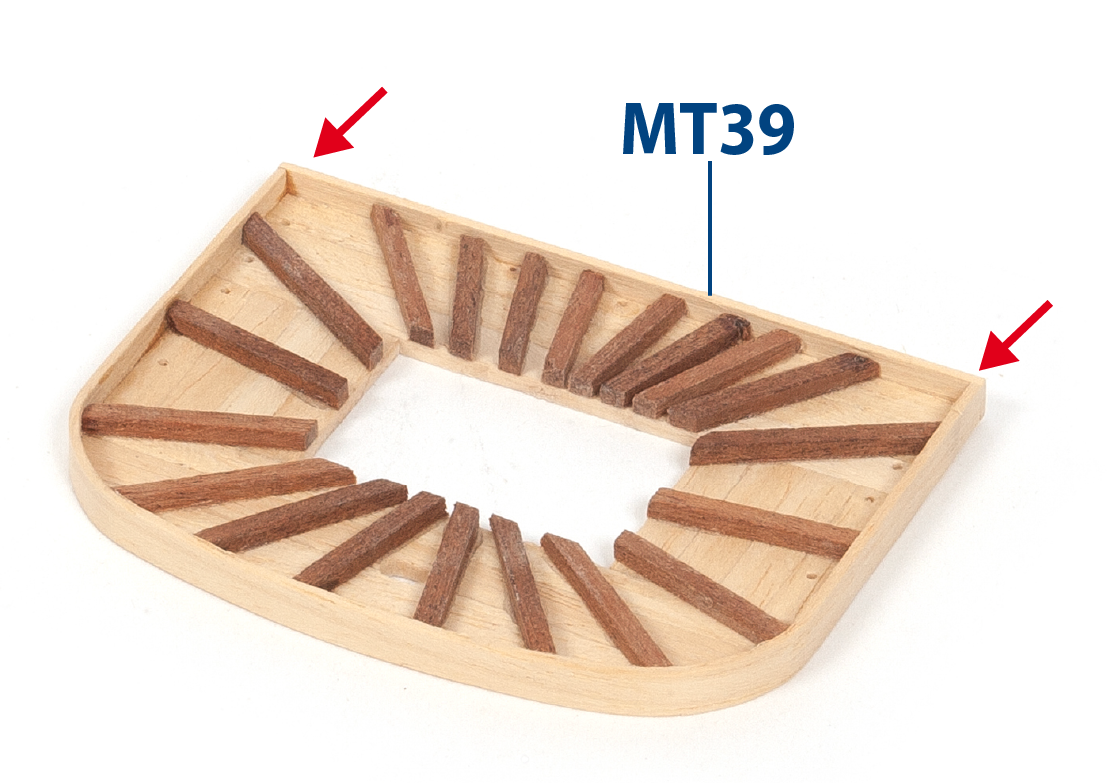
Schneiden Sie zwei Teile MT39 (1 x 5 x 174 mm Lindenholz) auf Länge zu und weichen Sie sie dann in Wasser ein.
Schritt 3
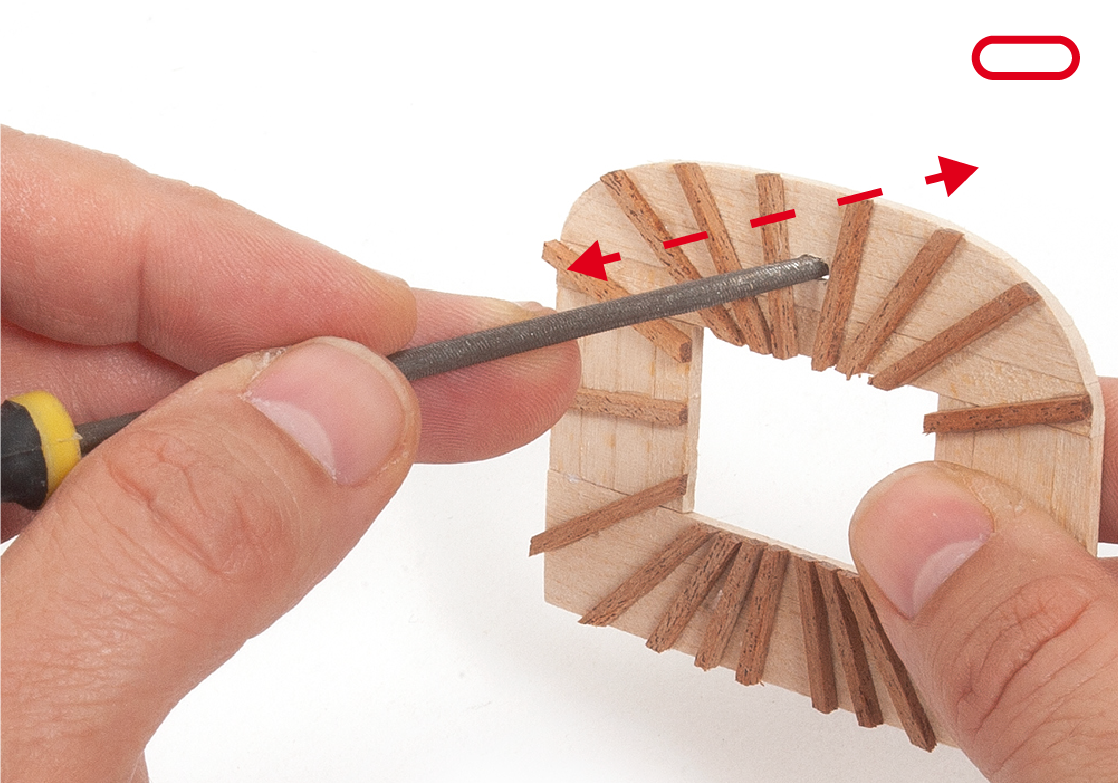
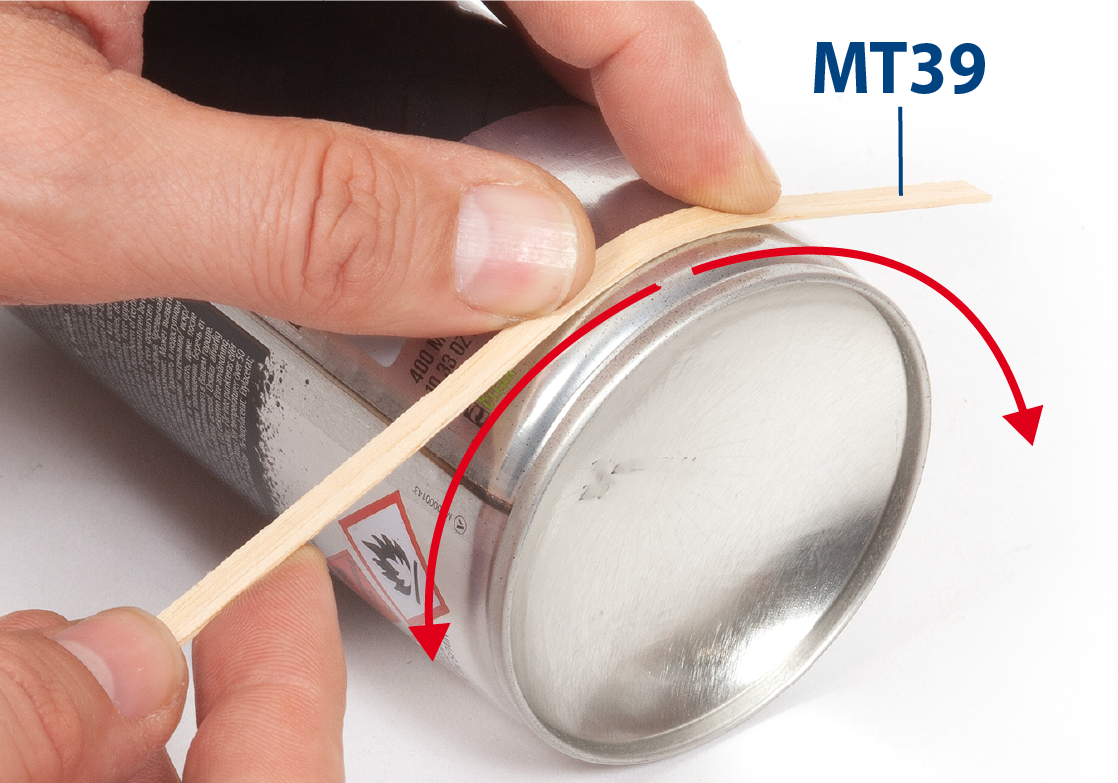
Verwenden Sie ein zylindrisches Objekt, um das Teil MT39 zu formen.
Schritt 4
Montieren und kleben Sie die Teile MT39 auf die Mastspitze.
Schritt 5
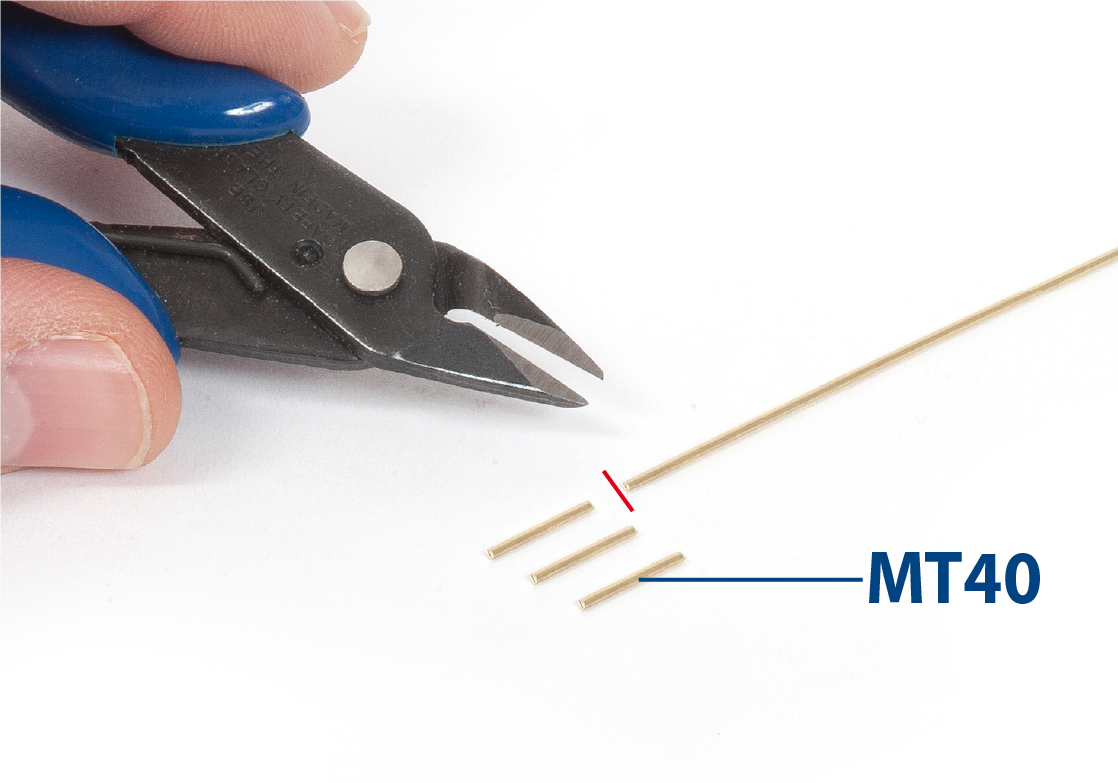
Schneiden Sie fünf Teile MT40 (ø1 x 14 mm Messing) auf Länge.
Schritt 6
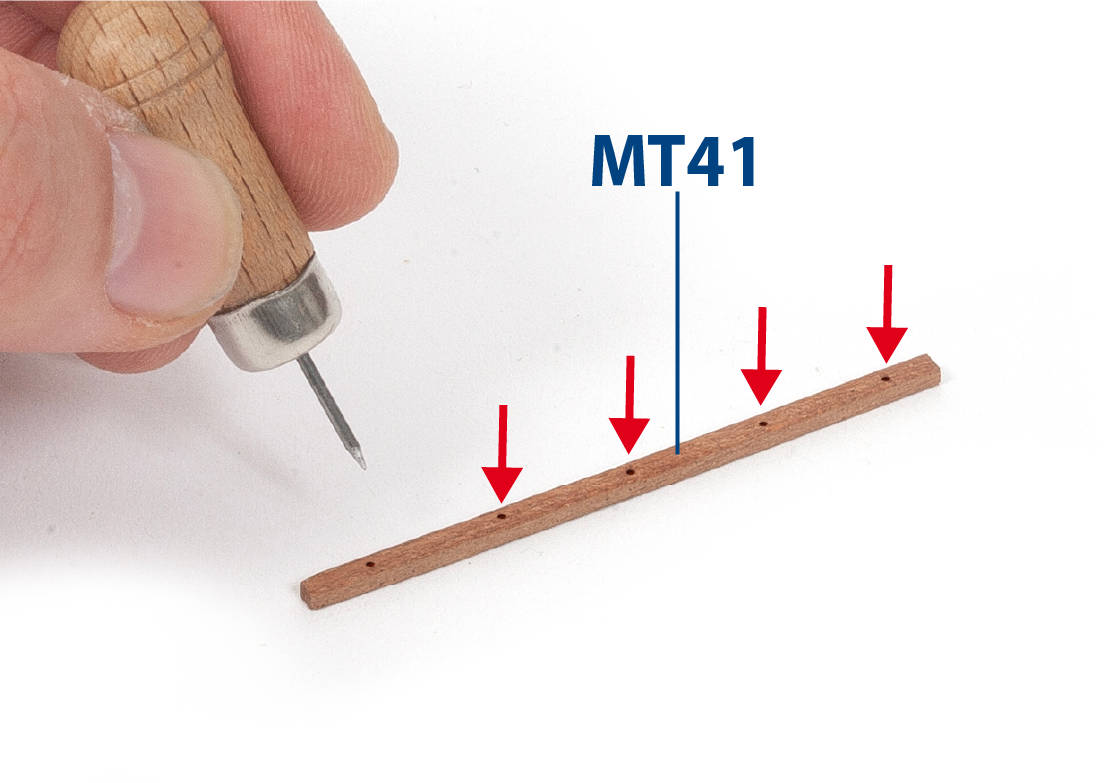
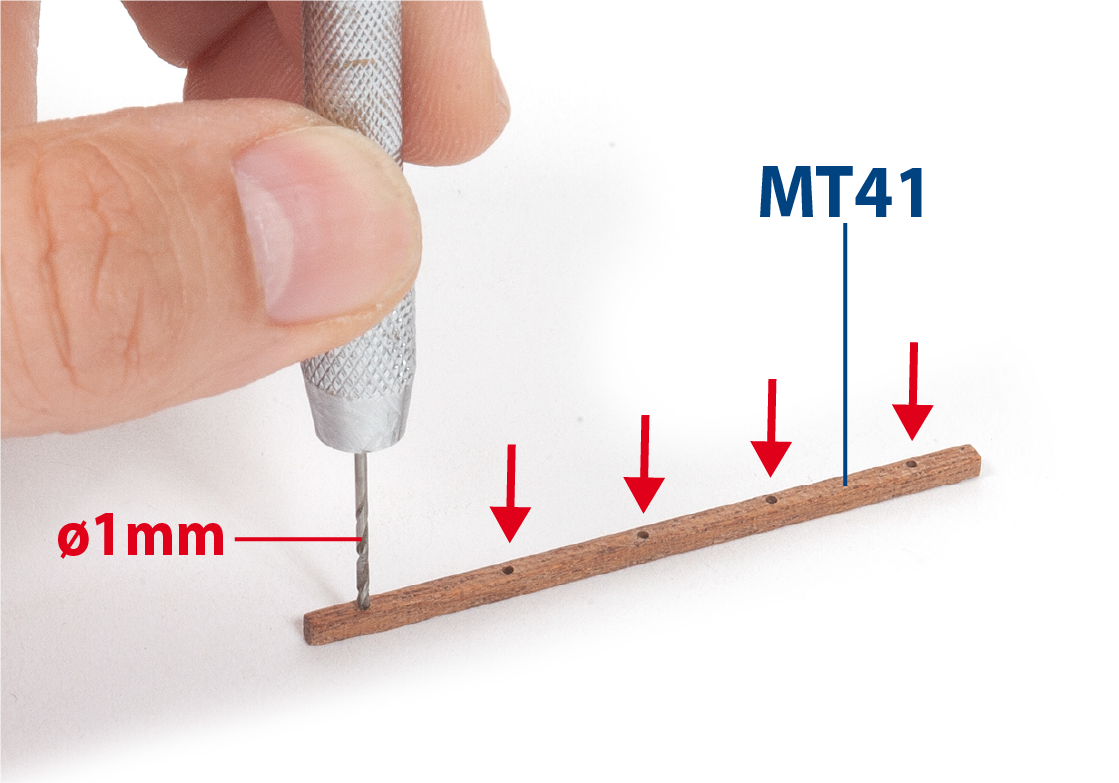
Schneiden Sie das Teil MT41 auf Länge (2 x 2 x 60 mm Mahagoni), und markieren Sie dann die Position der Löcher.
Schritt 7
Bohren Sie Löcher (ø1 mm) in das Bauteil MT41.
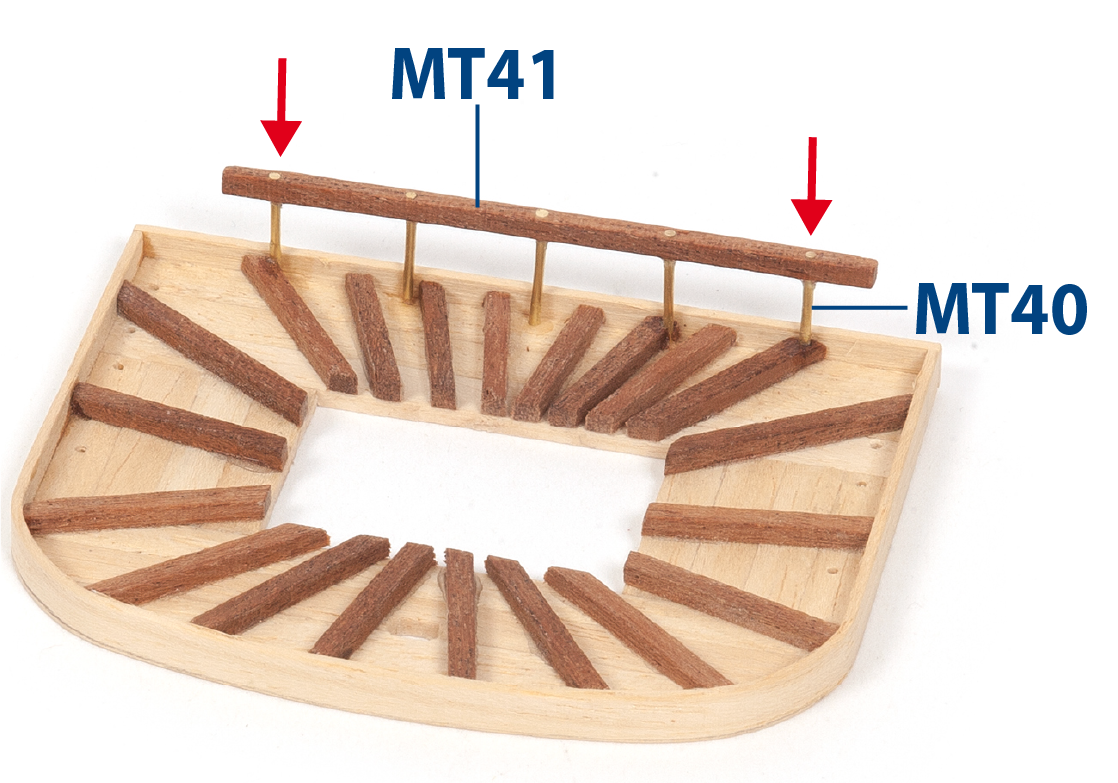
Schritt 8
Montieren und kleben Sie die Teile MT40 und MT41 auf die Mastspitze.
Schritt 9
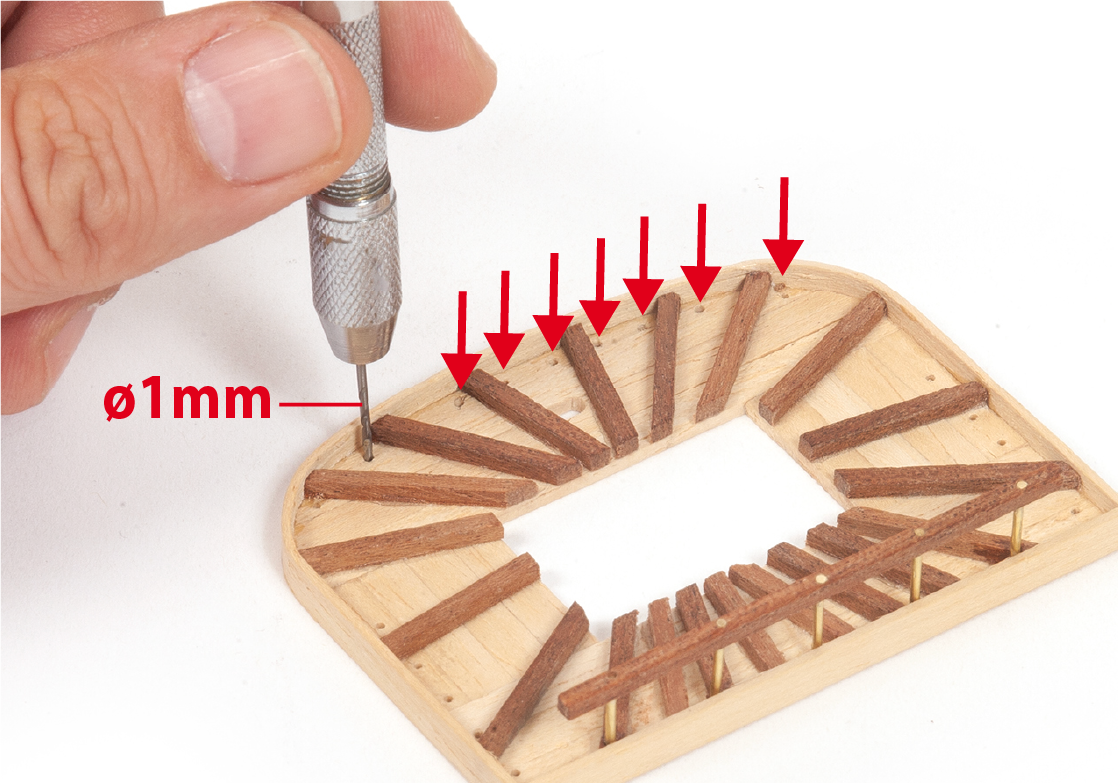
Bohren Sie Löcher (ø1 mm) in die Mastspitze, wie in der Zeichnung dargestellt.
Schritt 10
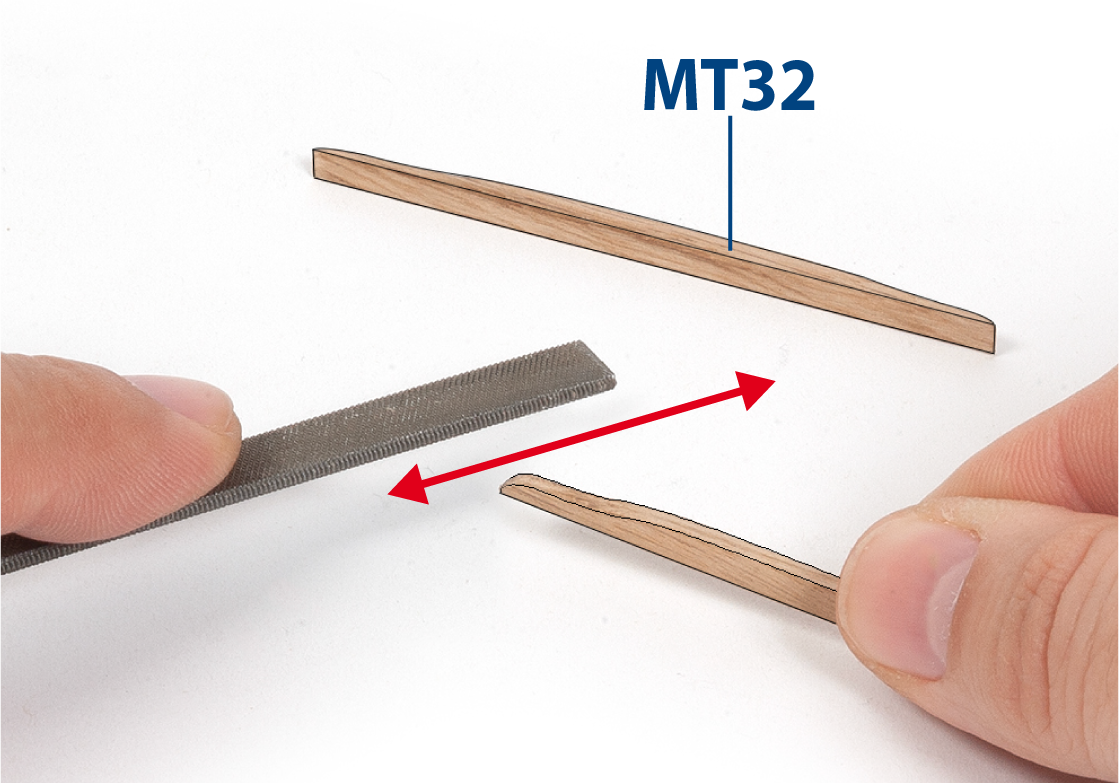
Schneiden Sie zwei Teile MT32 (3 x 3 x 67 mm Lindenholz) auf Länge zu und formen Sie diese dann mit einer Feile.
Schritt 11
Bohren Sie Löcher (ø1 mm) in die Teile MT32, wie in der Zeichnung dargestellt.

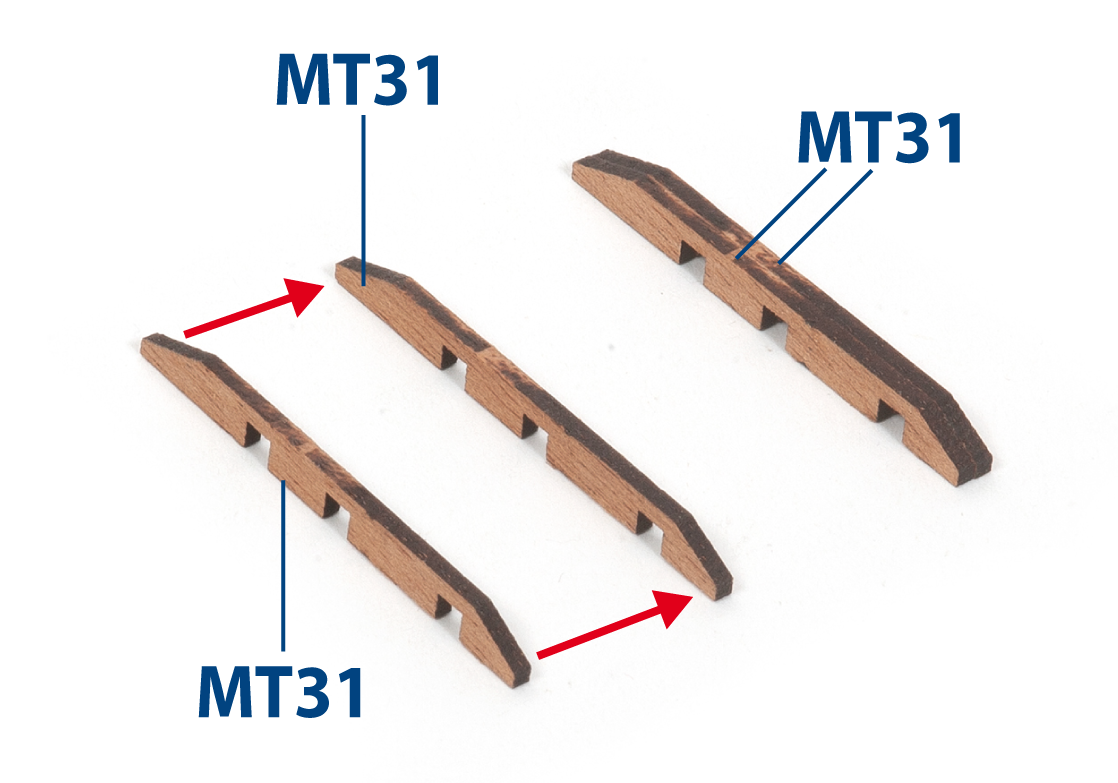
Schritt 12
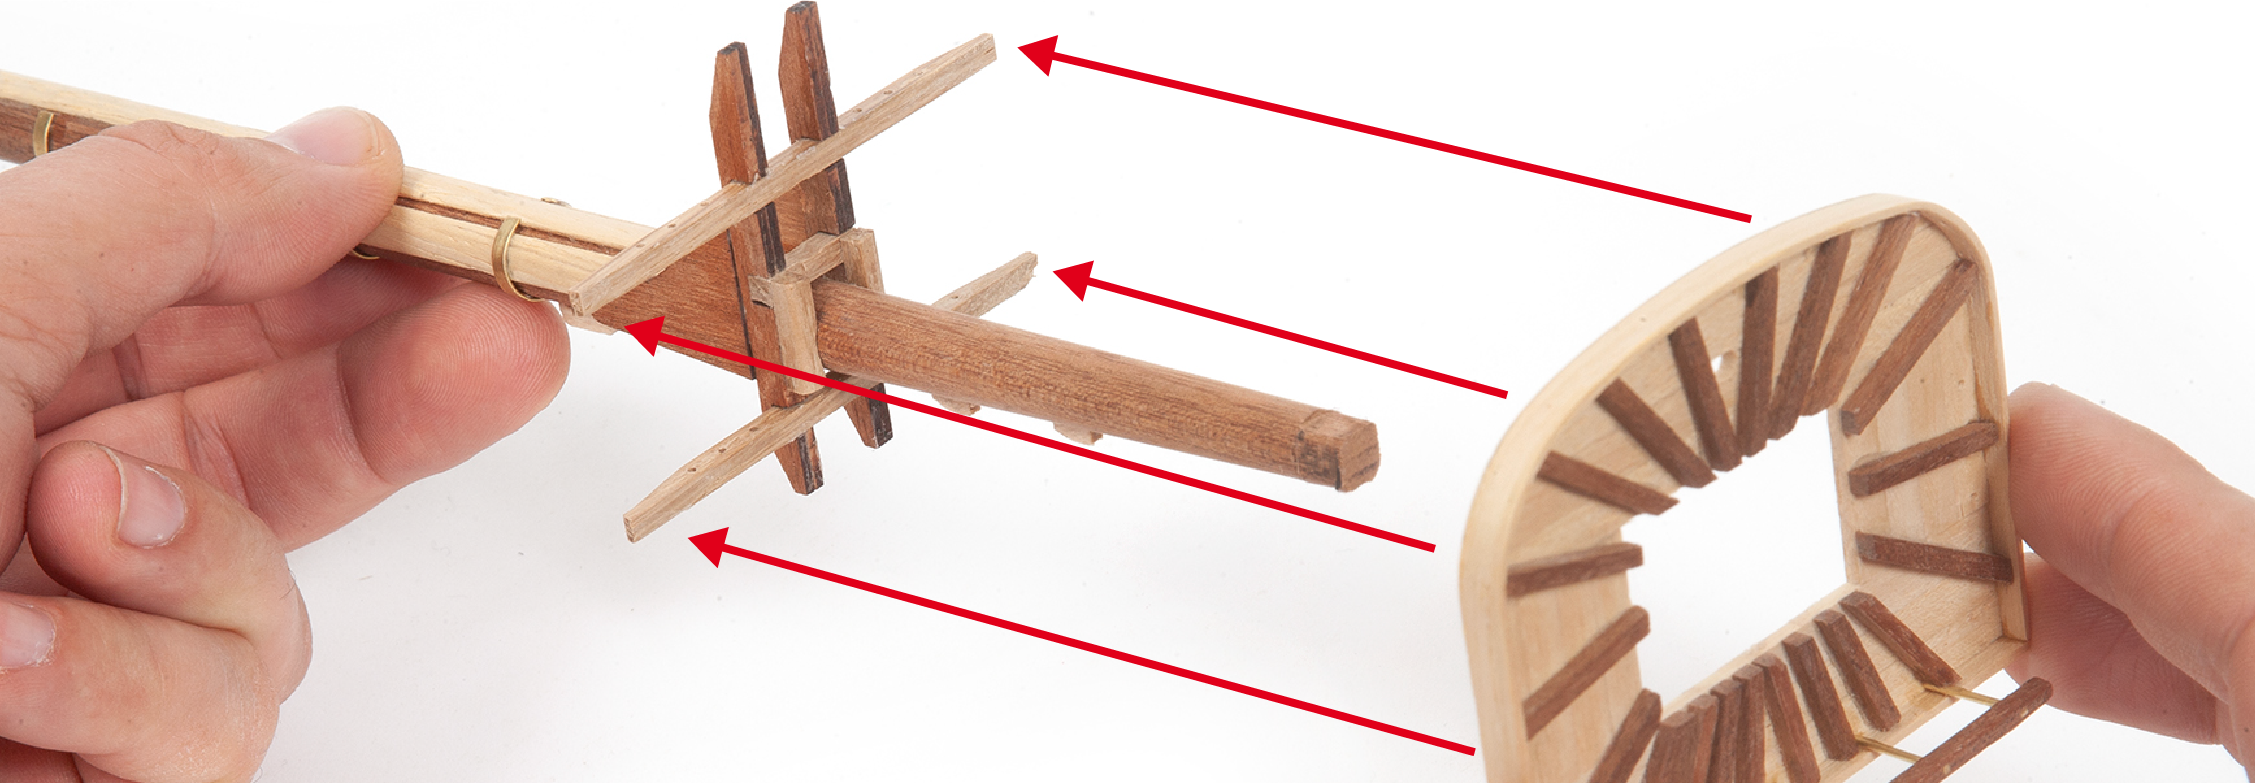
Kleben Sie die Teile MT31 wie gezeigt zusammen.
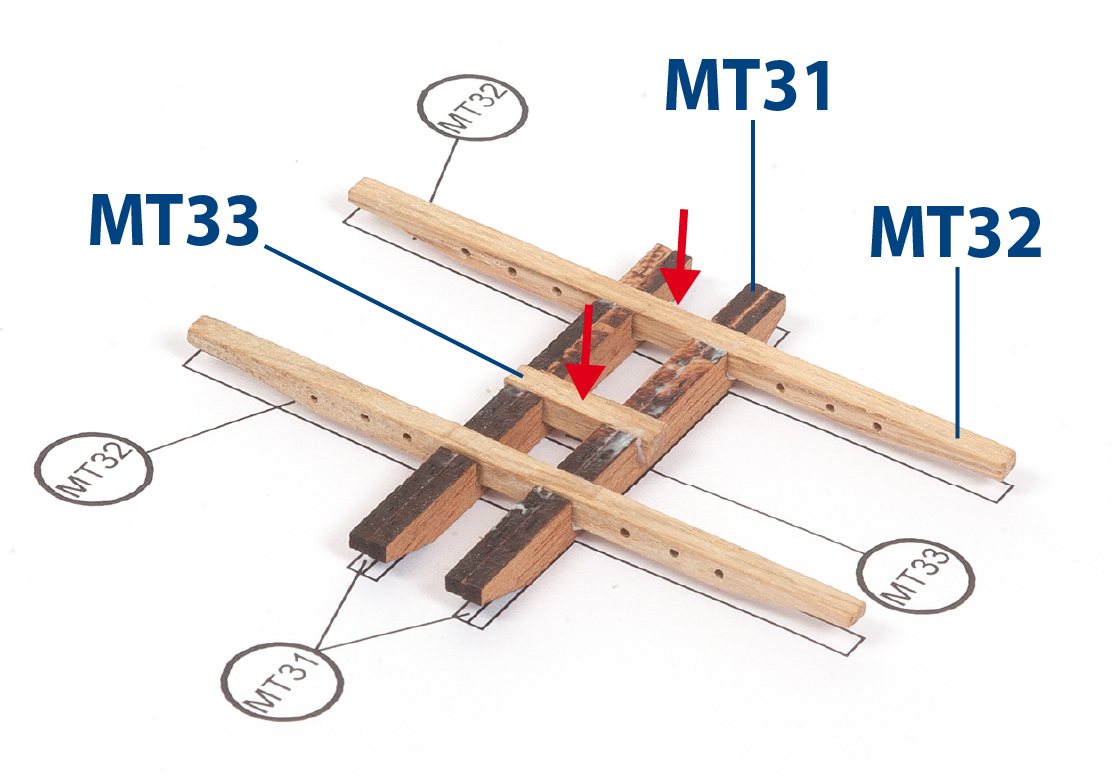
Schritt 13
Schneiden Sie das Teil MT33 (3 x 3 x 14 mm Lindenholz) auf die richtige Länge zu und kleben Sie die Teile gemäß der Zeichnung zusammen.
Schritt 14
Schneiden Sie Teile MT34 (3 x 3 x 13 mm Lindenholz) zu und formen Sie sie wie gezeigt, dann kleben Sie sie an die Baugruppe.
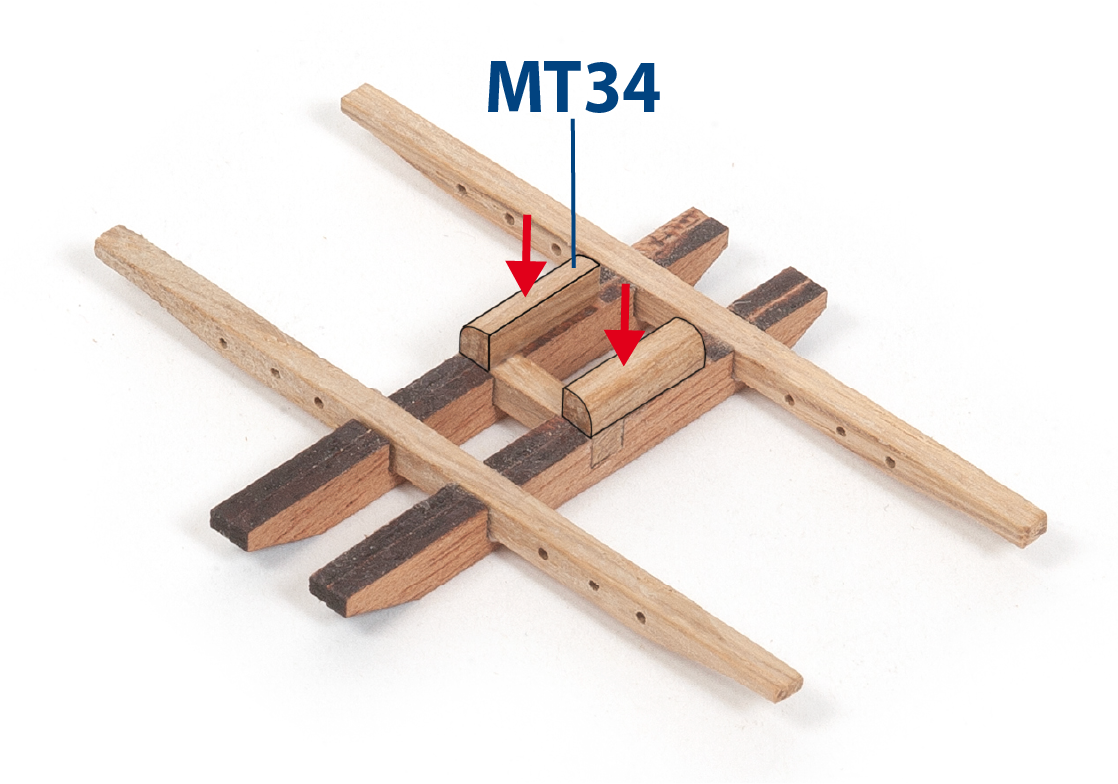
Schritt 15
Bauen Sie die gezeigte Baugruppe aus dem Bild.
Schritt 1
Schneiden Sie zwei Teile MT25 (1 x 5 x 83 mm Lindenholz) und ein Teil MT26 (1 x 5 x 198 mm Lindenholz) auf Länge zu und formen Sie die Enden wie gezeigt.

Schritt 2
Tragen Sie Kontaktkleber auf eine Seite der Teile auf.
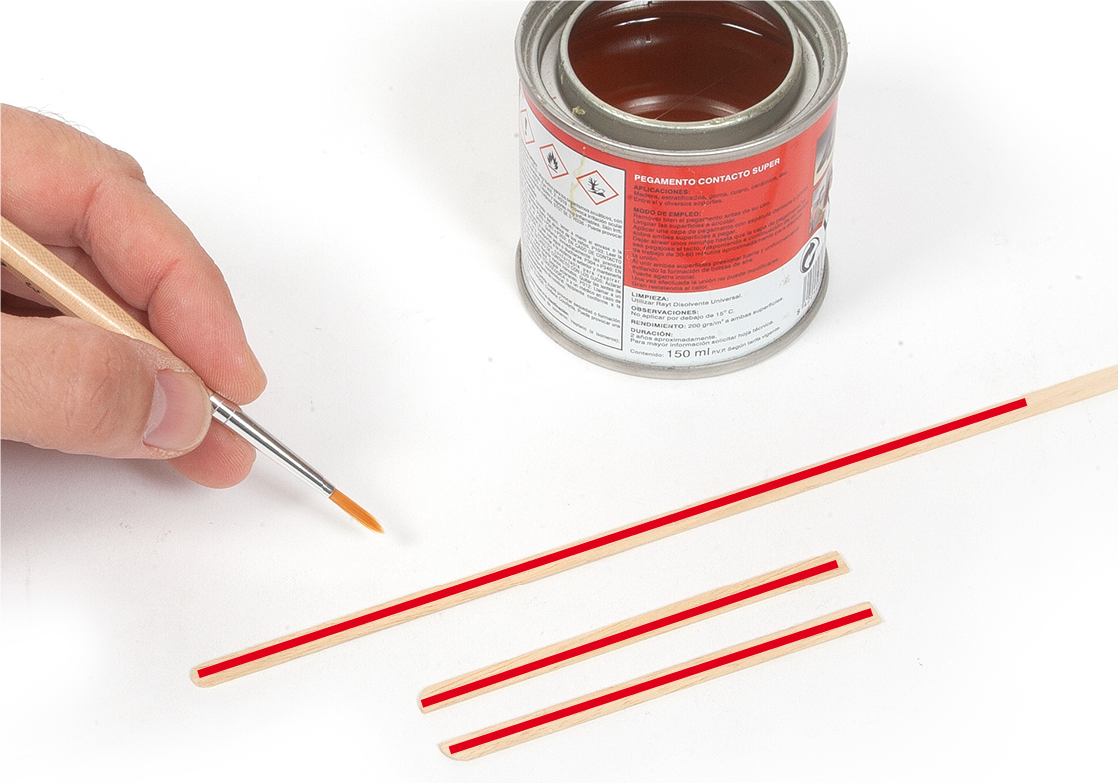
Schritt 3
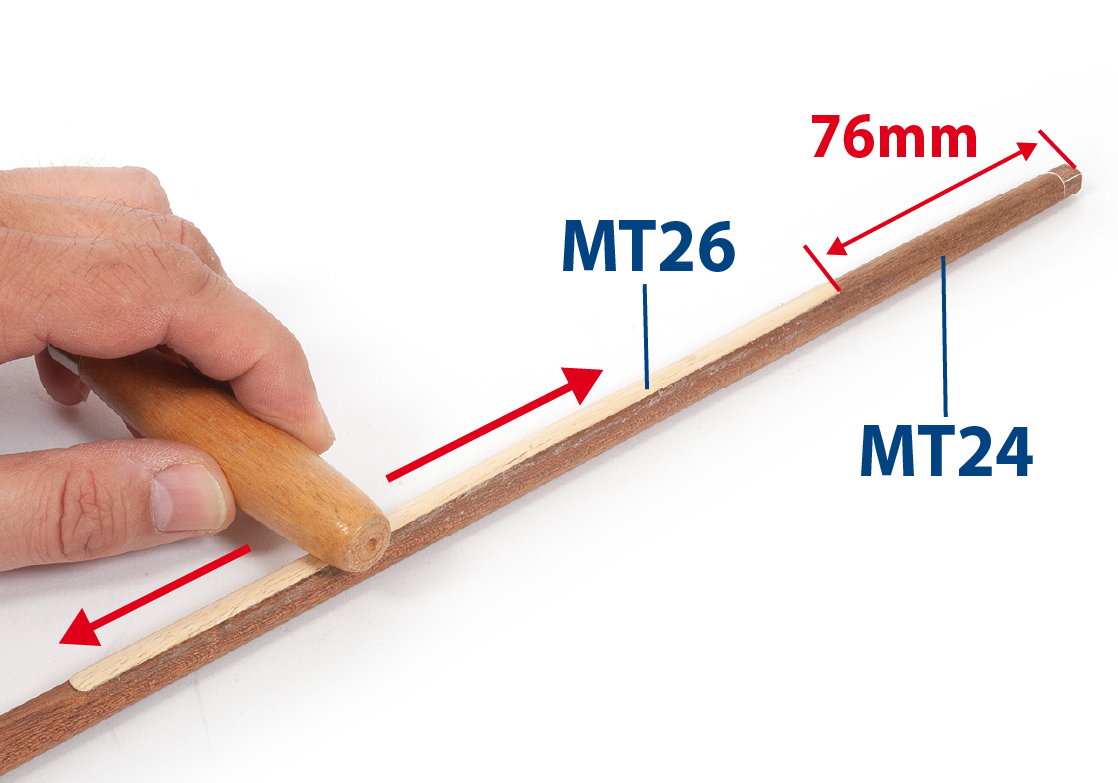
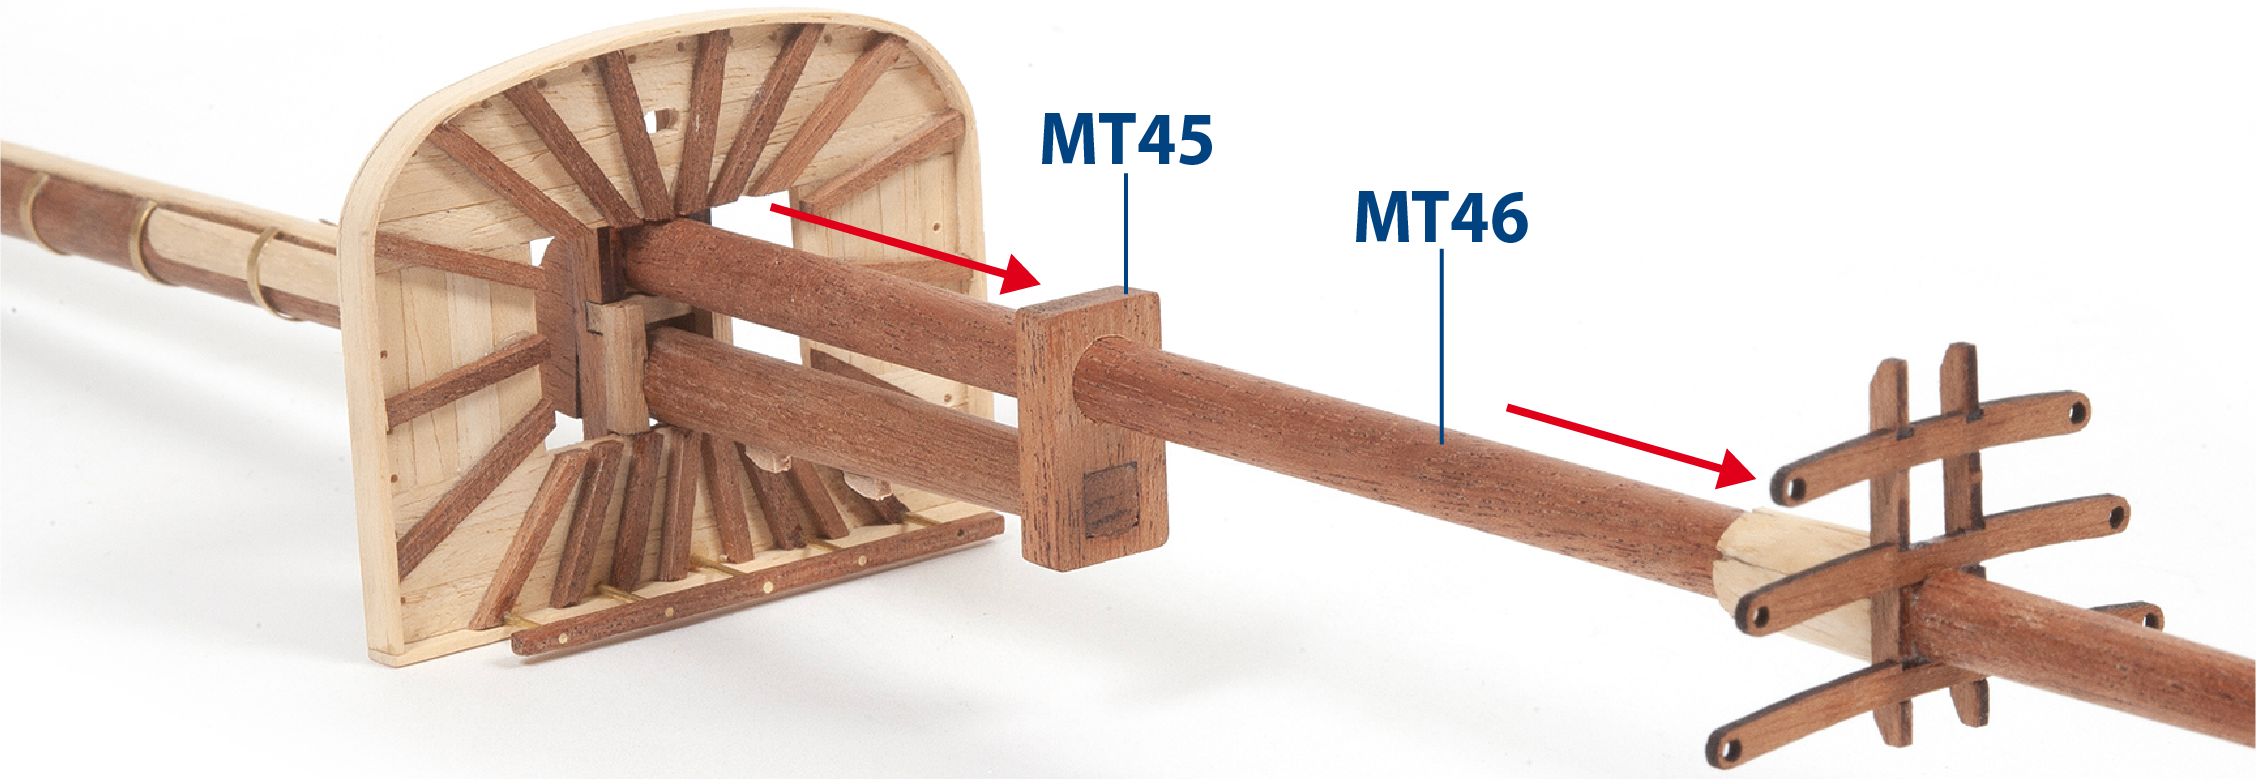
Kleben Sie Teil MT26 an Teil MT24 (ø10 x 387 mm) wie gezeigt.
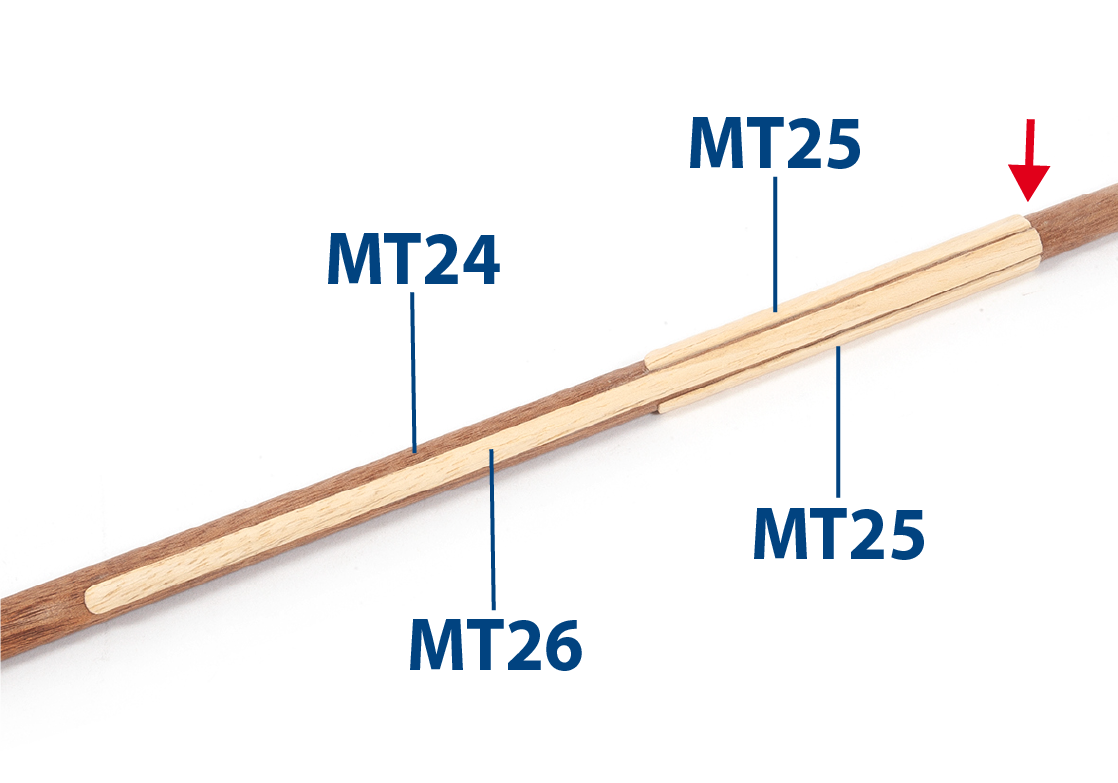
Schritt 4
Kleben Sie die Teile MT25 wie gezeigt.
Schritt 5
Montieren Sie die Baugruppe (Phase 65, Schritt 15) wie gezeigt am Mast.
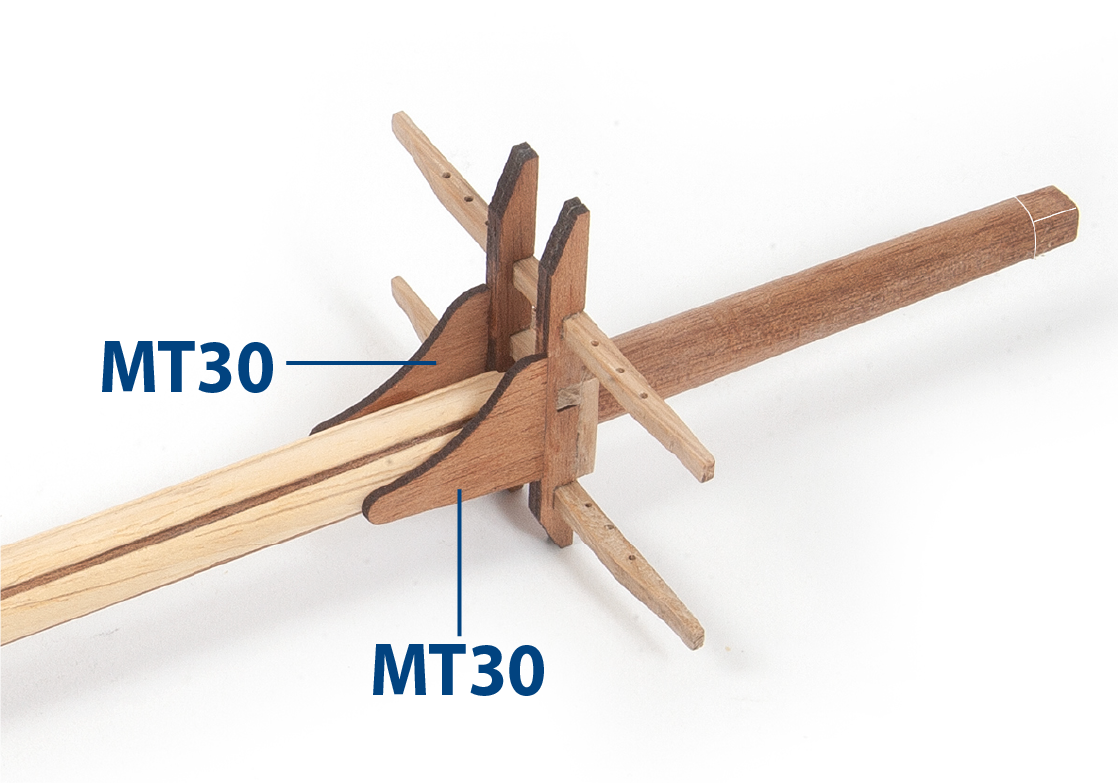
Schritt 6
Kleben Sie die Teile MT30 fest.
Schritt 7
Verwenden Sie eine Stange, um das Teil MT27 (2 x 35 mm Messing) zu formen.
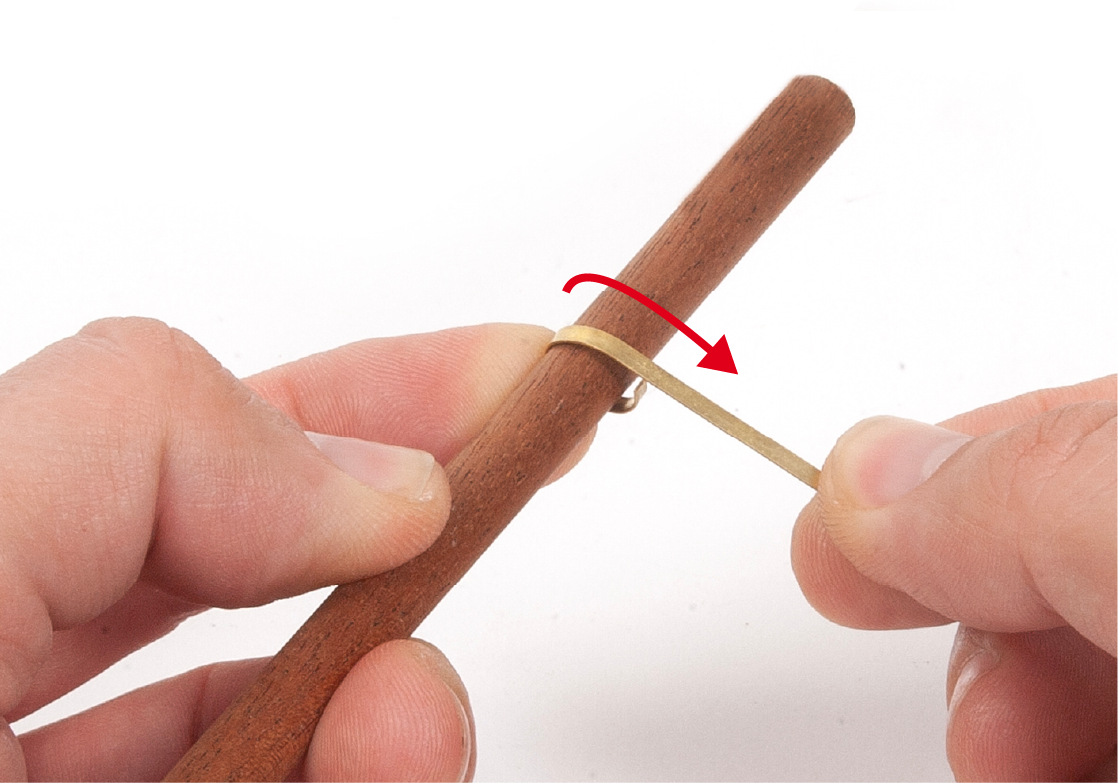
Schritt 8
Schneiden Sie das geformte Teil mit einer Zange wie gezeigt.
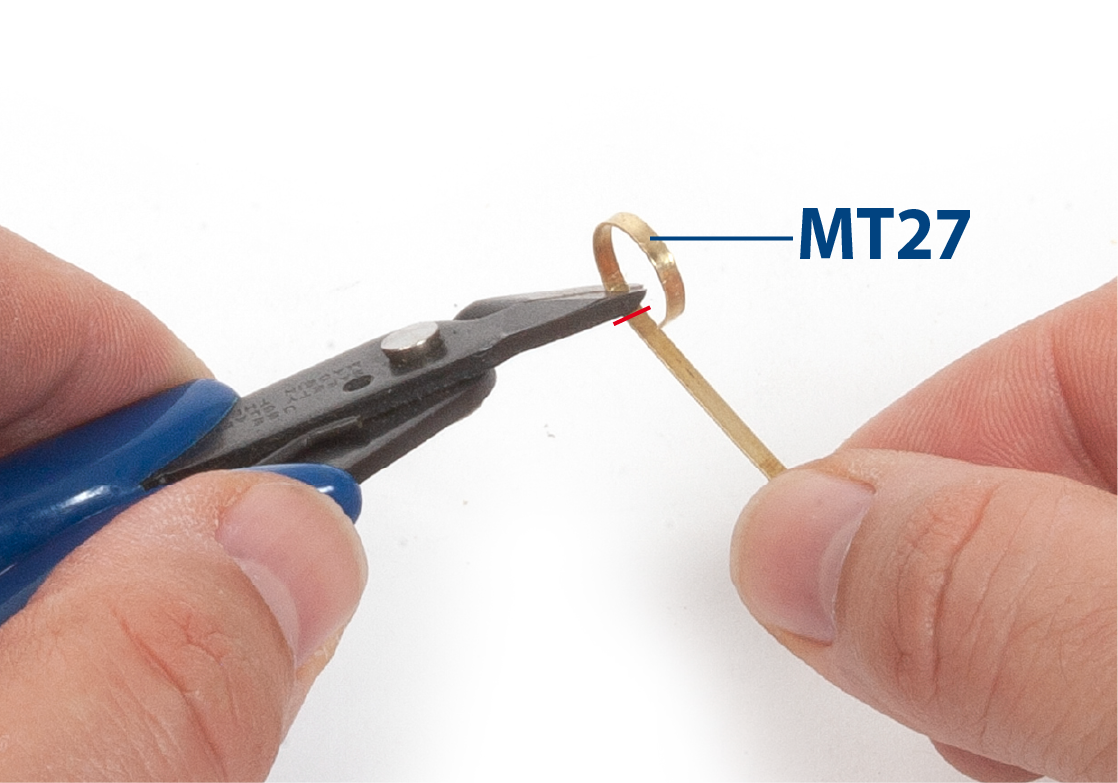
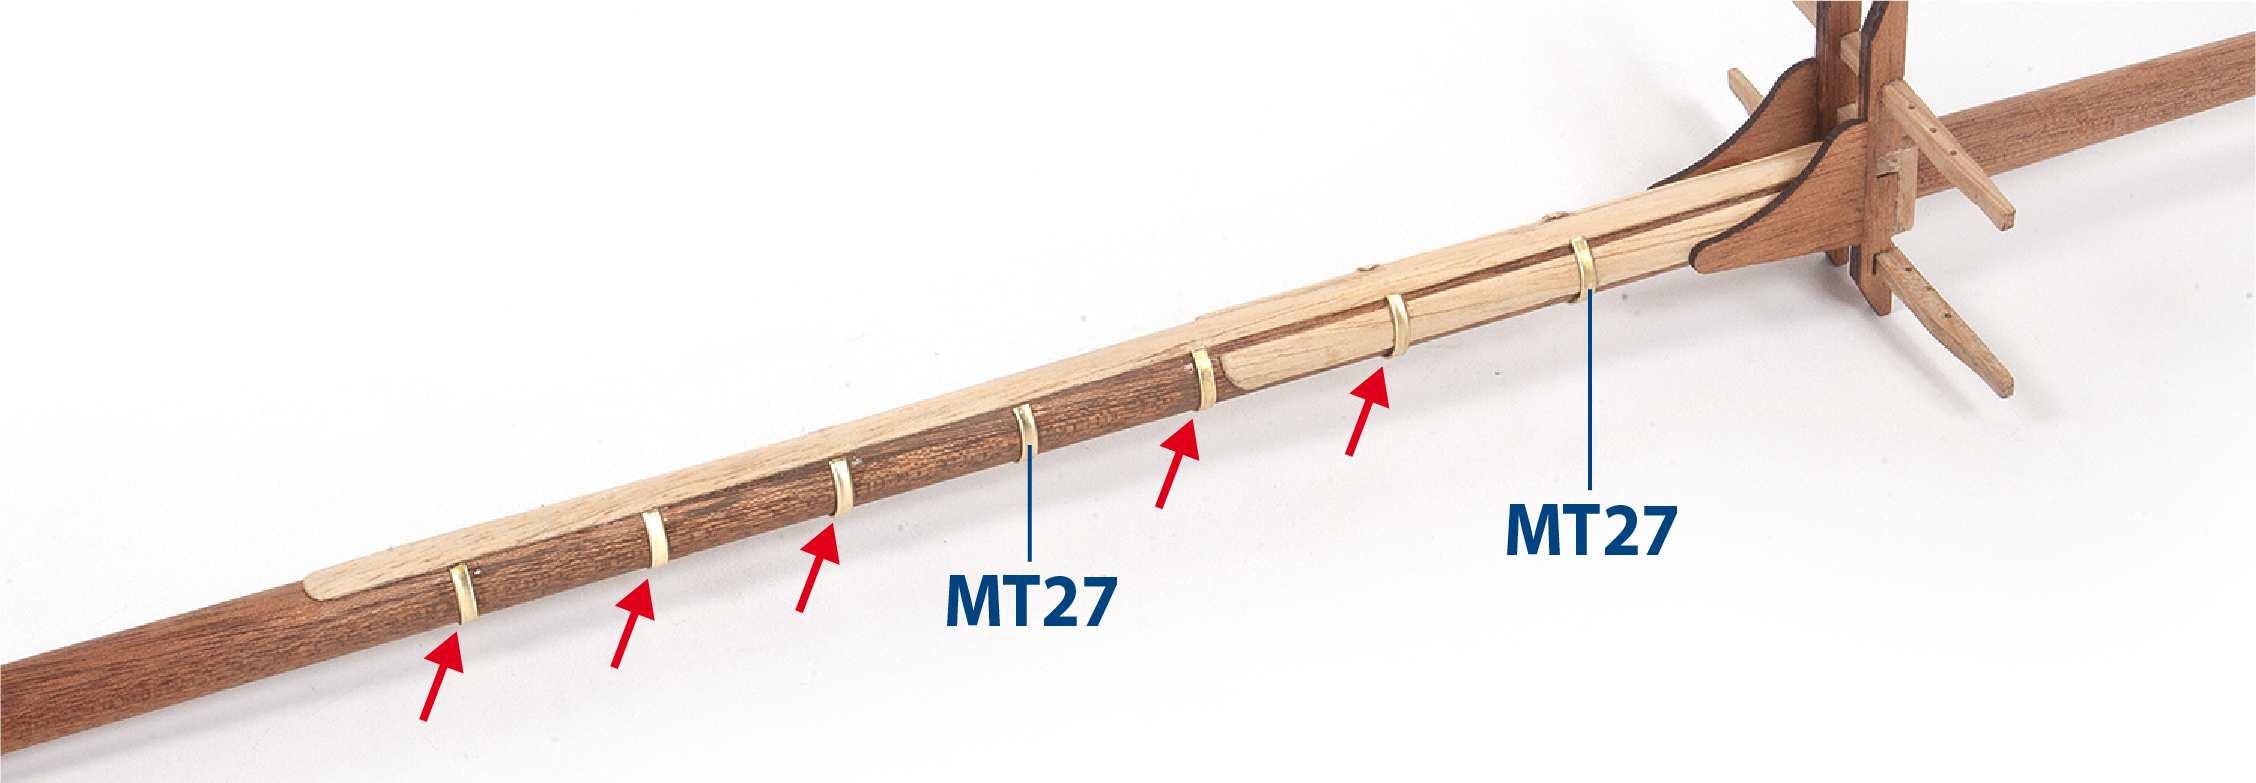
Schritt 9
Fügen Sie die Teile MT27 zur Baugruppe hinzu.
Schritt 10
Passen und kleben Sie die Mastspitze.
Schritt 11
Kleben Sie die Teile, wie im Bild gezeigt.
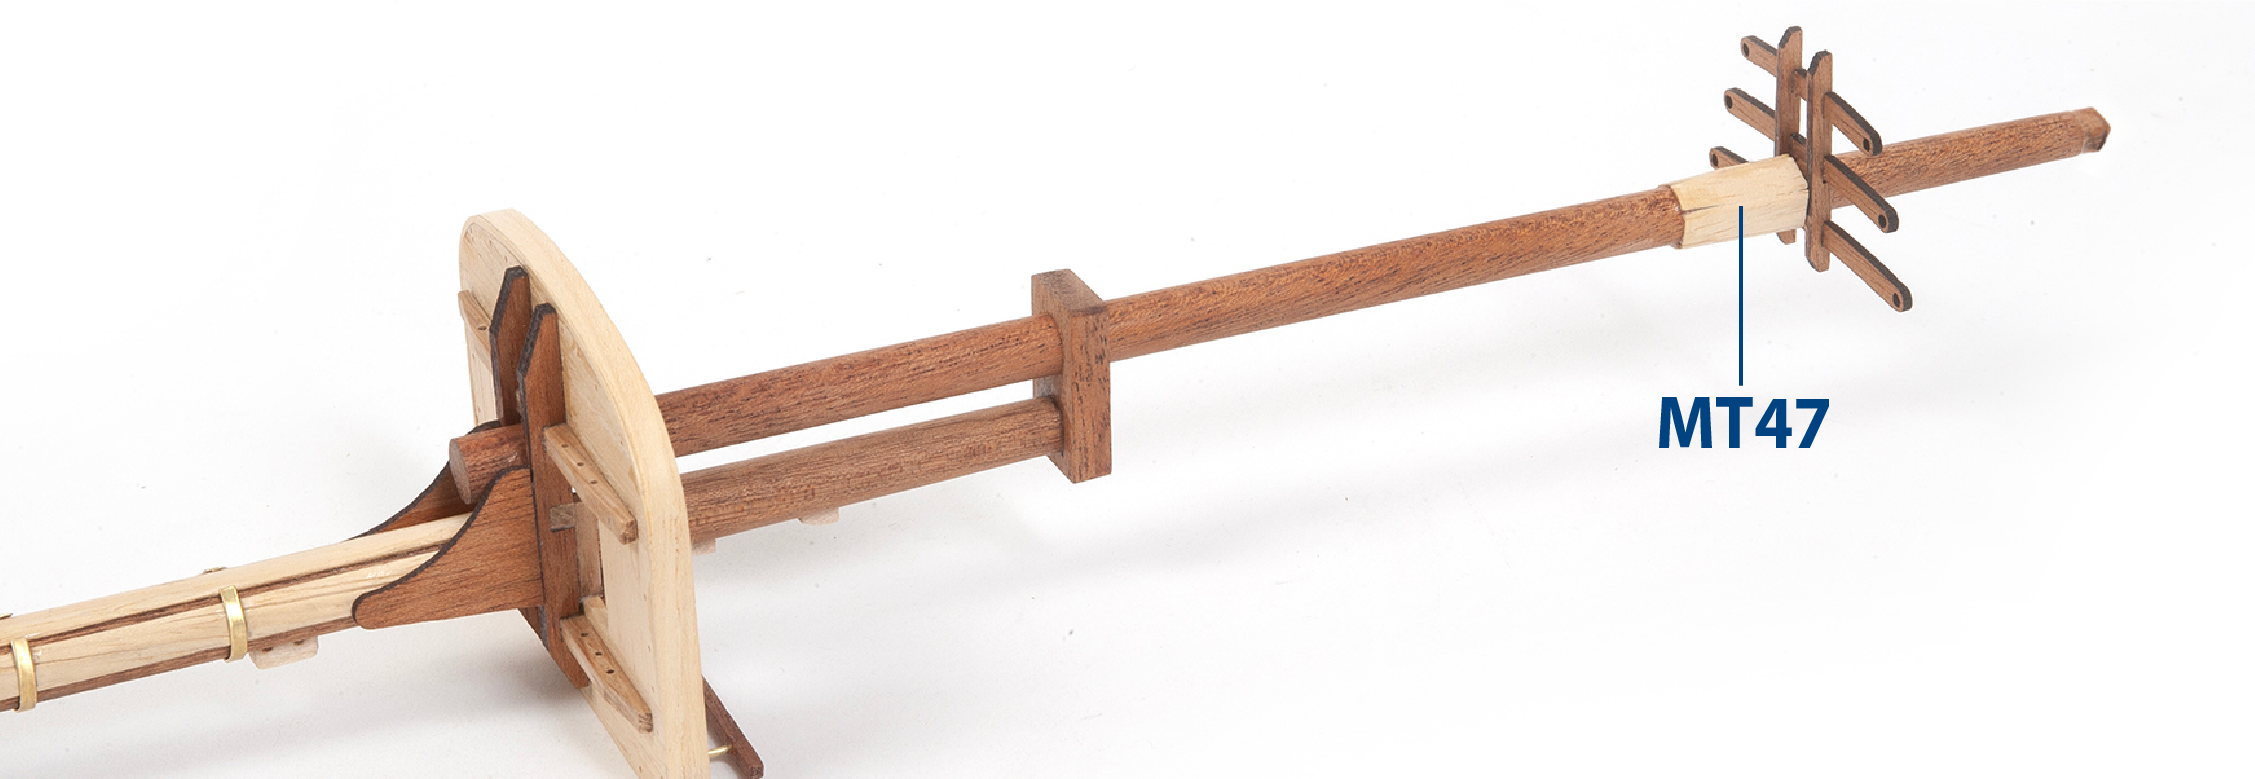
Schritt 12
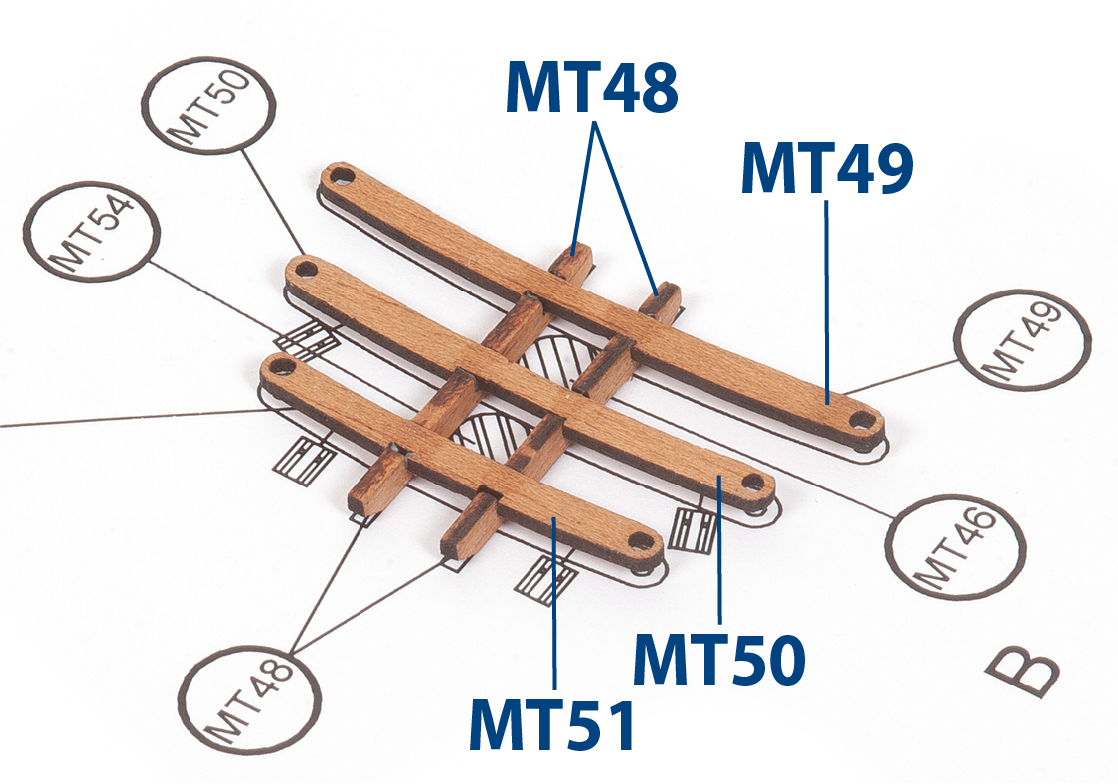
Fertigen und kleben Sie fünf Teile MT47 (1 x 5 x 18 mm Lindenholz).
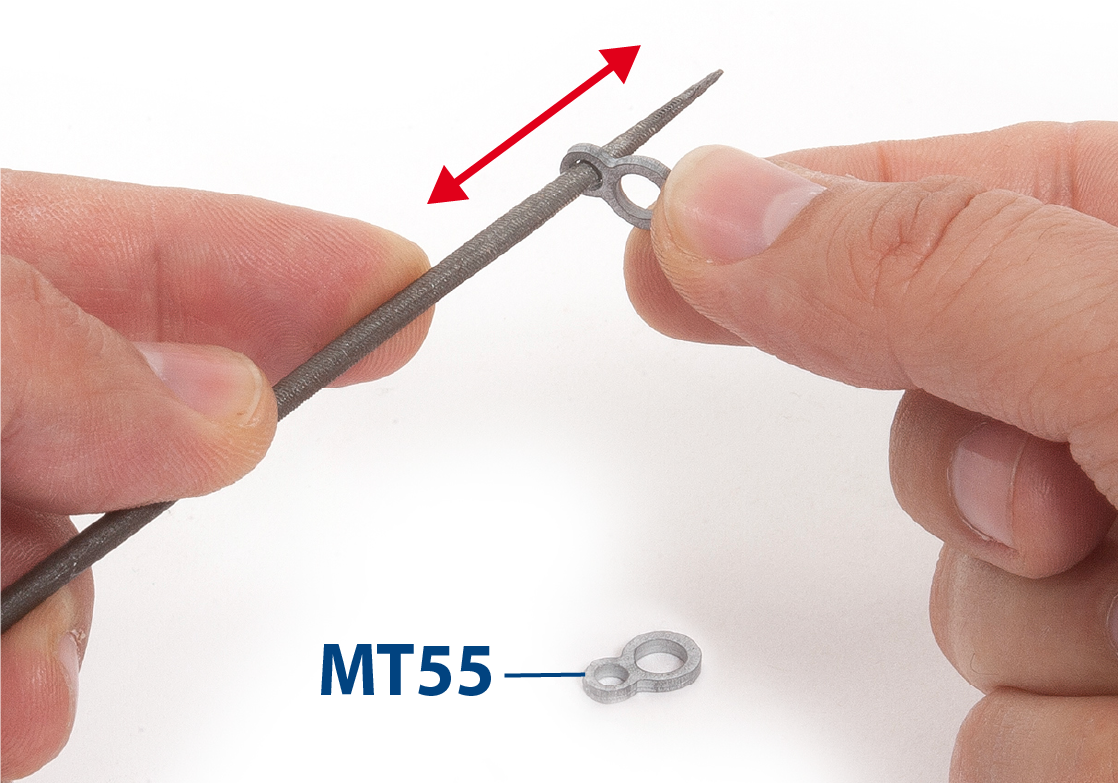
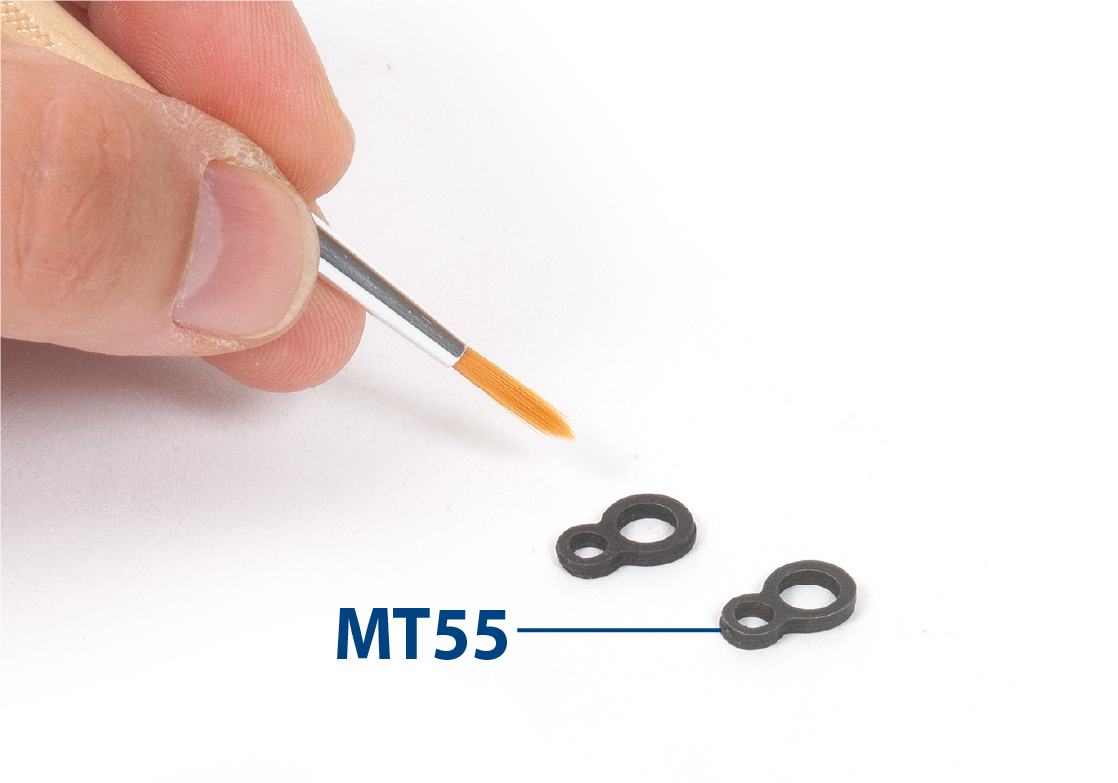
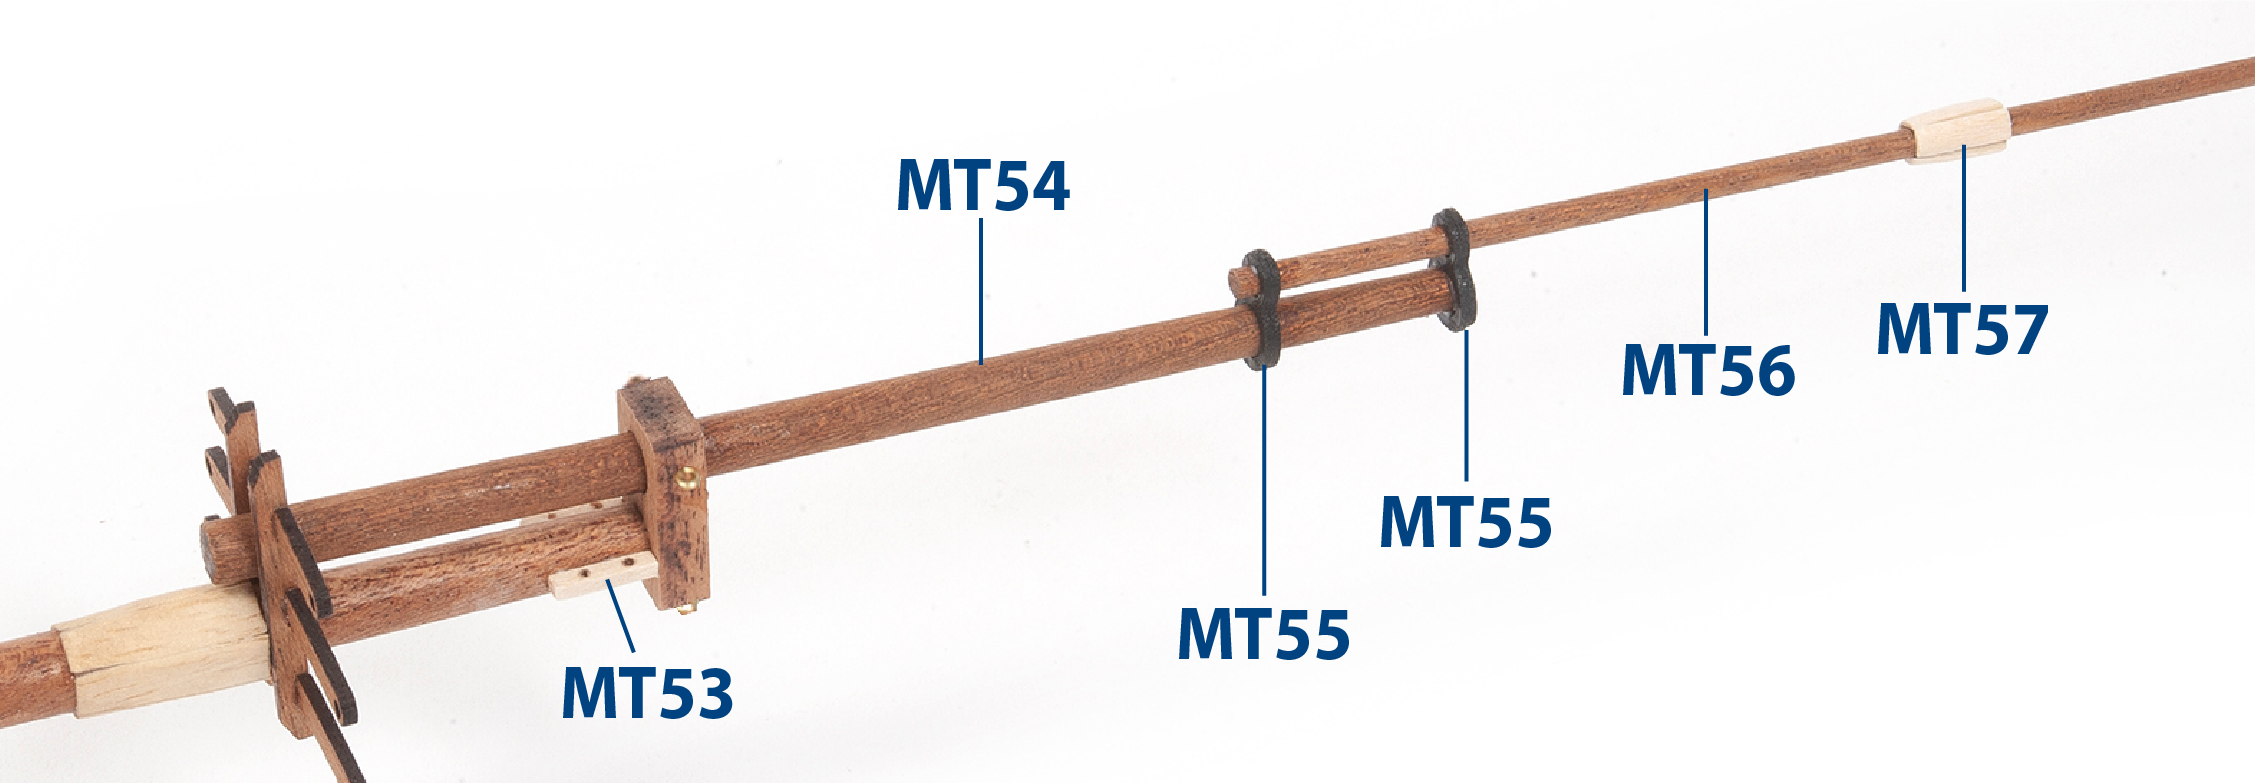
Schritt 1
Feilen Sie die Löcher der Teile MT55, damit die Teile MT54 und MT56 hindurchpassen können (siehe Schritt 3).
Schritt 2
Sie können die Teile schwarz lackieren, wenn Sie möchten.
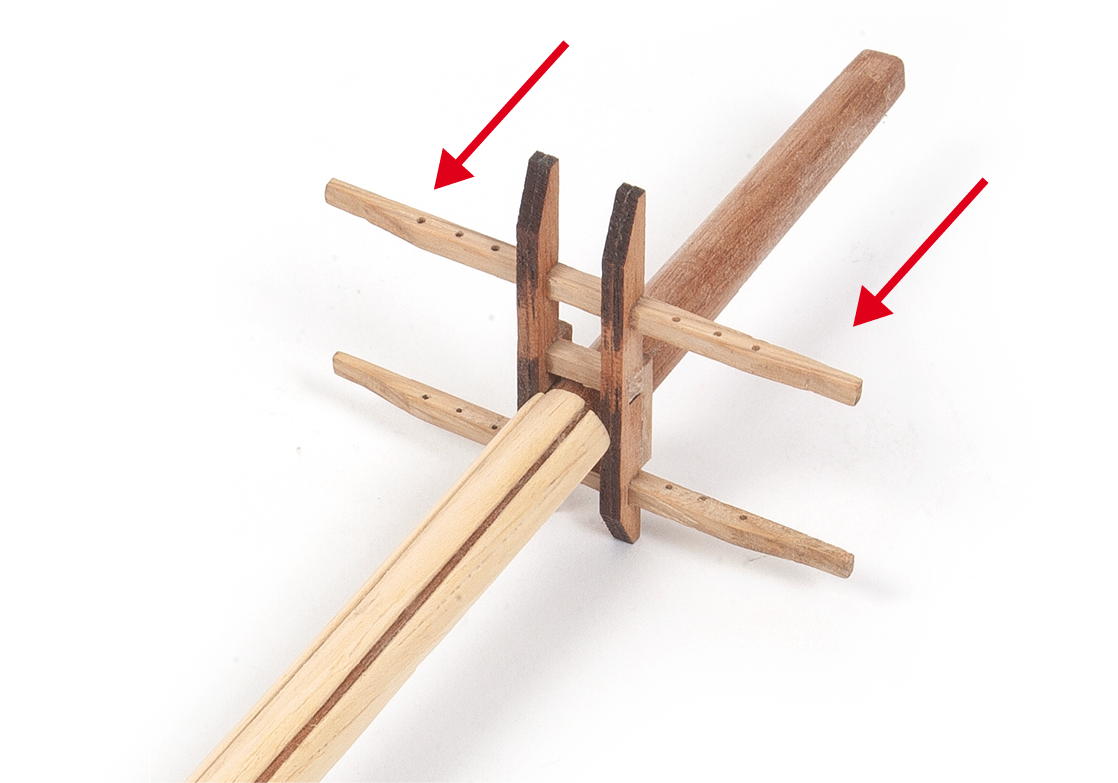
Schritt 3
Montieren Sie die gezeigten Teile, um den Mast weiter zu bauen.
| MT53 | 2 x 2 x 10 mm Lindenholz |
| MT54 | ø6 x 125 mm Mahagoni (Phase 64) |
| MT56 | ø3 x 242 mm Mahagoni (Phase 64) |
| MT57 | 1 x 3 x 8 mm Lindenholz |
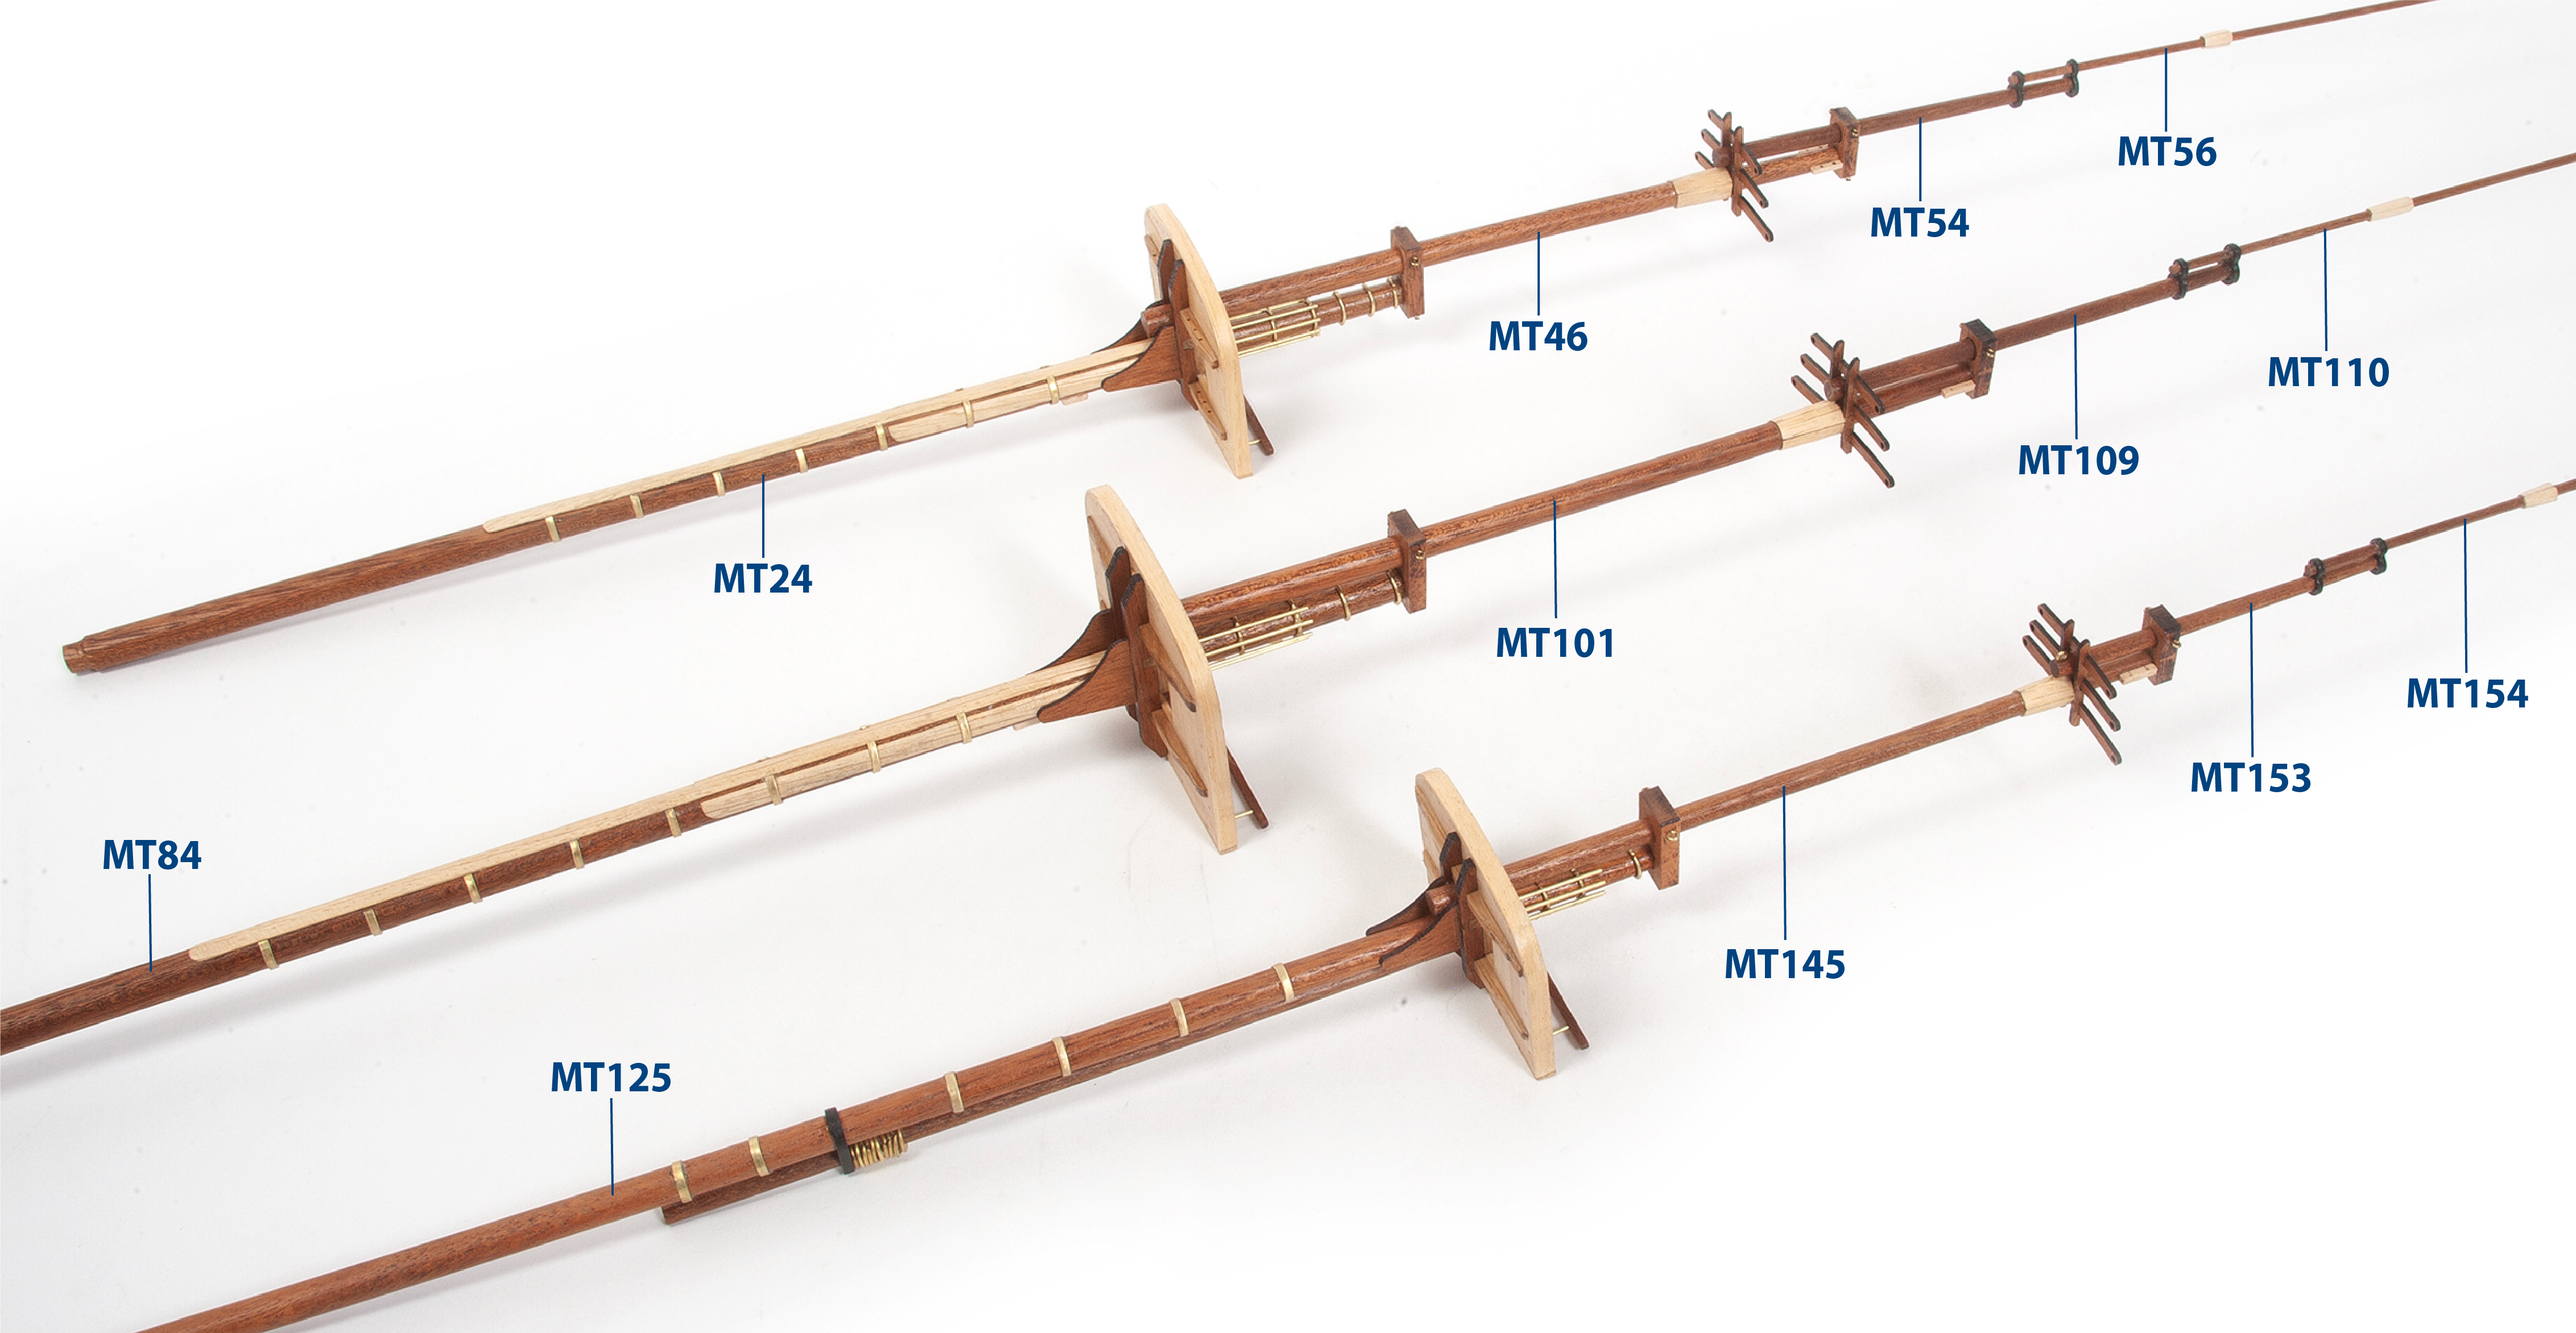
Schritt 4
Fertigen Sie den Hauptmast und den Besanmast nach derselben Methode an.
| MT84 | ø10 x 420 mm | MT125 | ø8 x 322 mm |
| MT101 | ø8 x 255 mm | MT145 | ø6 x 195 mm |
| MT109 | ø6 x 131 mm | MT153 | ø5 x 96 mm |
| MT110 | ø3 x 243 mm | MT154 | ø3 x 201 mm |
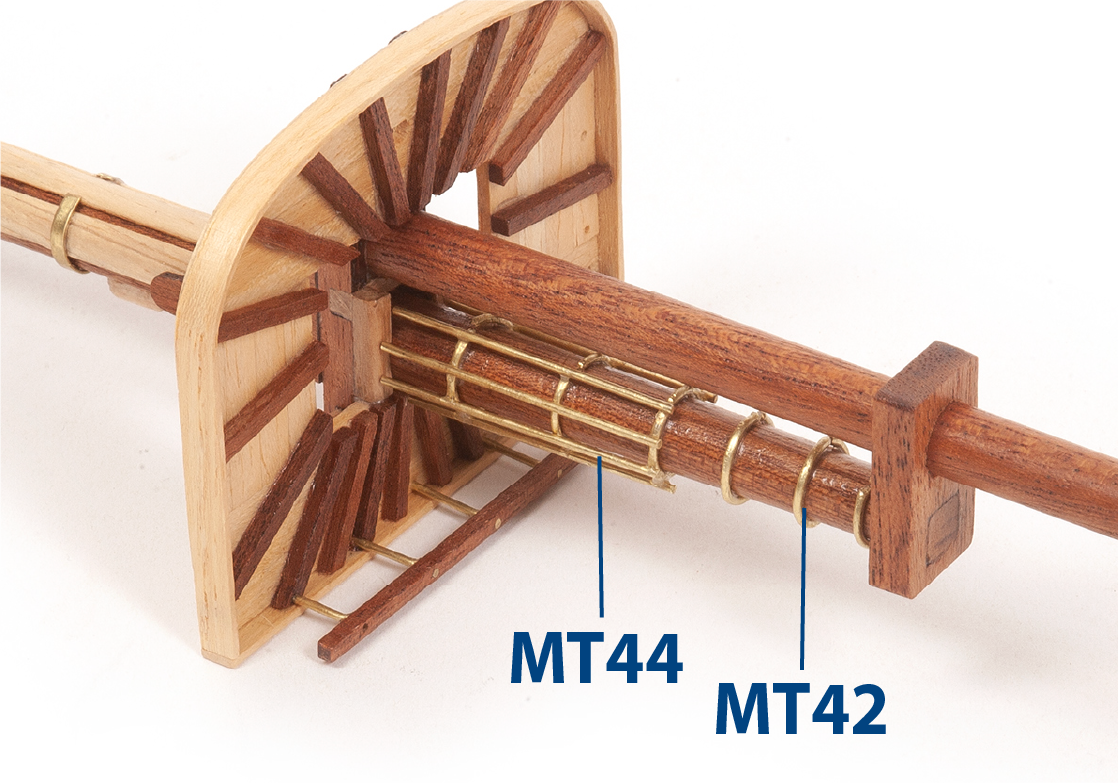
Schritt 5
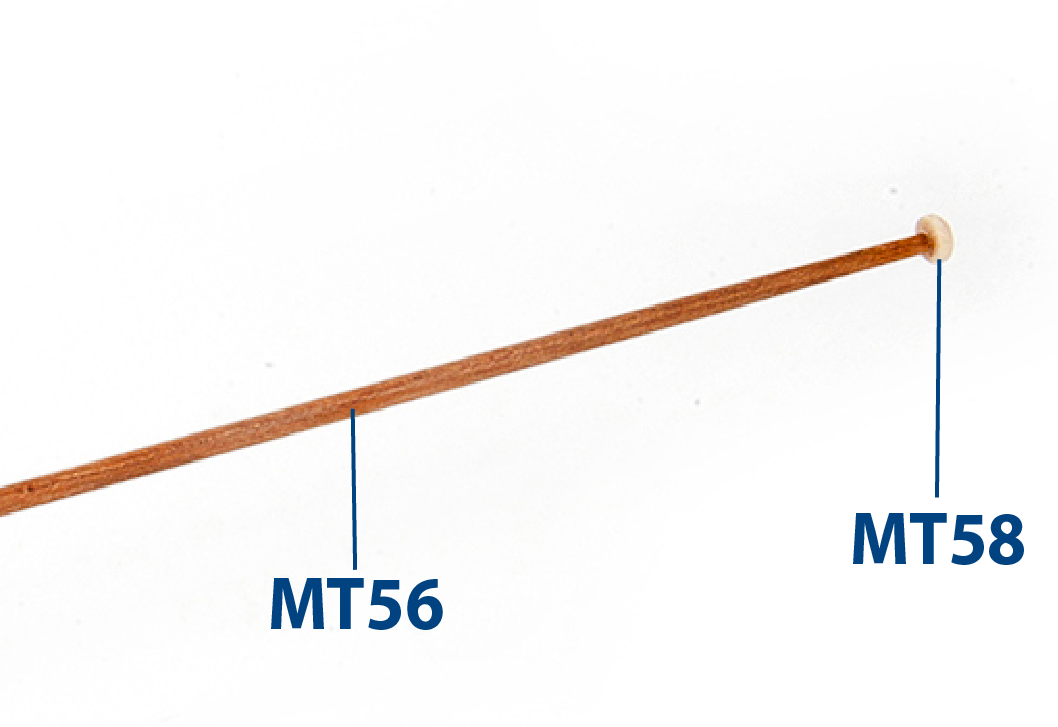
Montieren Sie Teil MT58 (2 x 5 x 5 mm Lindenholz) auf die Spitze der Masten.
Schritt 6
Schneiden und formen Sie den Messingdraht auf die angegebene Länge und kleben Sie ihn wie gezeigt an den Masten fest.
| MT42 | ø1 x 15 mm Messing |
| MT44 | ø1 x 39 mm Messing |
Schritt 1
Anbringen von Beschlägen und Takelage an den Raaen des Fockmasts
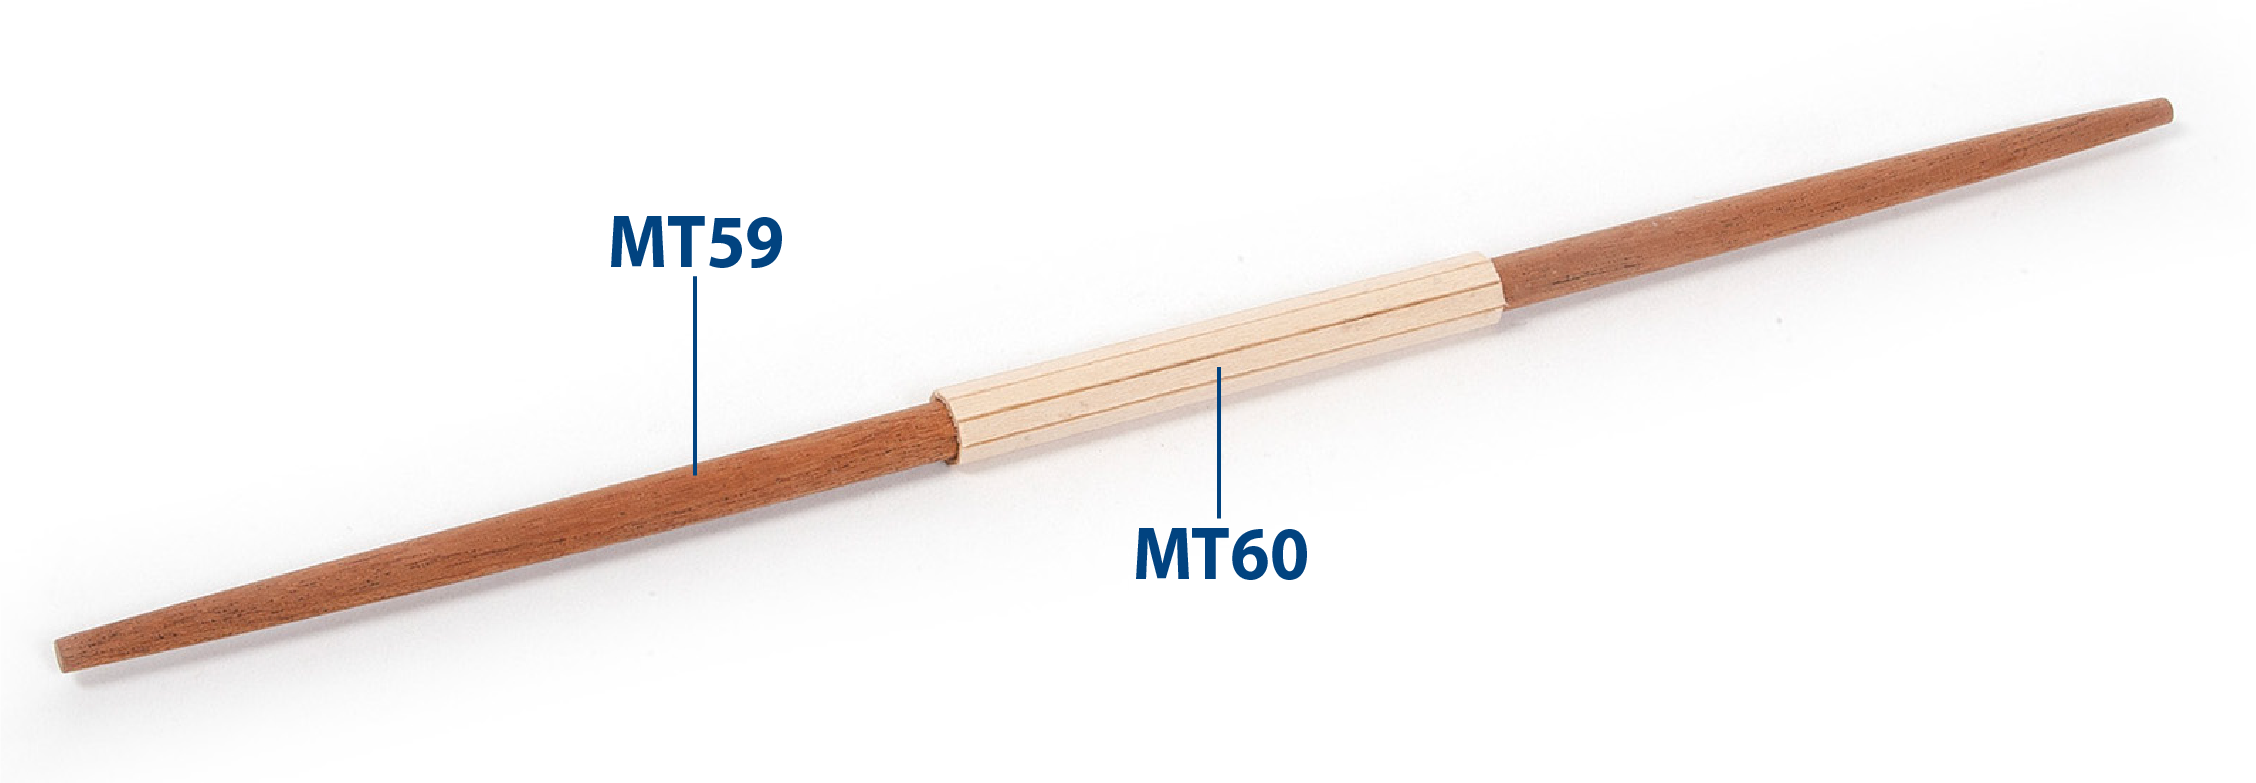
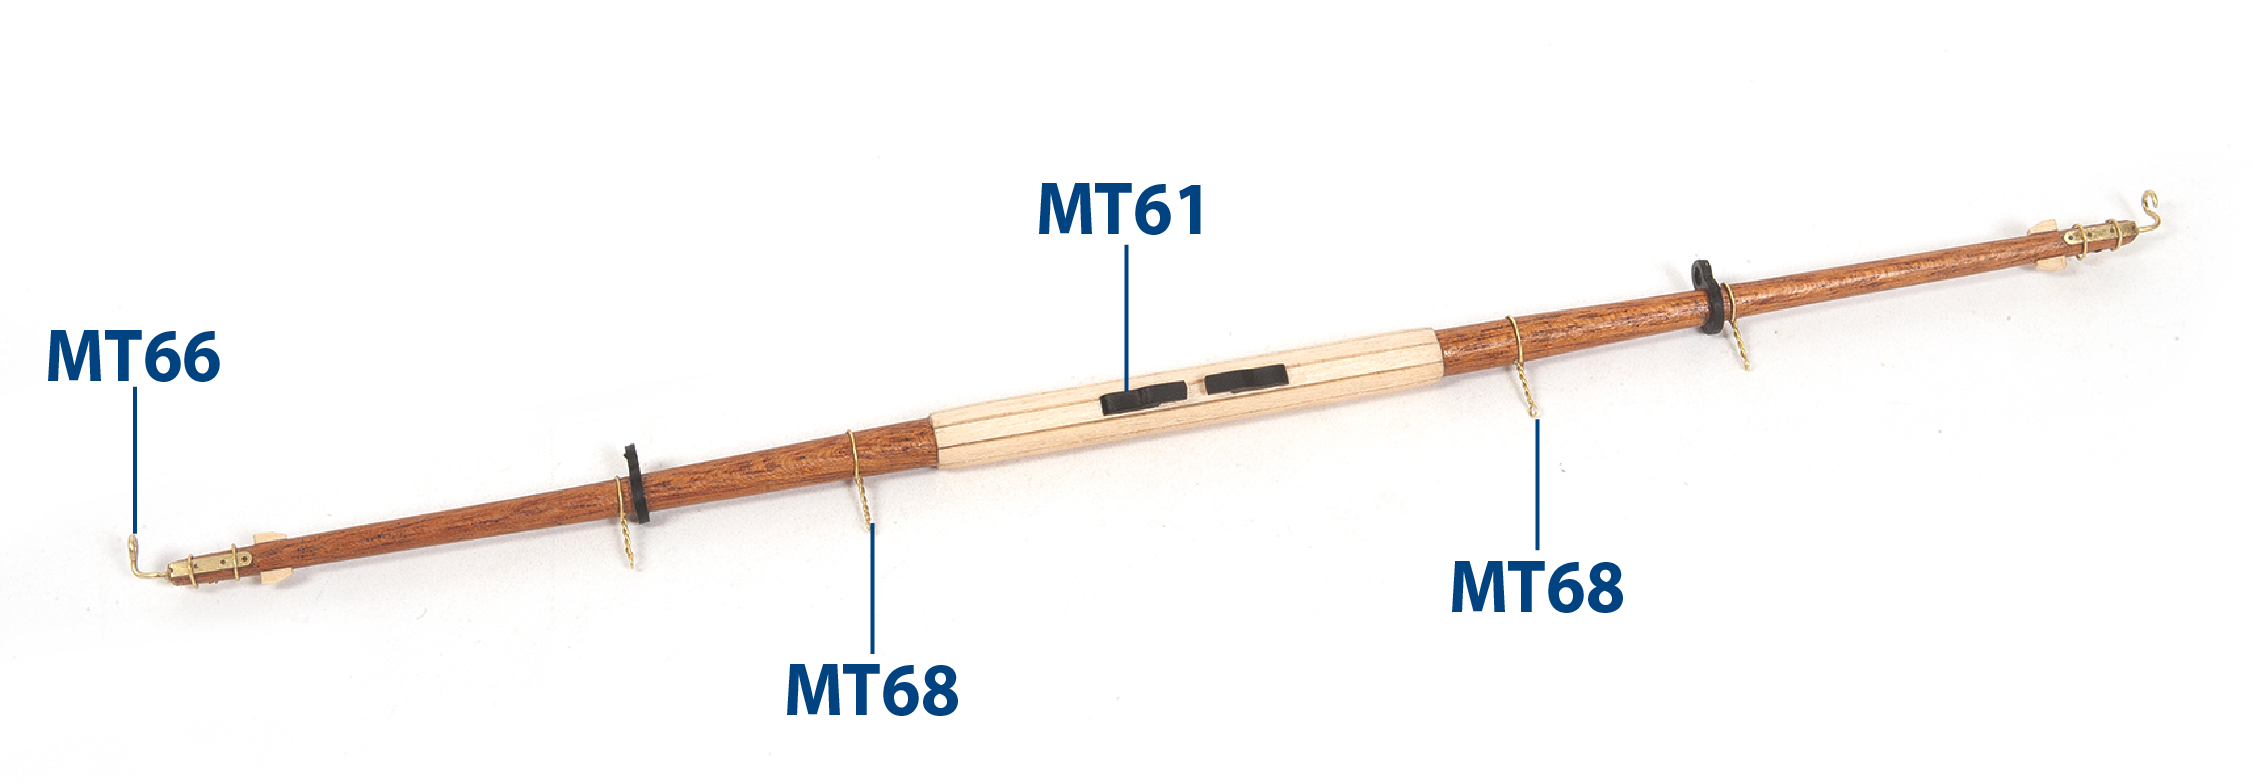
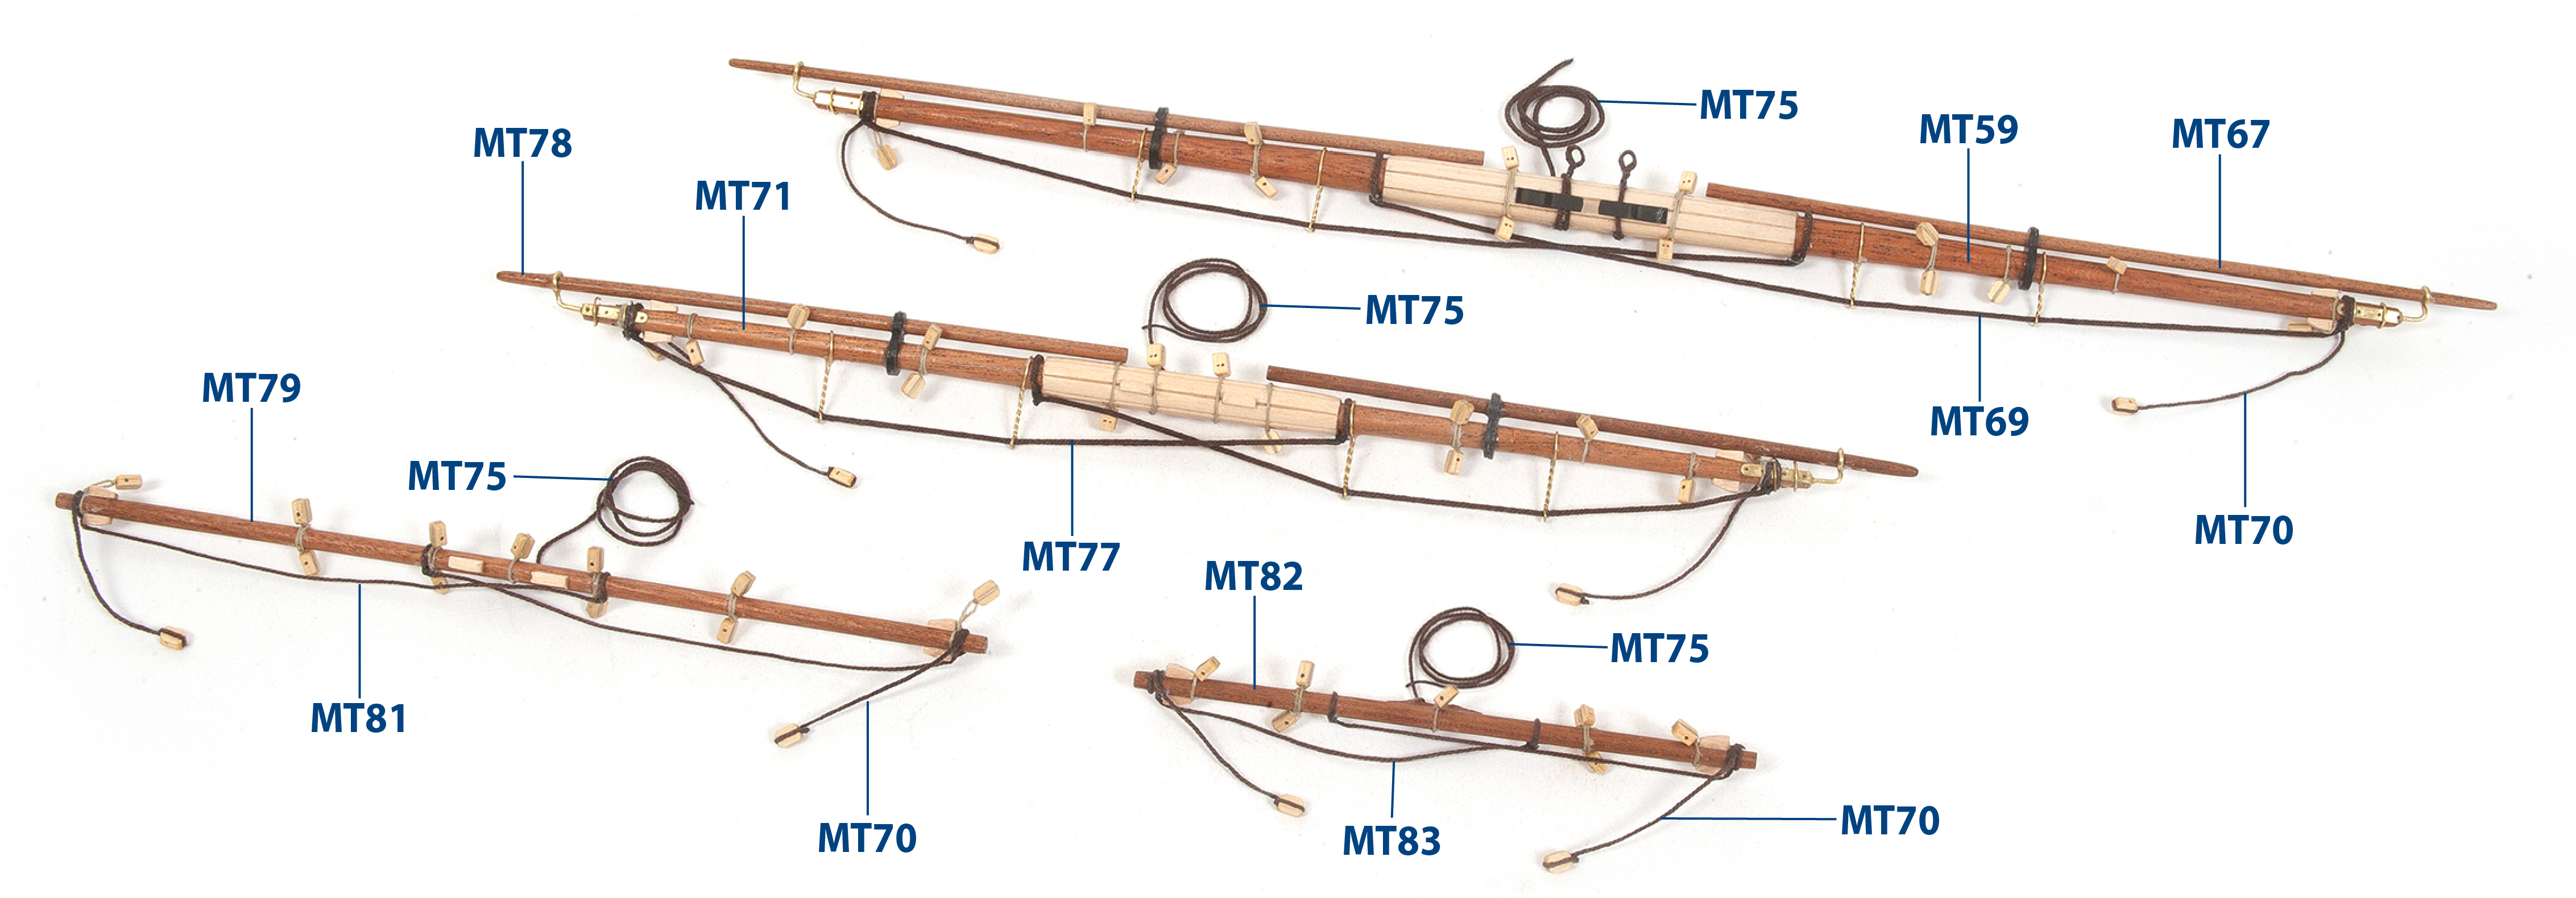
Montieren Sie die Teile MT60 (1 x 3 x 85 mm Lindenholz) an Teil MT59, wie in der Zeichnung dargestellt.
Schritt 2
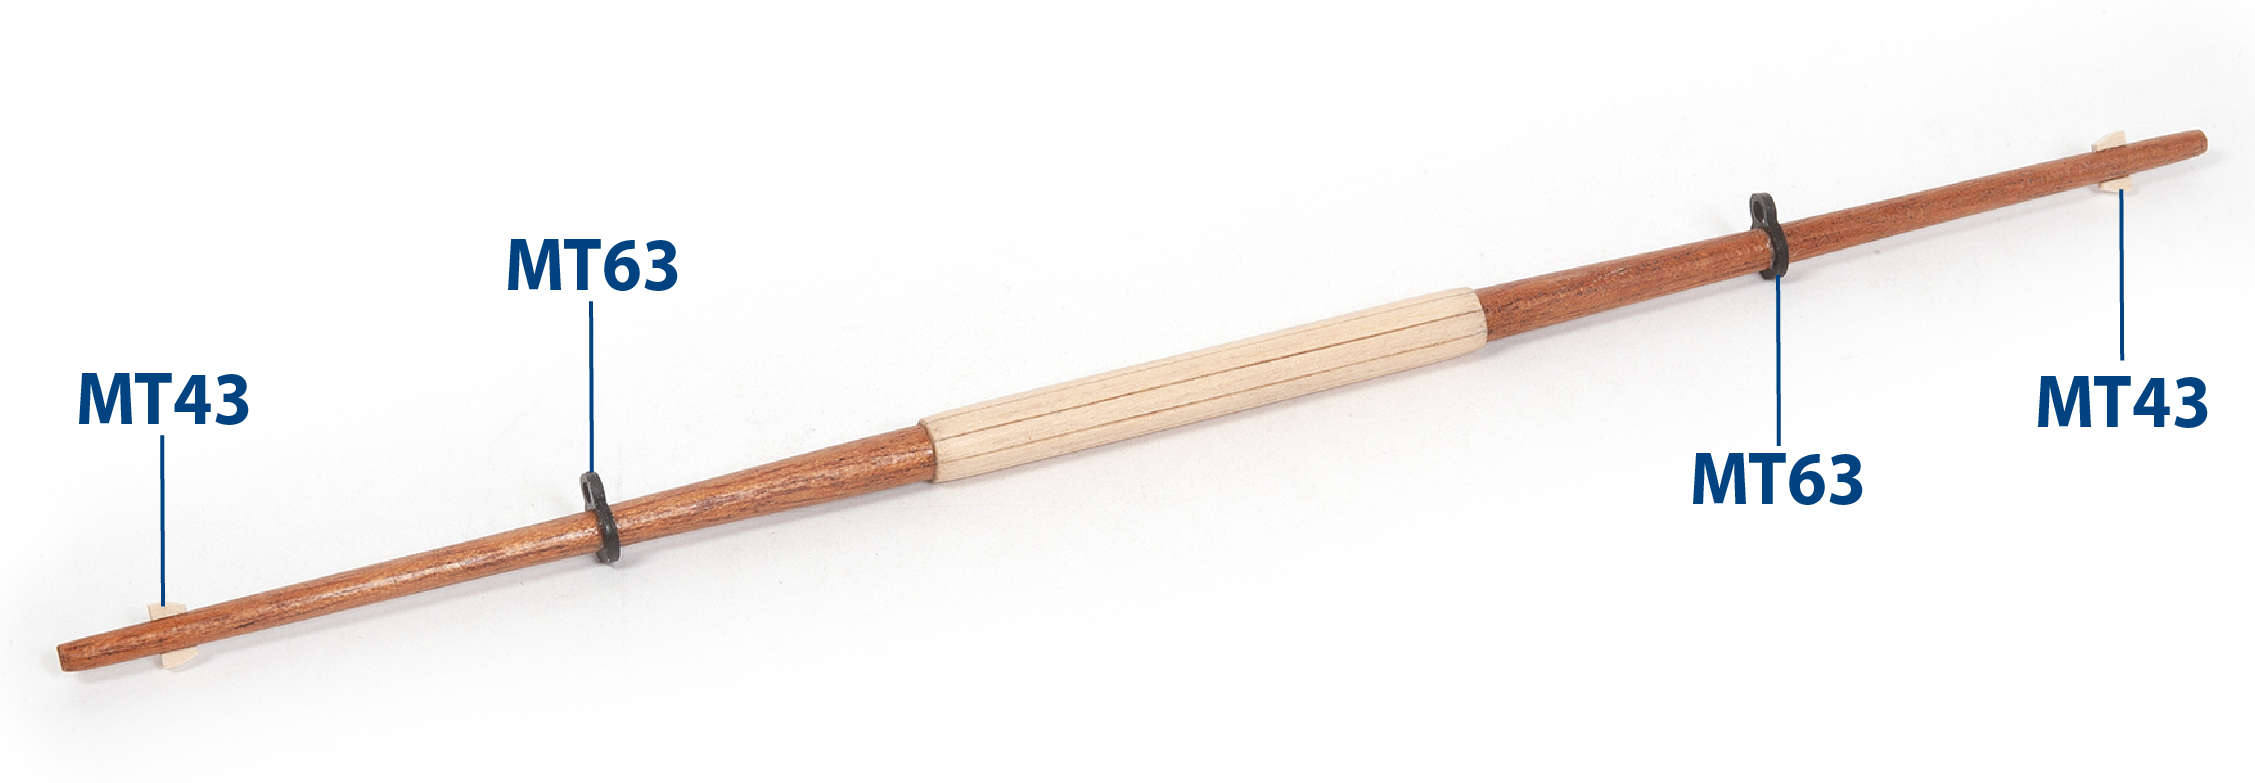
Passen und kleben Sie die Teile MT43 (2 x 2 x 5 mm Lindenholz) und MT63.
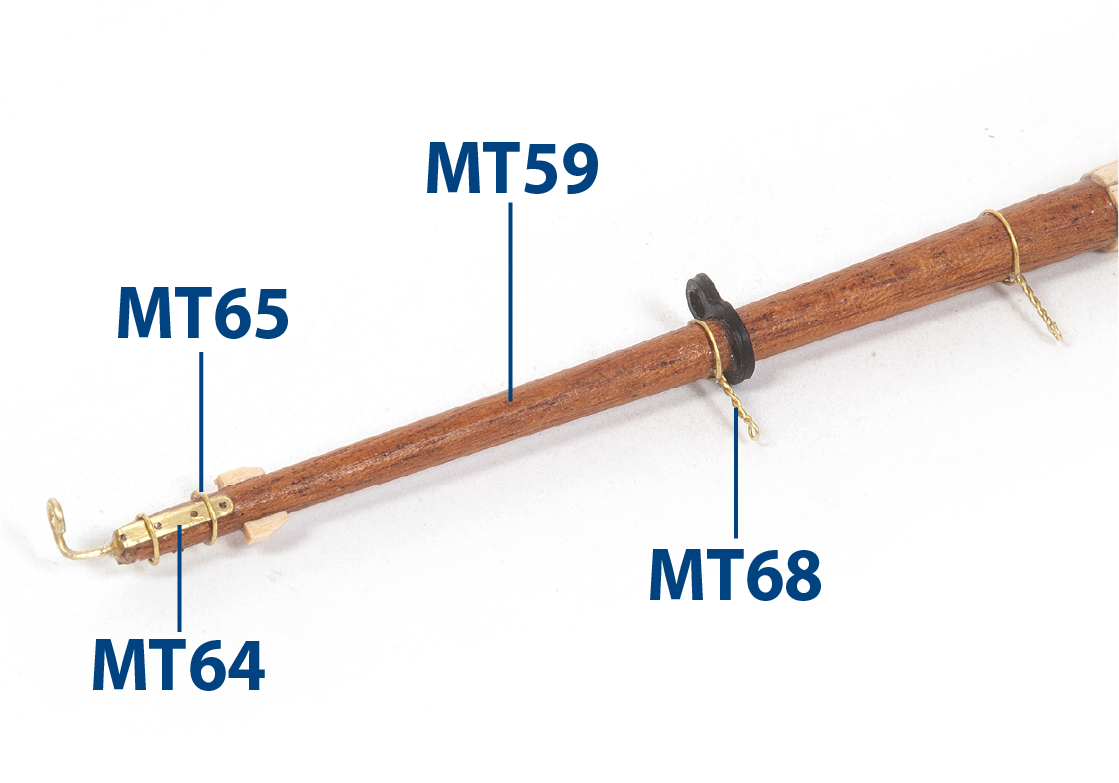
Schritt 3
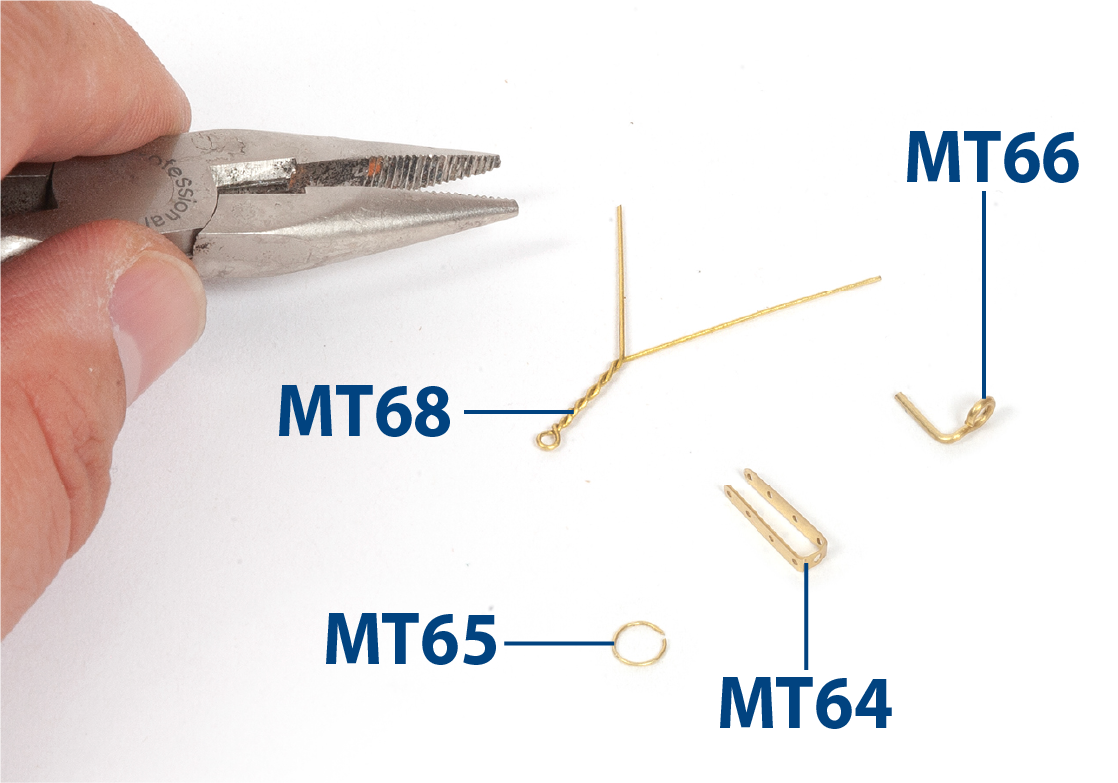
Nehmen Sie Teil MT64 aus Paket 4. Verwenden Sie Zangen, um die Teile wie im Bild gezeigt zu formen.
| MT65 | ø0,5 x 15 mm |
| MT66 | ø1 x 25 mm |
| MT68 | ø0,5 x 100 mm |
Schritt 4
Setzen Sie die Teile wie gezeigt zusammen.
Schritt 5
Nehmen Sie die Teile MT61 (Parrel-Klampen, Paket 9) und lackieren Sie sie schwarz. Montieren Sie die Teile MT61 wie gezeigt an der Baugruppe.
Schritt 6
Dieses Bild zeigt alle fertigen Fockrahen. Wiederholen Sie den Vorgang, um alle Rahen gemäß den Zeichnungen herzustellen.
| MT67 | ø3 x 160 mm Mahagoni | MT78 | ø3 x 128 mm Mahagoni |
| MT69 | ø0.8 x 225 mm braunes Garn | MT79 | ø5 x 182 mm Mahagoni |
| MT71 | ø6 x 243 mm Mahagoni | MT81 | ø0.5 x 175 mm braunes Garn |
| MT70 | ø0.5 x 150 mm braunes Garn | MT82 | ø4 x 115 mm Mahagoni |
| MT75 | ø0.5 x 125 mm braunes Garn | MT83 | ø0.5 x 150 mm braunes Garn |
| MT77 | ø0.8 x 200 mm braunes Garn |
Schritt 7
Die folgende Tabelle kann nützlich sein, um die Größen der verschiedenen Teile zu referenzieren.
| Teilenummer | Maße | Material | Anzahl |
| MT84 | ø10 x 420 mm | Mahagoni | 1 |
| MT85 | 1 x 5 x 229 mm | Lindenholz | 1 |
| MT86 | 1 x 5 x 92 mm | Lindenholz | 2 |
| MT87 | 2 x 3 x 8 mm | Lindenholz | 1 |
| MT88 | Vorgeschnitten | Mahagoni | 2 |
| MT89 | Vorgeschnitten | Mahagoni | 4 |
| MT90 | 3 x 3 x 75 mm | Lindenholz | 2 |
| MT91 | 3 x 3 x 14 mm | Lindenholz | 1 |
| MT92 | 3 x 3 x 13 mm | Lindenholz | 2 |
| MT93 | ø0,8 x 150 mm | Braunes Garn | 2 |
| MT94 | 2 x 5 x 83 mm | Lindenholz | 8 |
| MT95 | 2 x 5 x 24 mm | Lindenholz | 10 |
| MT96 | 2 x 2 x 30 mm | Mahagoni | 20 |
| MT97 | 1 x 5 x 195 mm | Lindenholz | 2 |
| MT98 | ø1 x 14 mm | Messing | 5 |
| MT99 | 2 x 2 x 79 mm | Mahagoni | 1 |
| MT100 | Vorgeschnitten | Mahagoni | 1 |
| MT101 | ø8 x 255 mm | Mahagoni | 1 |
| MT102 | 1 x 5 x 18 mm | Lindenholz | 5 |
| MT103 | Vorgeschnitten | Mahagoni | 2 |
| MT104 | Vorgeschnitten | Mahagoni | 1 |
| MT105 | Vorgeschnitten | Mahagoni | 1 |
| MT106 | Vorgeschnitten | Mahagoni | 1 |
| MT107 | Vorgeschnitten | Mahagoni | 1 |
| MT108 | 2 x 2 x 10 mm | Lindenholz | 4 |
| MT109 | ø6 x 131 mm | Mahagoni | 1 |
| MT110 | ø3 x 243 mm | Mahagoni | 1 |
| MT111 | 1 x 3 x 10 mm | Lindenholz | 5 |
| MT112 | ø8 x 371 mm | Mahagoni | 1 |
| MT113 | 1 x 3 x 85 mm | Lindenholz | 9 |
| MT114 | ø3 x 182 mm | Mahagoni | 2 |
| MT115 | ø0,5 x 100 mm | Messing | 8 |
| MT116 | ø0,8 x 225 mm | Braunes Garn | 2 |
| MT117 | ø6 x 279 mm | Mahagoni | 1 |
| MT118 | 1 x 3 x 58 mm | Lindenholz | 6 |
| MT119 | ø0,8 x 200 mm | Braunes Garn | 2 |
| MT120 | ø3 x 146 mm | Mahagoni | 2 |
| MT121 | ø5 x 188 mm | Mahagoni | 1 |
| MT122 | ø0,5 x 175 mm | Braunes Garn | 2 |
| MT123 | ø4 x 125 mm | Mahagoni | 1 |
| MT124 | ø0,5 x 150 mm | Braunes Garn | 2 |
| MT125 | ø8 x 322 mm | Mahagoni | 1 |
| MT126 | Vorgeschnitten | Metall | 1 |
| MT127 | 2 x 25 mm | Messing | 6 |
| MT128 | ø0,8 x 100 mm | Braunes Garn | 1 |
| MT129 | Vorgeschnitten | Mahagoni | 2 |
| MT130 | Vorgeschnitten | Mahagoni | 4 |
| MT131 | 3 x 3 x 12 mm | Lindenholz | 1 |
| MT132 | 3 x 3 x 58 mm | Lindenholz | 2 |
| MT133 | 3 x 3 x 13 mm | Lindenholz | 2 |
| MT134 | ø5 x 182 mm | Mahagoni | 1 |
| MT135 | Vorgeschnitten | Messing | 10 |
| MT136 | ø0,8 x 150 mm | Braunes Garn | 1 |
| MT137 | 2 x 5 x 64 mm | Lindenholz | 6 |
| MT138 | 2 x 5 x 20 mm | Lindenholz | 8 |
| MT139 | 2 x 2 x 25 mm | Mahagoni | 20 |
| MT140 | 1 x 5 x 150 mm | Lindenholz | 2 |
| MT141 | ø1 x 31 mm | Messing | 8 |
| MT142 | ø1 x 14 mm | Messing | 5 |
| MT143 | 2 x 2 x 60 mm | Mahagoni | 1 |
| MT144 | Vorgeschnitten | Mahagoni | 1 |
| MT145 | ø6 x 195 mm | Mahagoni | 1 |
| MT146 | 1 x 5 x 13 mm | Lindenholz | 5 |
| MT147 | Vorgeschnitten | Mahagoni | 2 |
| MT148 | Vorgeschnitten | Mahagoni | 1 |
| MT149 | Vorgeschnitten | Mahagoni | 1 |
| MT150 | Vorgeschnitten | Mahagoni | 1 |
| MT151 | Vorgeschnitten | Mahagoni | 1 |
| MT152 | Vorgeschnitten | Metall | 2 |
| MT153 | ø5 x 96 mm | Mahagoni | 1 |
| MT154 | ø3 x 201 mm | Mahagoni | 1 |
| MT155 | 1 x 3 x 15 mm | Lindenholz | 5 |
| MT156 | ø6 x 298 mm | Mahagoni | 1 |
| MT157 | 1 x 3 x 58 mm | Lindenholz | 6 |
| MT158 | ø0,5 x 100 mm | Messing | 4 |
| MT159 | ø0,5 x 100 mm | Braunes Garn | 1 |
| MT160 | ø0,8 x 200 mm | Braunes Garn | 2 |
| MT161 | ø5 x 193 mm | Mahagoni | 1 |
| MT162 | Vorgeschnitten | Mahagoni | 2 |
| MT163 | ø0,8 x 200 mm | Braunes Garn | 2 |
| MT164 | ø4 x 127 mm | Mahagoni | 1 |
| MT165 | ø0,5 x 175 mm | Braunes Garn | 2 |
| MT166 | ø4 x 85 mm | Mahagoni | 1 |
| MT167 | ø0,5 x 150 mm | Braunes Garn | 2 |
| MT168 | ø4 x 211 mm | Mahagoni | 1 |
| MT169 | Vorgeschnitten | Mahagoni | 2 |
| MT170 | ø0,8 x 80 mm | Braunes Garn | 4 |
| MT171 | Vorgeschnitten | Metall | 1 |
| MT172 | 2 x 2 x 4 mm | Lindenholz | 8 |
| MT173 | ø4 x 157 mm | Mahagoni | 1 |
| MT174 | Vorgeschnitten | Mahagoni | 2 |
| MT175 | ø0,5 x 100 mm | Braunes Garn | 4 |
| MT176 | ø0,5 x 175 mm | Braunes Garn | 1 |