Pack 08
BUILD INSTRUCTIONS
Instructions for building your Cutty Sark model ship
Your model of the Cutty Sark is divided into 12 packs.
You will need to follow the step-by-step assembly photos, the plans and the explanatory texts below.
Please save the leftover materials from each pack for use when instructed to do so at a later stage of the assembly instructions.
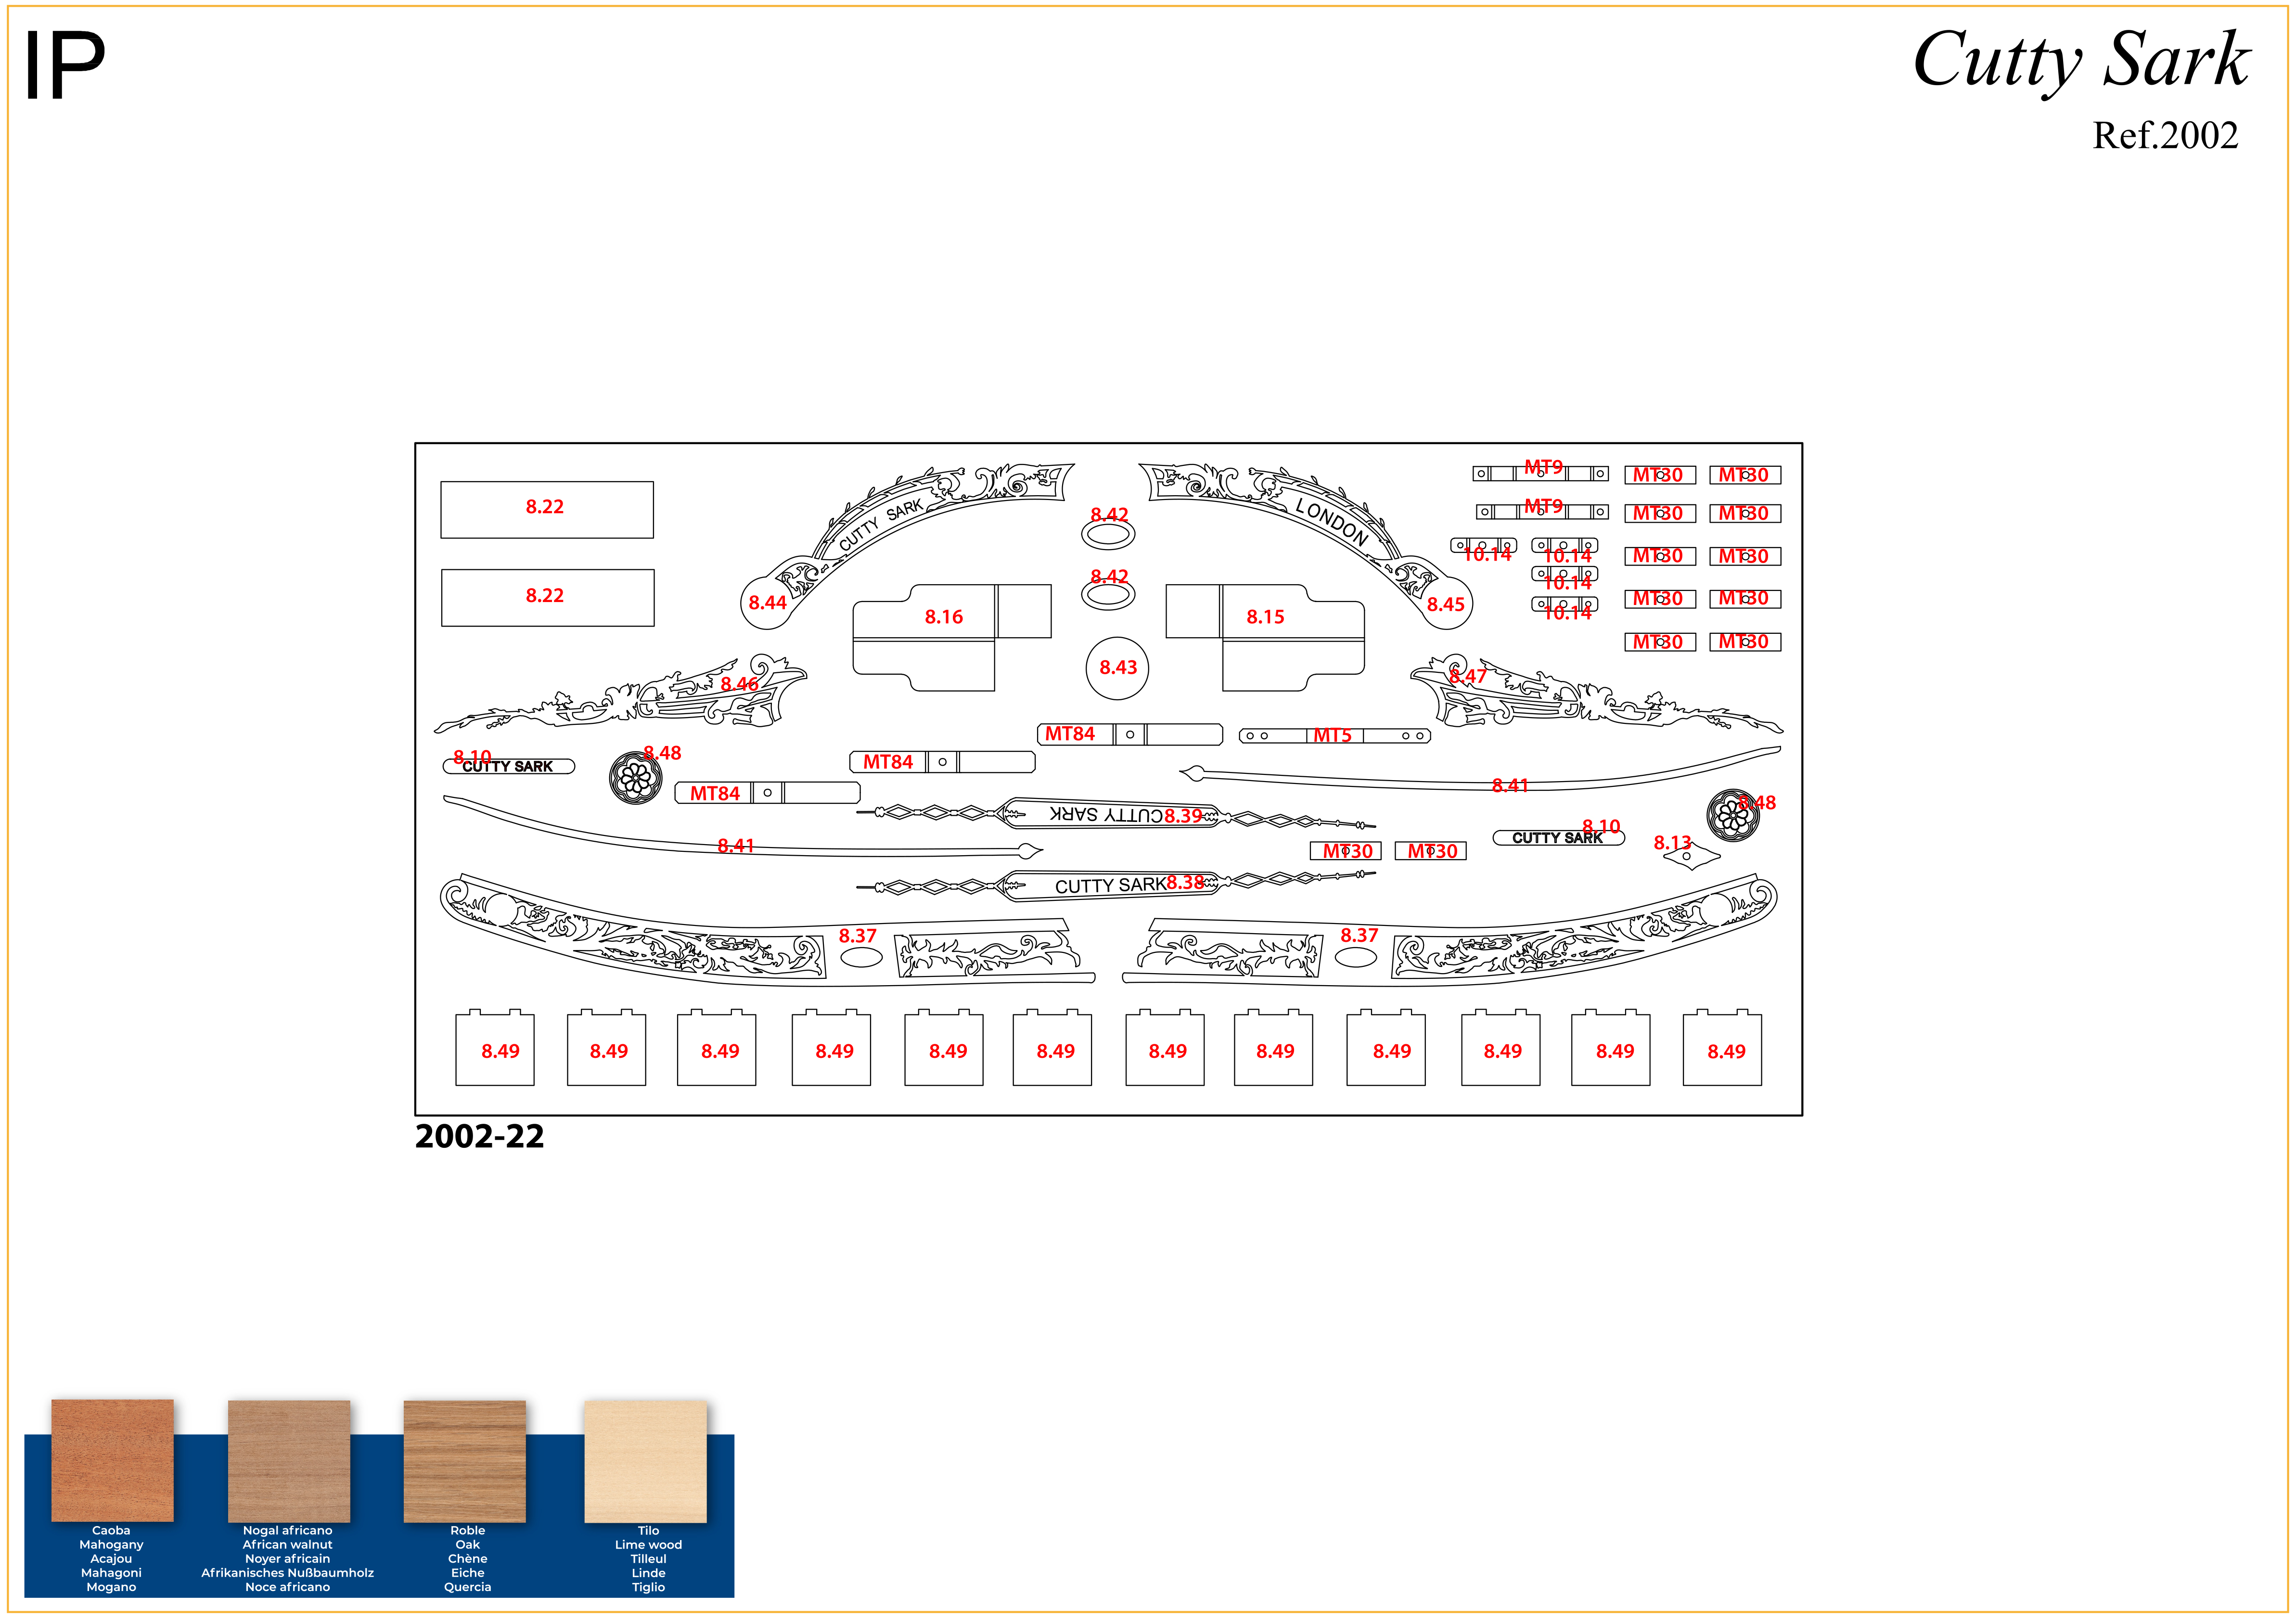
The IP sheets displayed below are drawings of laser-cut parts and photo-etched brass parts and will serve as a guide for identification of some parts.
Use the PARTS REFERENCE table to help locate the parts.
The PL-00 templates (printed at 1/1 scale) will serve as a guide for building the frames.
Please check the list below to ensure you have all the tools required for building your wooden ship.
When removing a part, cut the ribs that join the part to the wooden plate with a cutter.
Remove the parts carefully so as not to break them.
Keep and store the parts in their frames. Only remove the parts you are working on in each step.
Extra support can be found on our forum.
PARTS LIST
| Material | Quantity | |
| Brass Sheet | ||
| 2002-22 | 1 | |
| Other | ||
| Accomodation-ladder davit (10.23) | 1 | |
| Anchor davit (9.30) | 2 | |
| Ship's wheel (8.8) | 1 | |
| Railing stanchion (9.17 / 10.18) | 50 | |
| Stanchion (P) | 14 | |
| Deadeye (ø4 mm) (F) | 140 | |
| Deadeye (ø5 mm) (G) | 65 | |
| Small railing stanchion (9.16) | 15 | |
| Cathead band (10.7) | 2 | |
| Bow decoration (9.38) | 2 | |
| Fairlead (9.25) | 2 | |
| Figurehead (9.39) | 1 | |
| Chain (1.1 x 3000 mm) | Brass | 1 |
| Wire (ø1.50 x 400 mm) | Brass | 4 |
| Wire (ø0.50 x 400 mm) | Brass | 20 |
| Paint | ||
| Red (30 ml) | Acrylic | 1 |
| Light Green (30 ml) | Acrylic | 1 |
| Judea Bitumen (30 ml) | 1 |
Tools you will need: cutting mat, pencil, cutting knife, fine-grit sandpaper or sponge sandpaper, file, white wood glue, super glue (cyanoacrylate glue), masking tape, set square, hacksaw, sanding block, 30 cm steel ruler, clamps, moulding scriber tool
PACK 08 IDENTIFICATION SHEETS
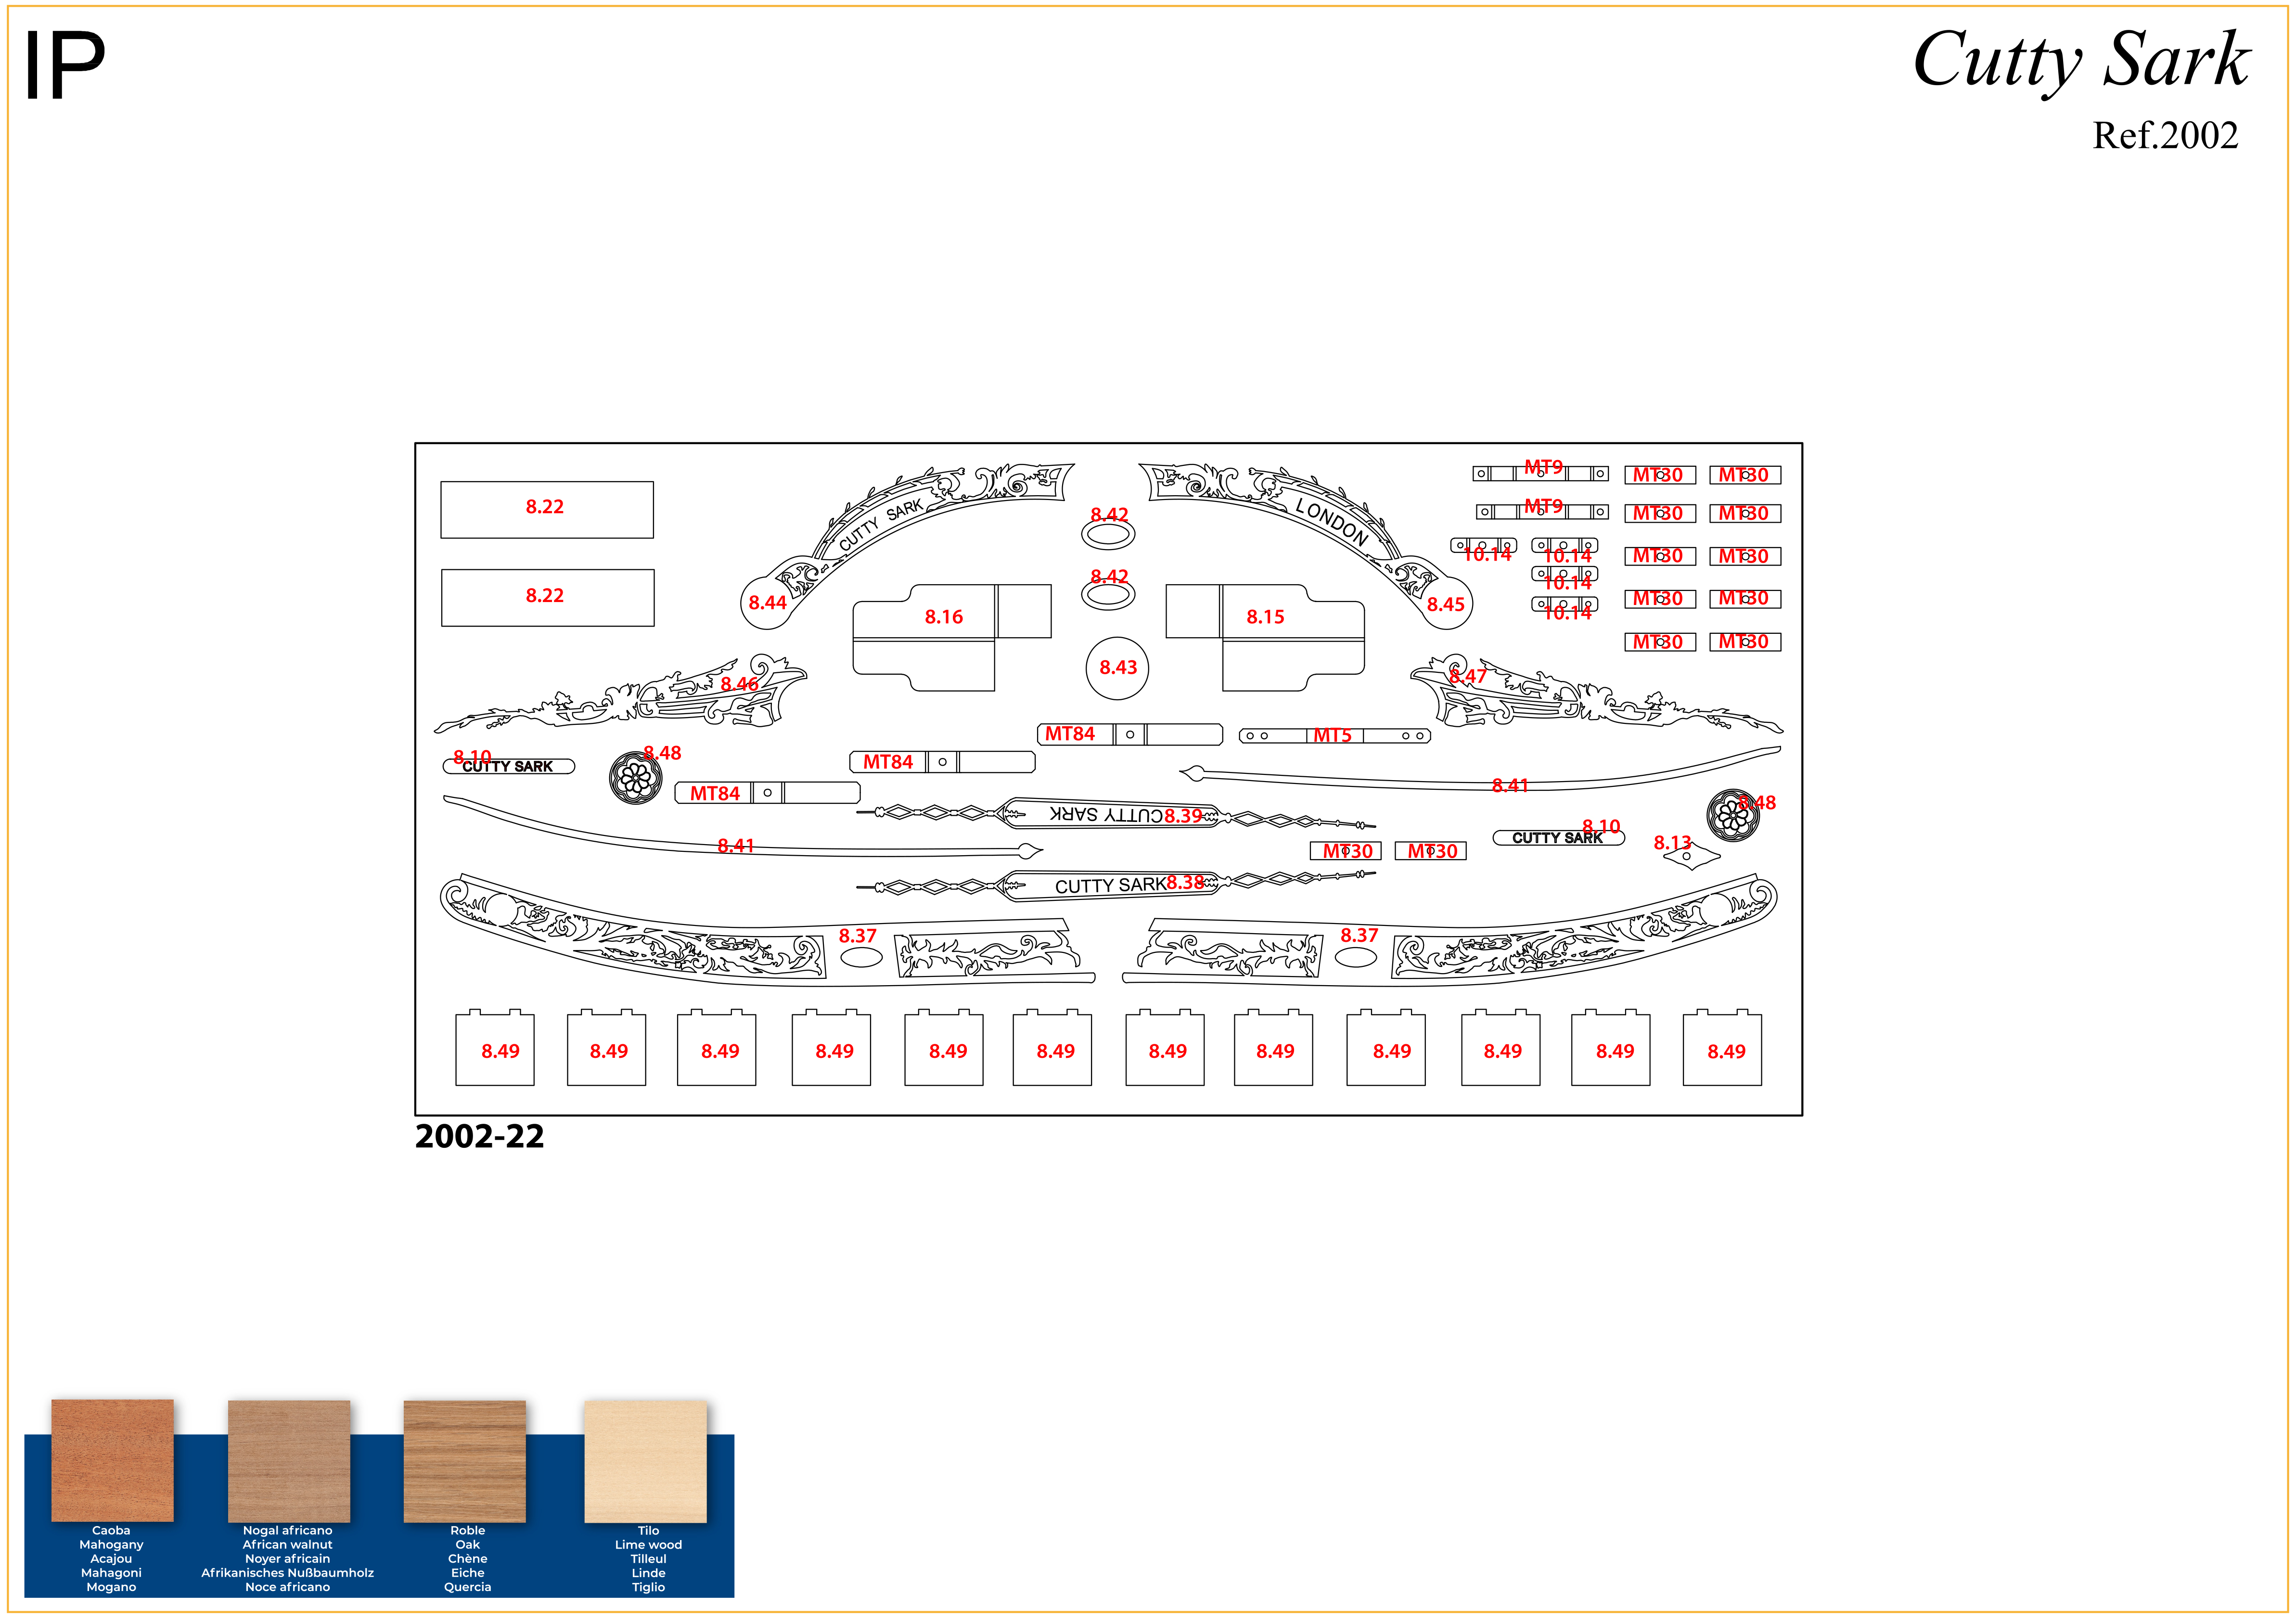
PARTS REFERENCE
PART NO. | IP-SHEET LOCATION | PART NO. | IP-SHEET LOCATION |
| 8.3 | 2002-26 (pack 7) | 8.34 | 2002-27 (pack 7) |
| 8.4 | 2002-26 (pack 7) | 8.35 | 2002-27 (pack 7) |
| 8.7 | 2002-26 (pack 7) | 8.36 | 2002-27 (pack 7) |
| 8.10 | 2002-22 | 8.37 | 2002-22 |
| 8.13 | 2002-22 | 8.38 | 2002-22 |
| 8.15 | 2002-22 | 8.39 | 2002-22 |
| 8.16 | 2002-22 | 8.41 | 2002-22 |
| 8.19 | 2002-26 (pack 7) | 8.42 | 2002-22 |
| 8.20 | 2002-26 (pack 7) | 8.43 | 2002-22 |
| 8.21 | 2002-26 (pack 7) | 8.44 | 2002-22 |
| 8.22 | 2002-22 | 8.45 | 2002-22 |
| 8.23 | 2002-26 (pack 7) | 8.46 | 2002-22 |
| 8.24 | 2002-26 (pack 7) | 8.47 | 2002-22 |
| 8.26 | 2002-26 (pack 7) | 8.48 | 2002-22 |
| 8.30 | 2002-26 (pack 7) | 8.49 | 2002-22 |
| 8.31 | 2002-26 (pack 7) |
For extra support and guidance, John Builds Iconic Military Models demonstrates his build of the Cutty Sark on his YouTube channel, sharing 30+ years of wooden ship-building experience. Experts can be found on our Forum.
Step 1
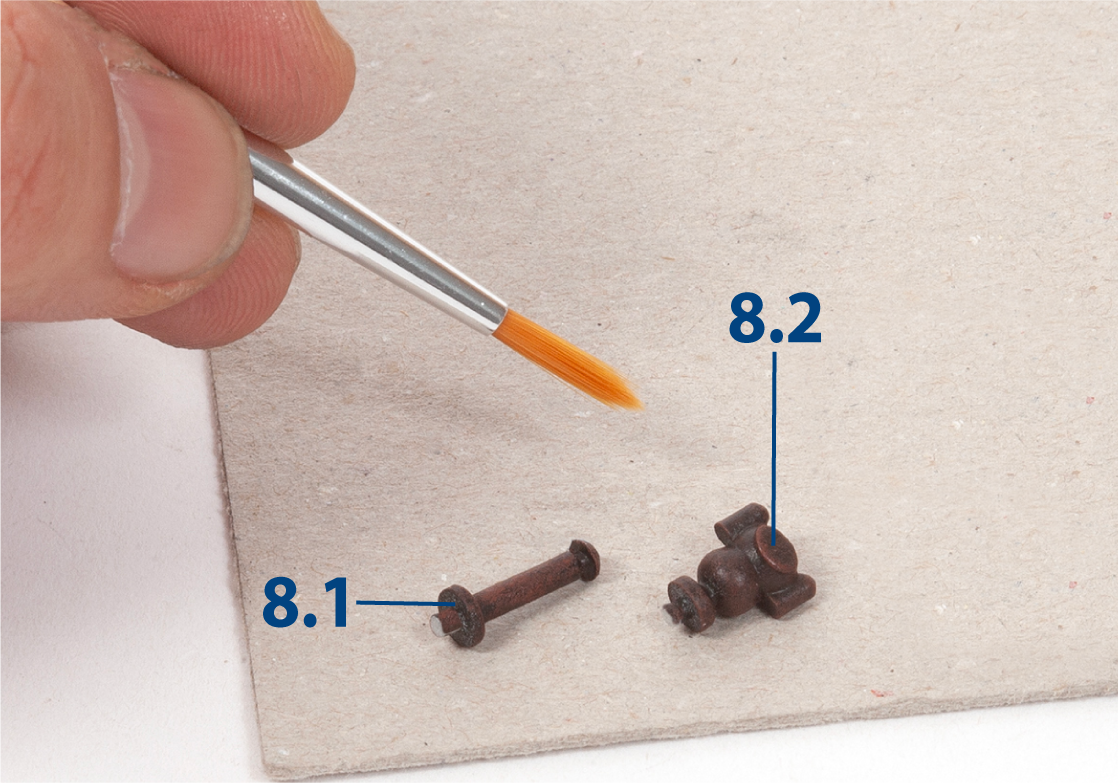
Paint parts 8.1 and 8.2 black, then dry-brush them with dark red paint.
Step 2
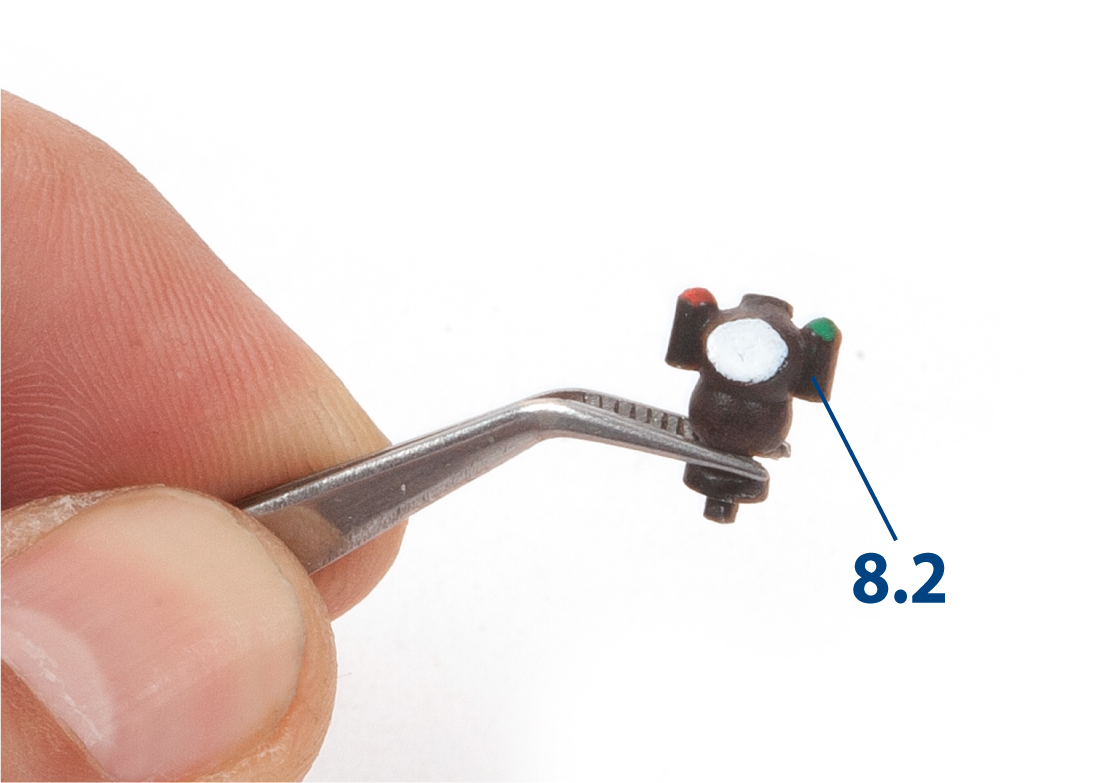
Paint the areas of part 8.2 red, white and green, as shown.
Step 3
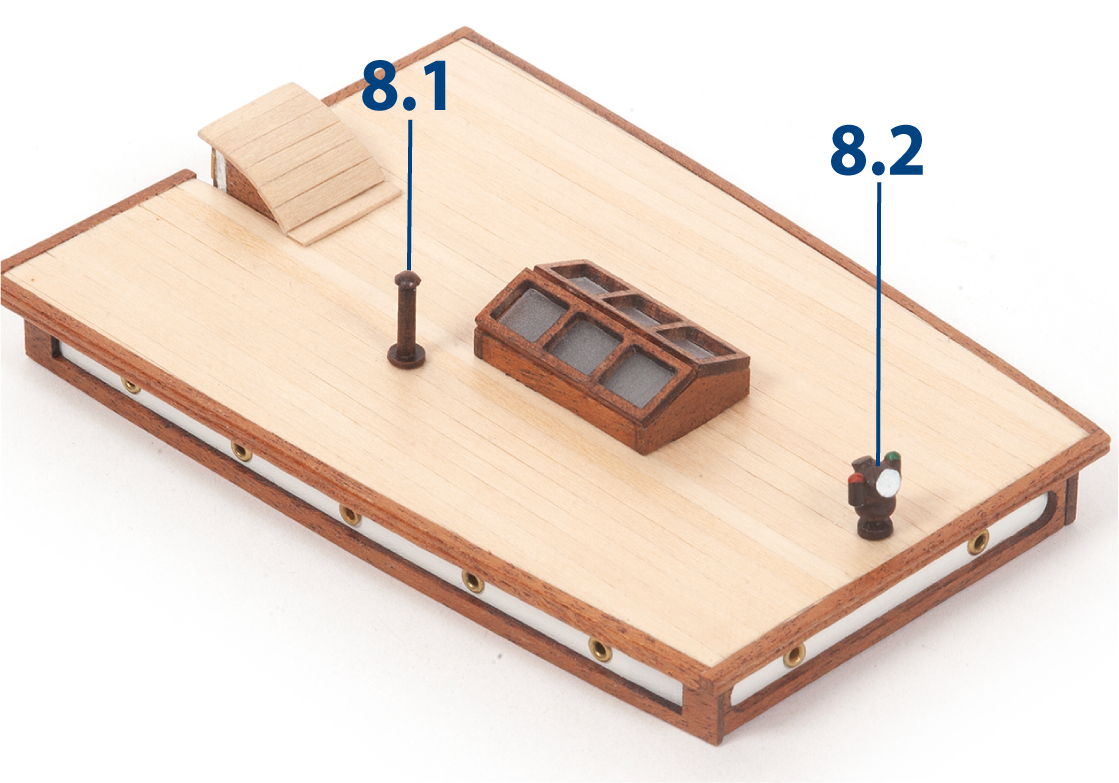
Glue parts 8.1 and 8.2 to the roof of the poop deckhouse, as shown.
Step 4
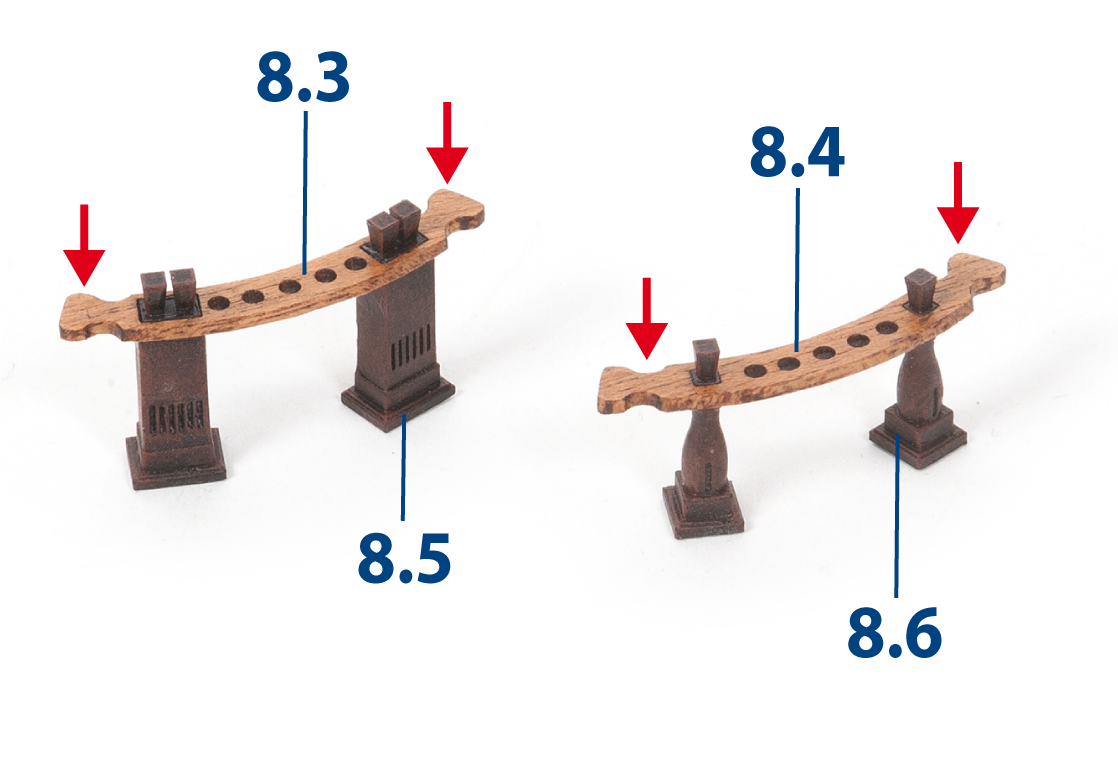
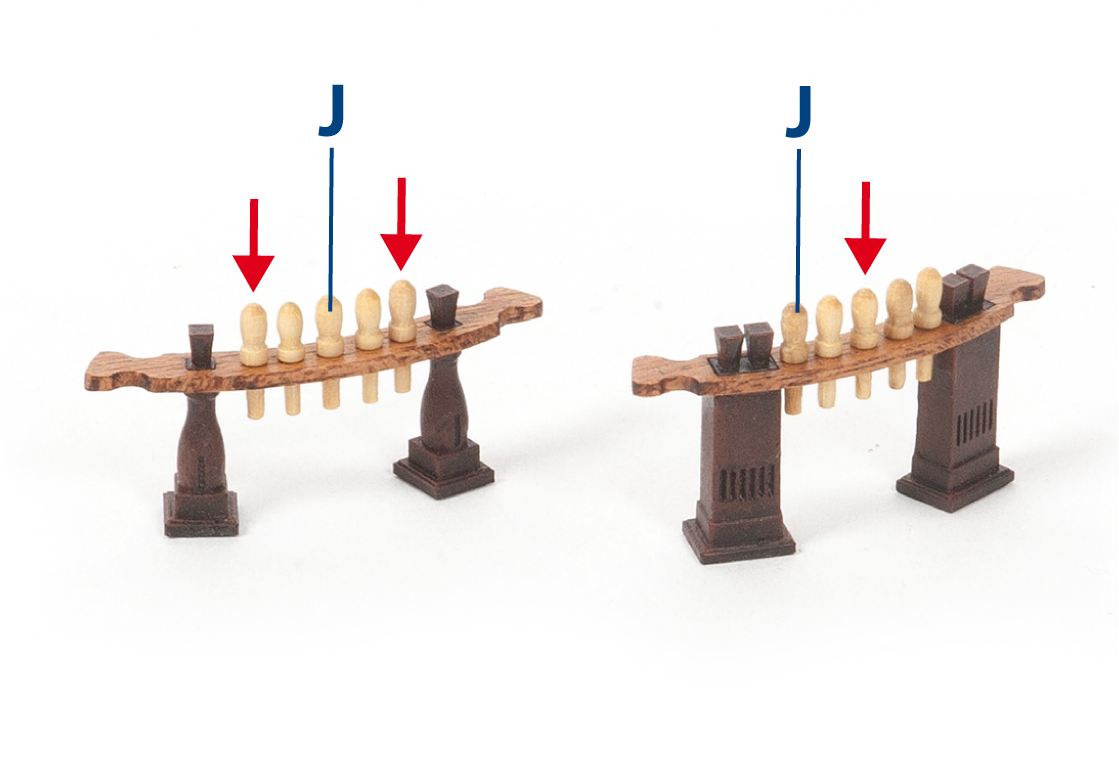
Paint parts 8.5 and 8.6 black, then dry-brush them with dark red paint. Then fit and glue pin rails 8.3 and 8.4 to the pin-rail posts, as shown.
Step 5
Apply varnish to the wooden parts. Then glue belaying pins J into the pin rails, as shown.
Step 6
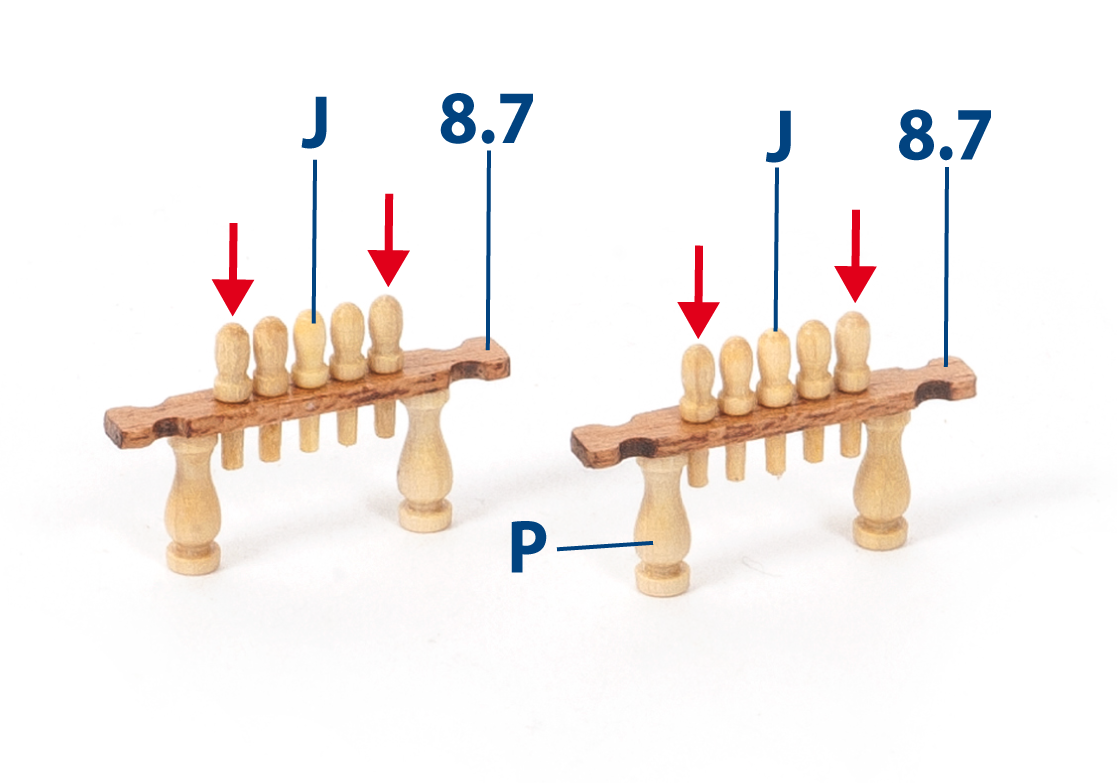
Build the remaining pin rails using parts 8.7 and P and belaying pins J, as shown.
Step 7
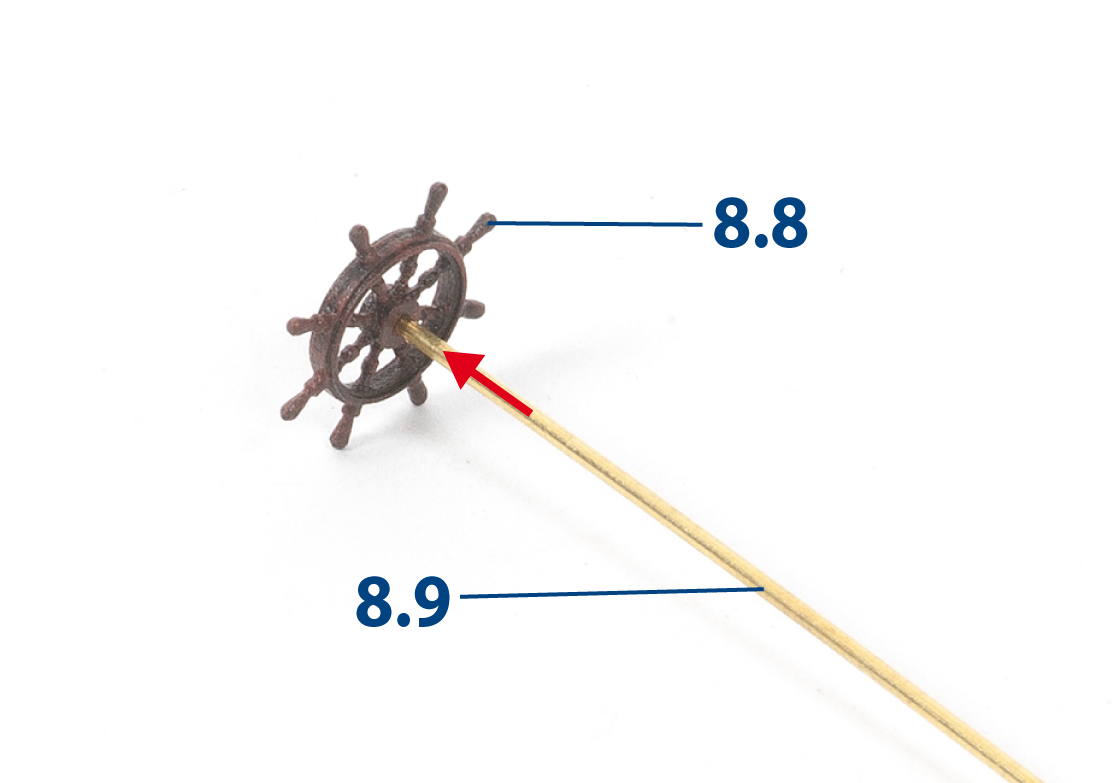
Paint the ship’s wheel black, then dry-brush it with dark red paint. Then insert and glue wheel shaft 8.9 (ø1.5 mm brass wire) into the ship’s wheel.
Step 8
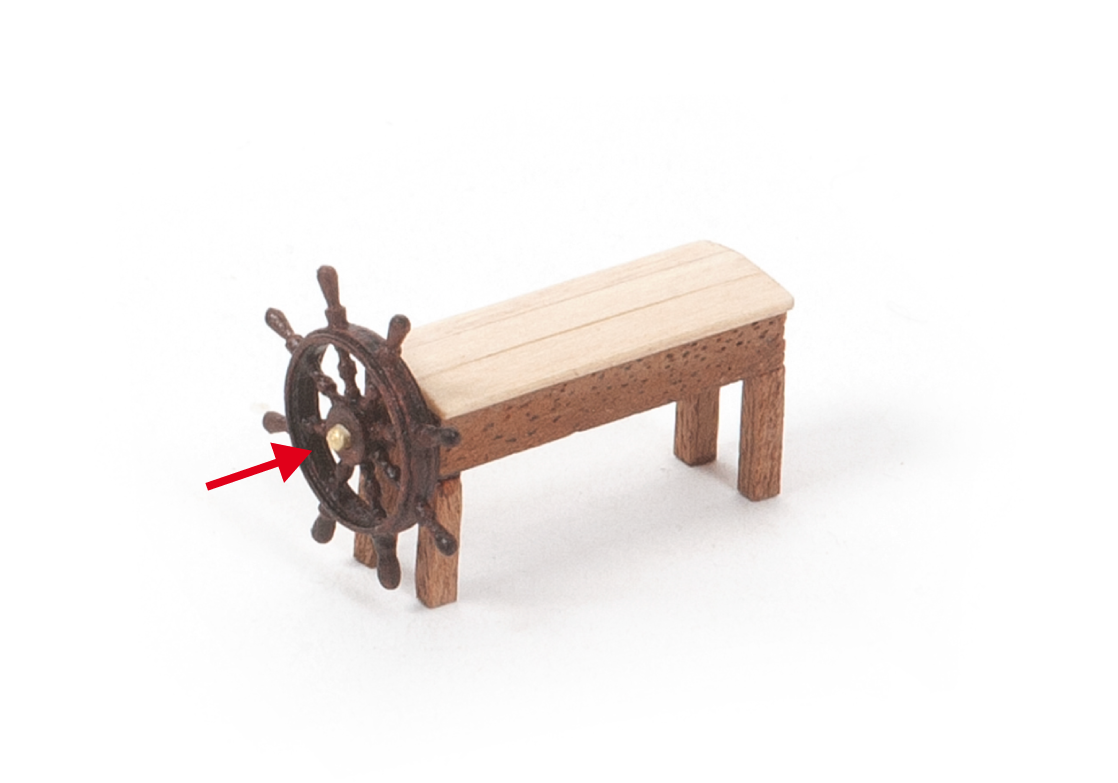
Adjust the length of the wheel shaft, then insert and glue it into the steering gear housing built in Pack 5.
Step 9
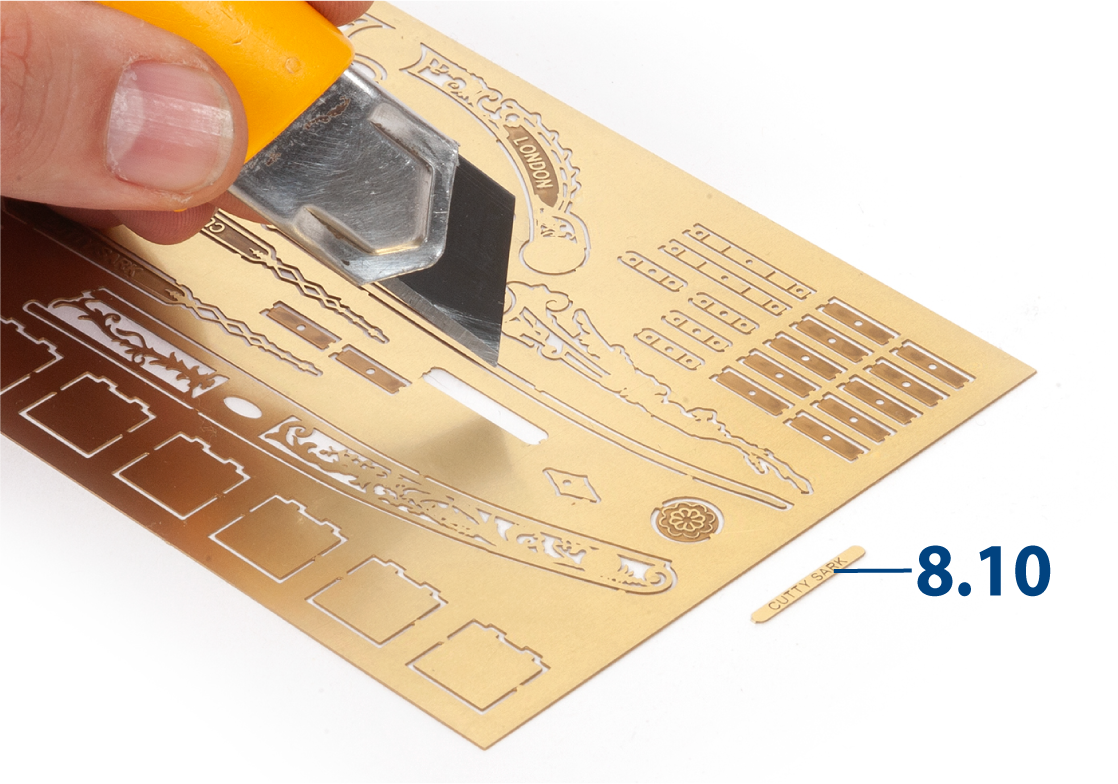
Cut parts 8.10 from the brass sheet using a craft knife. File away any remaining tabs. The brass sheet may have a thin transparent coating that gives it a glazed appearance. Remove the coating with a stiff-bristled brush.
Step 10
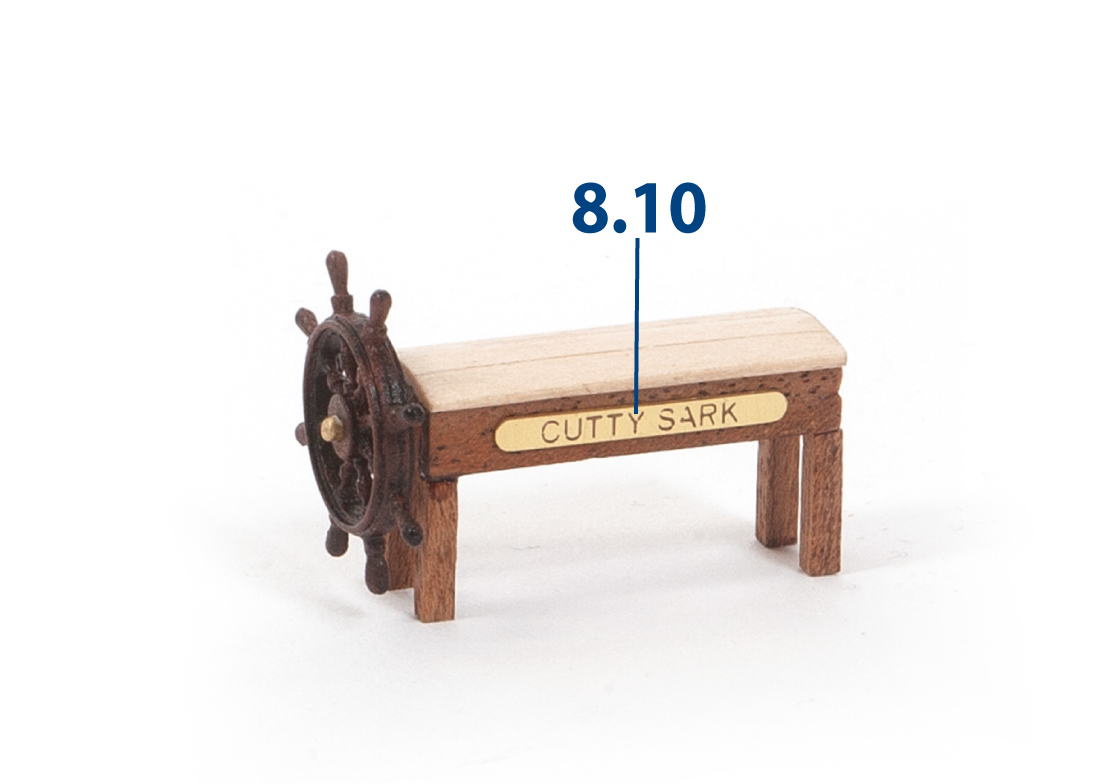
Glue parts 8.10, one on each side of the steering gear housing.
Step 11
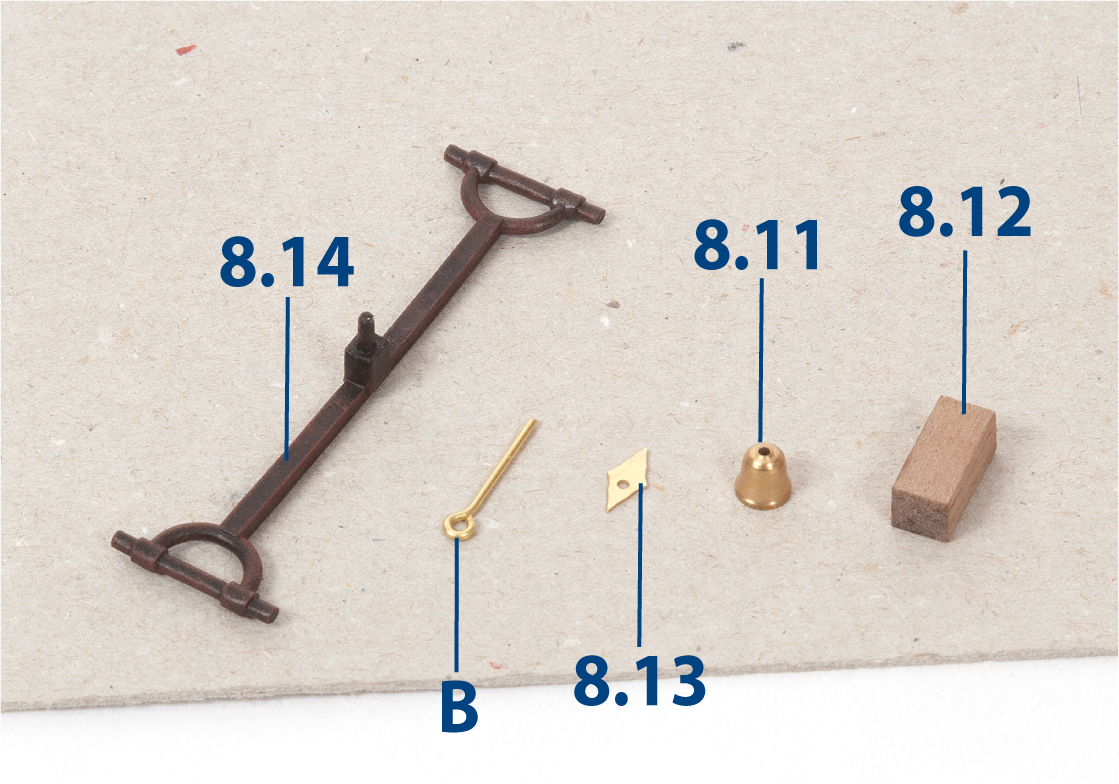
Prepare the parts shown. Remove part 8.13 from the brass sheet. Cut part 8.12 to length (5 x 5 x 12 mm African walnut). Paint part 8.14 black, then dry-brush it with dark red paint.
Step 12
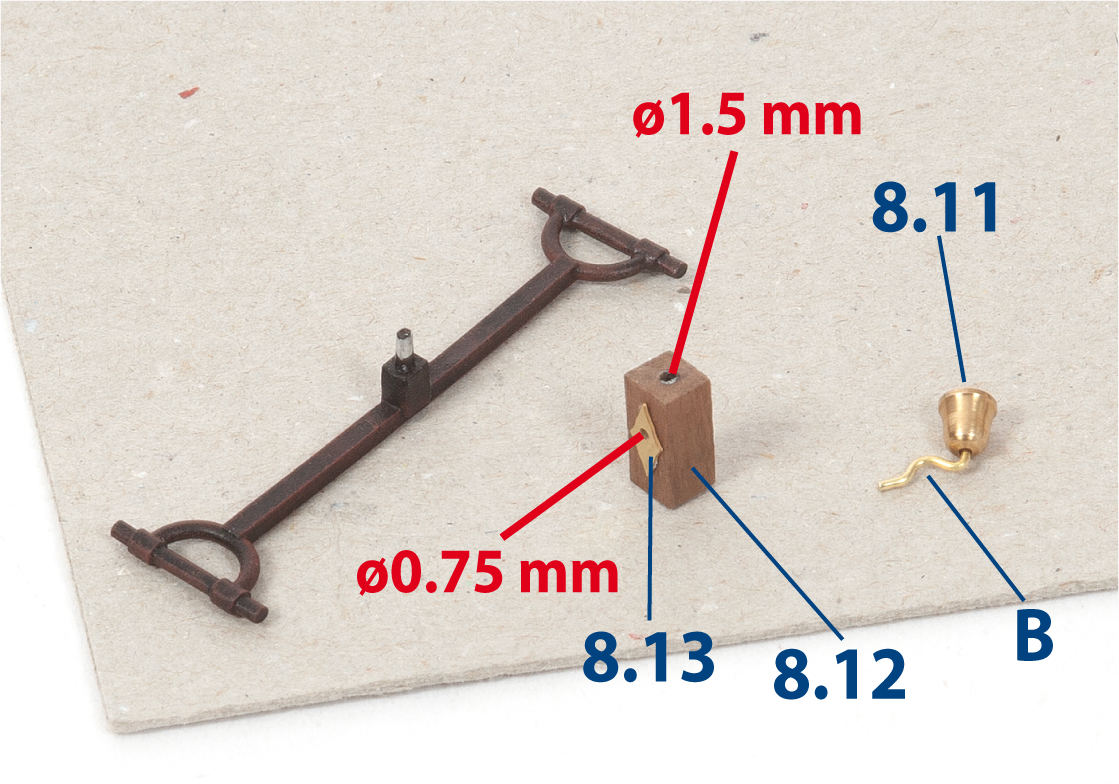
Insert an eyebolt B into the ship’s bell and bend it into shape using pliers. Then glue part 8.13 to part 8.12. Drill a ø1.5 mm hole and a ø0.75 mm hole in part 8.12, as shown.
Step 13
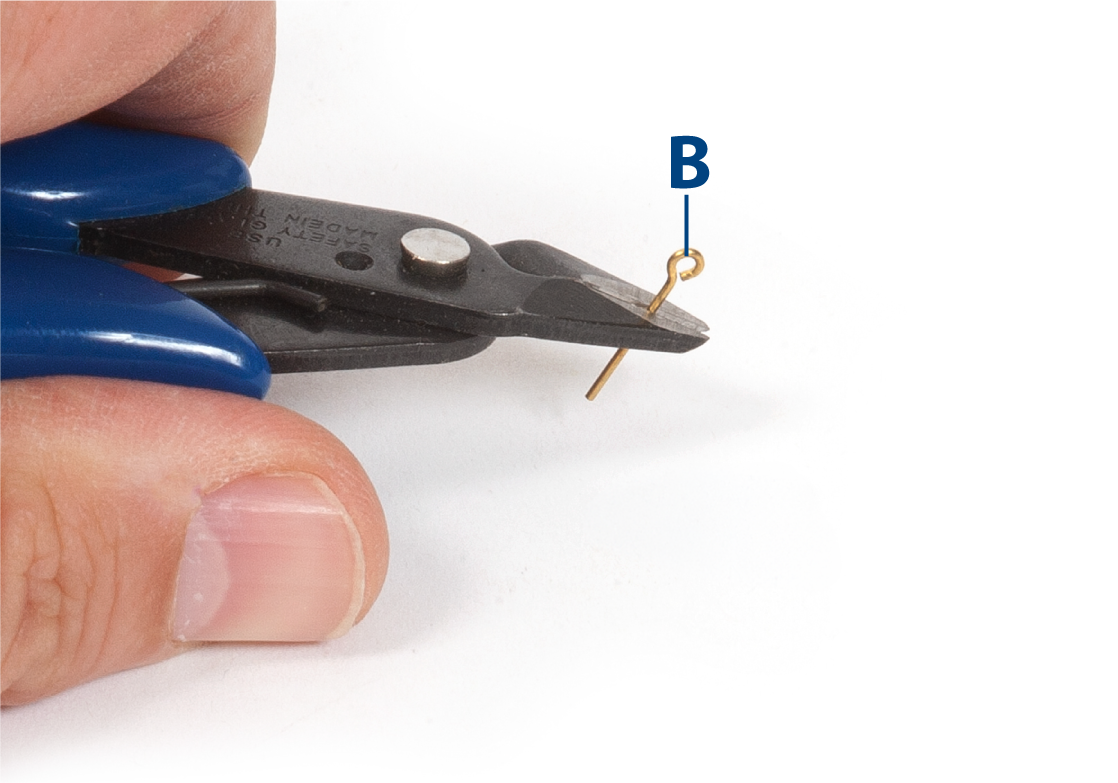
Cut the stem off an eyebolt B.
Step 14
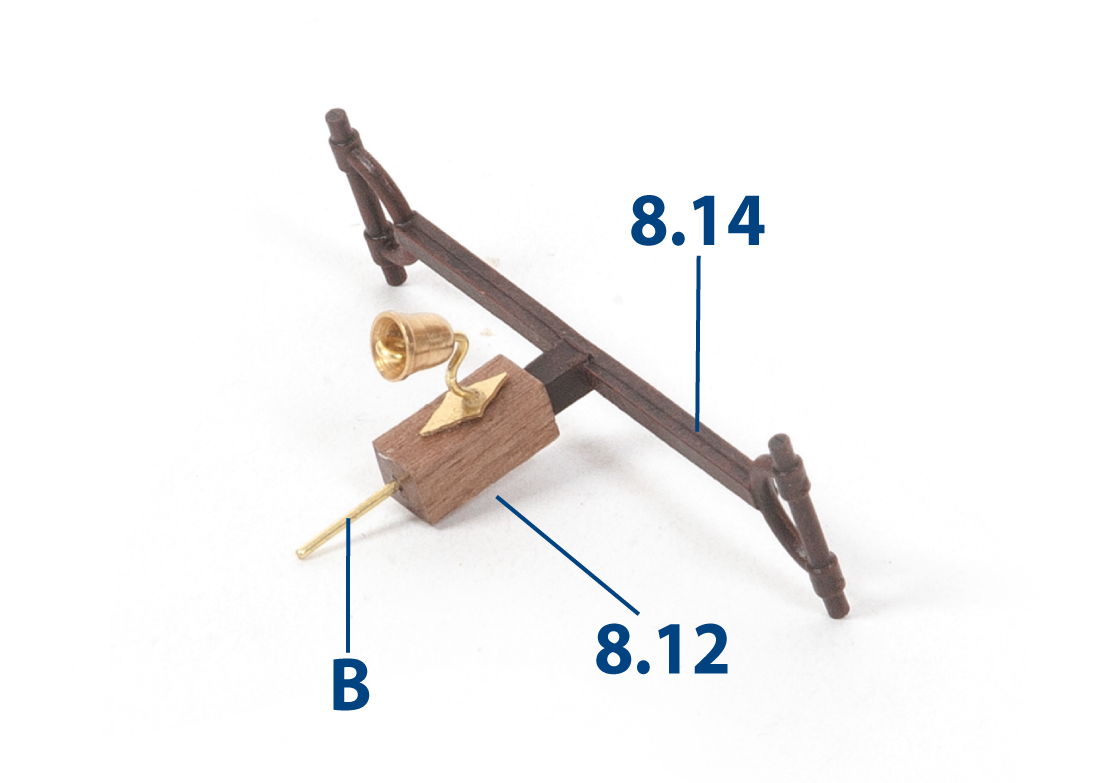
Drill a hole in the base of part 8.12. Insert the stem of eyebolt B into the hole and secure the eyebolt. Fit and glue the parts together as shown.
Step 15
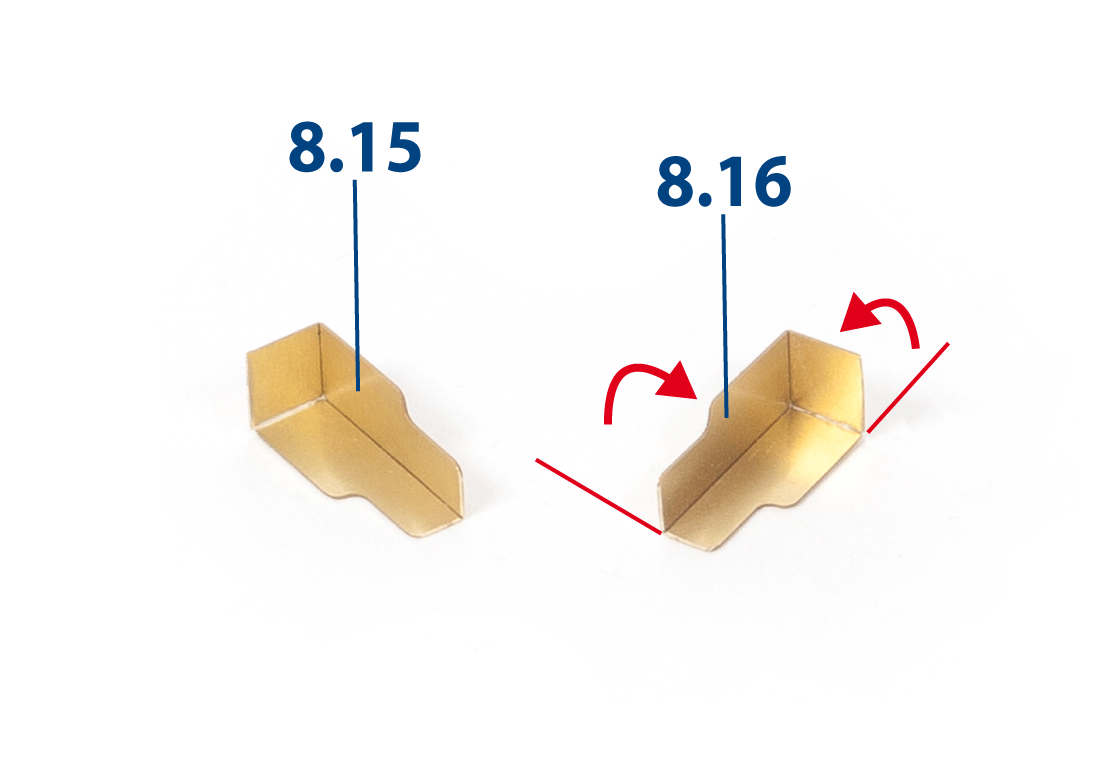
Cut parts 8.15 and 8.16 from the brass sheet. Then bend the parts upwards as shown.
Step 16
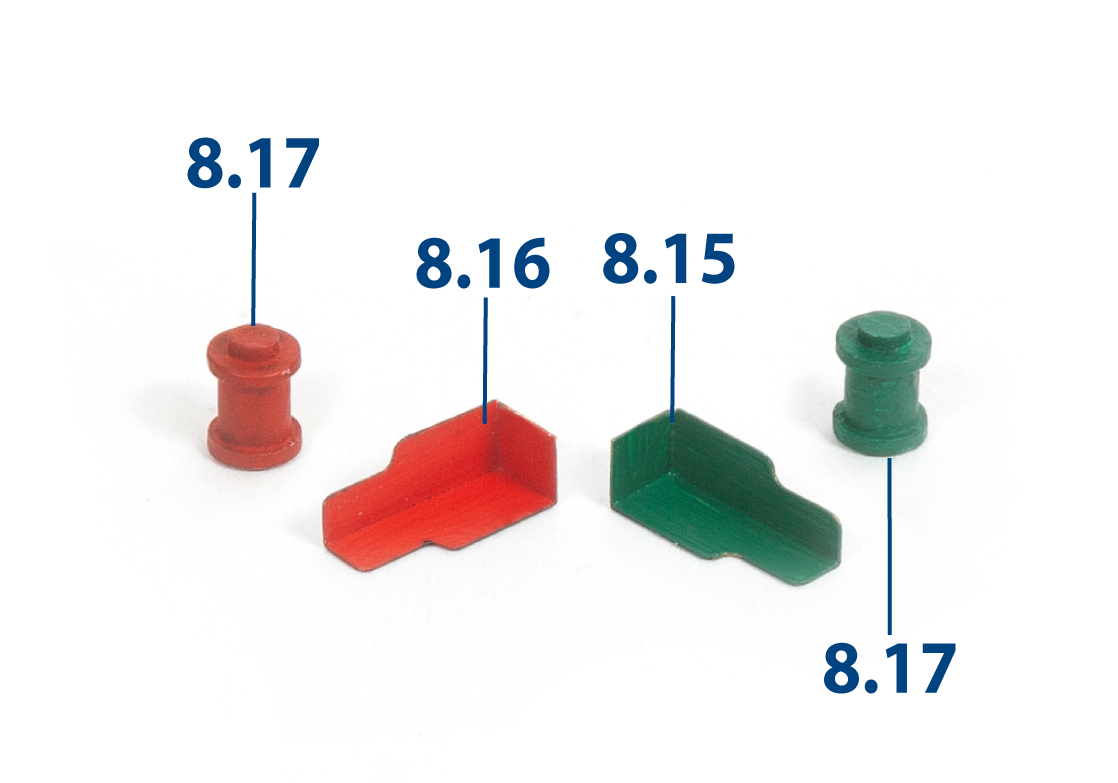
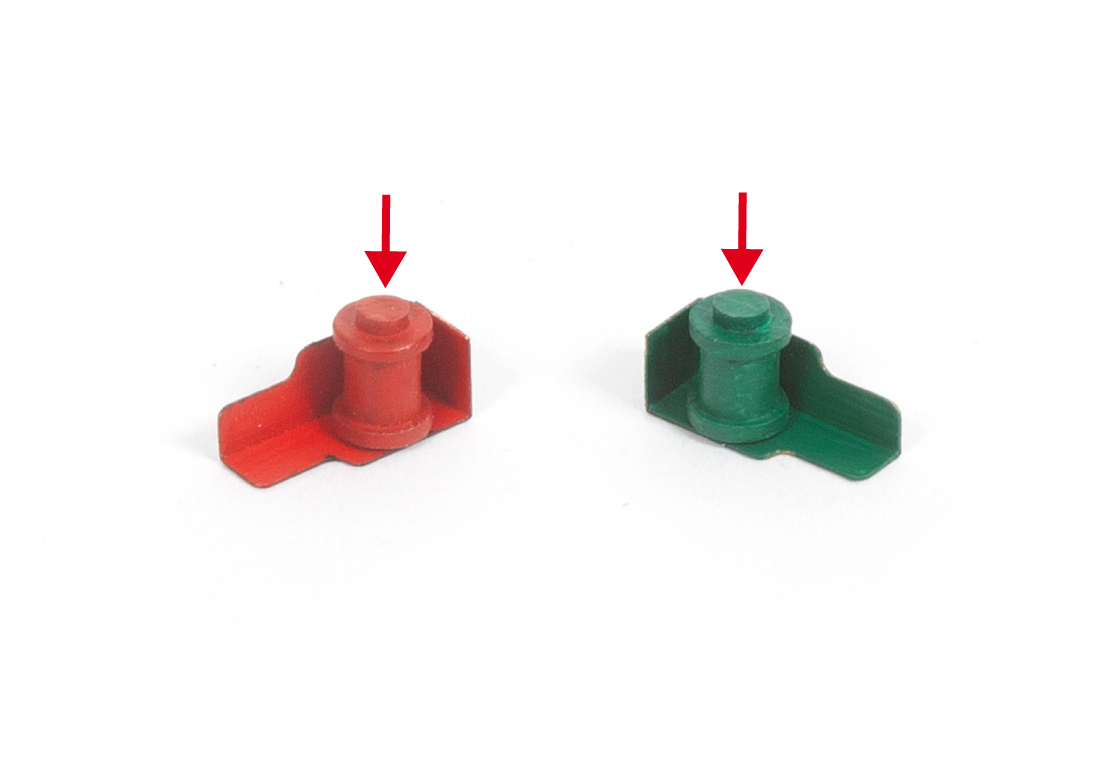
Paint one navigation light 8.17 and navigation-light housing 8.15 green. Paint the other navigation light 8.17 and navigation-light housing 8.16 red, as shown.
Step 1
Glue each navigation light 8.17 to the matching-coloured navigation-light housing, as shown.
Step 2
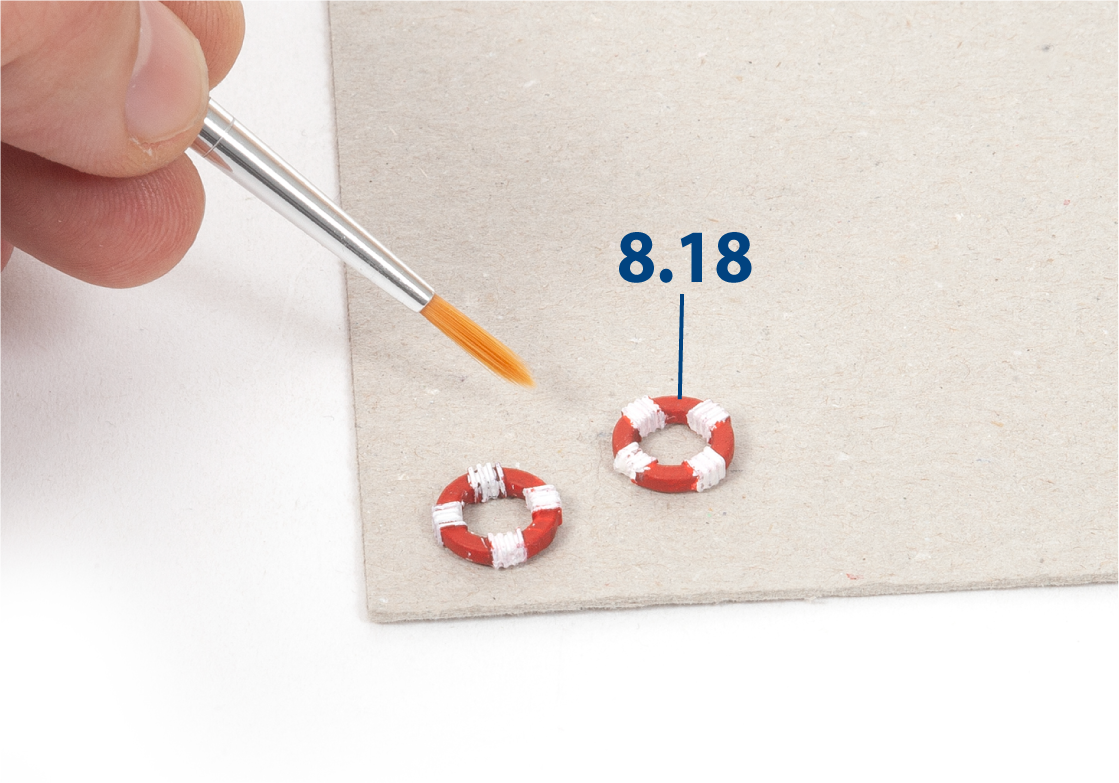
Paint lifebuoys 8.18 white and red, as shown.
Step 3
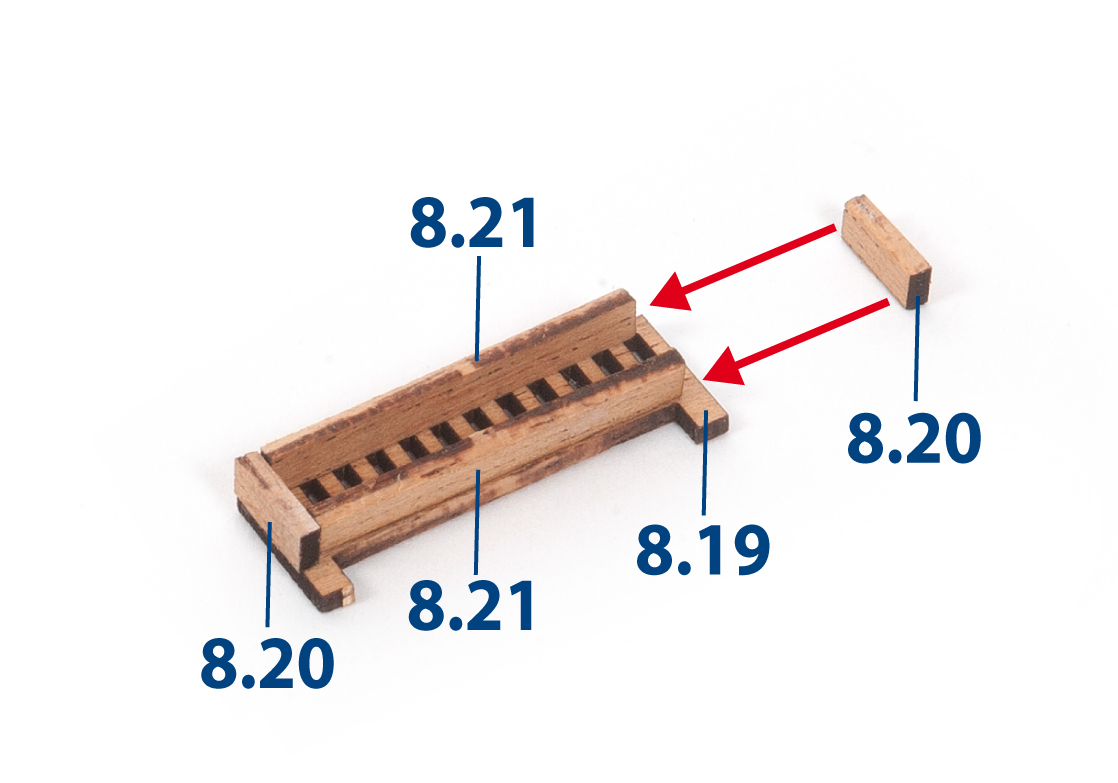
Fit and glue parts 8.19, 8.20 and 8.21 together to build a chicken coop, as shown.
Step 4
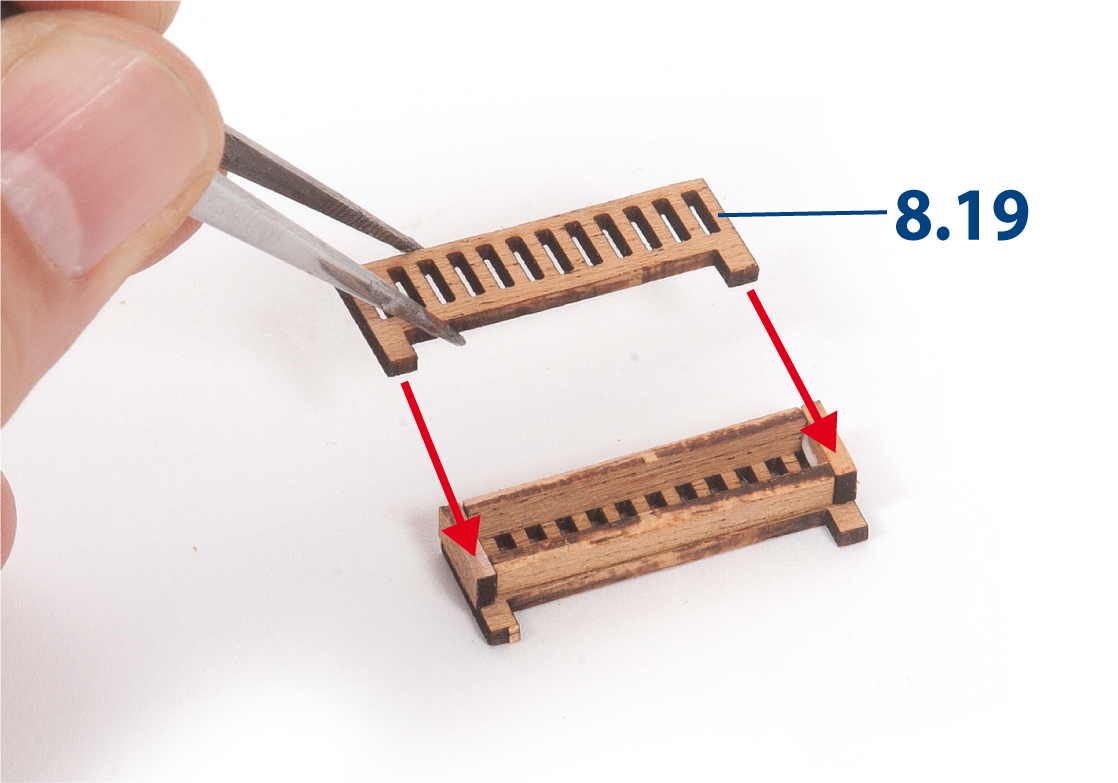
Complete the assembly with part 8.19.
Step 5
This image shows the completed chicken coop at this stage.
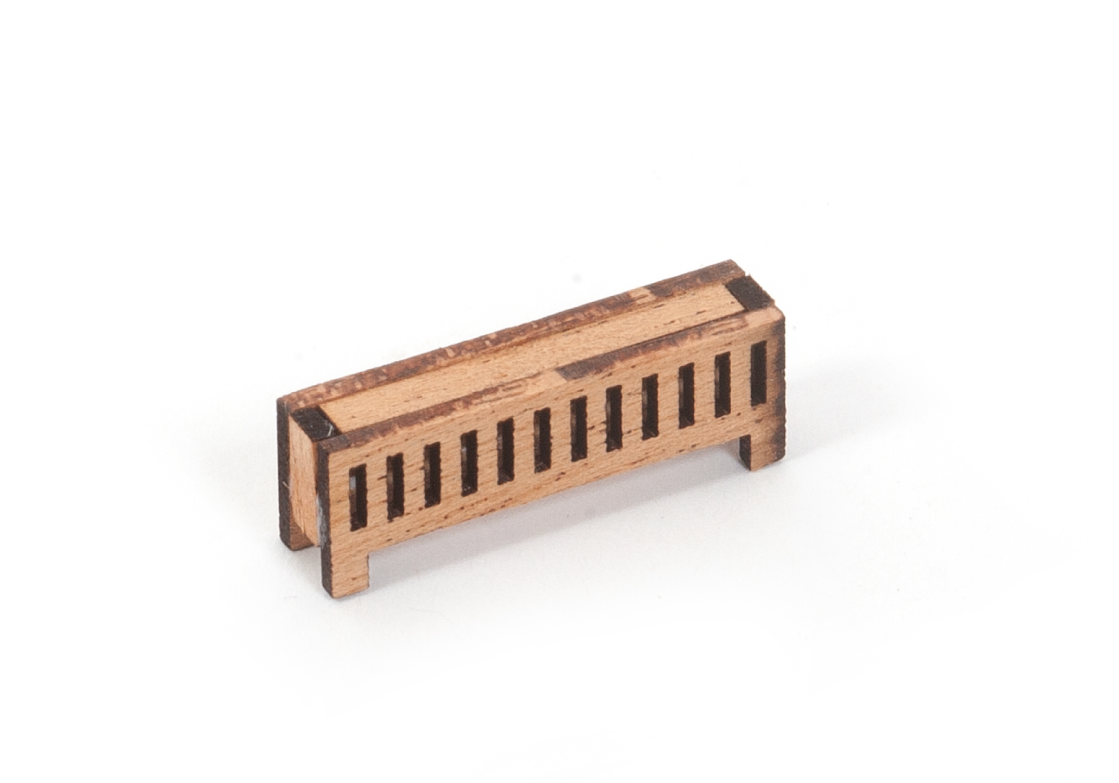
Step 6
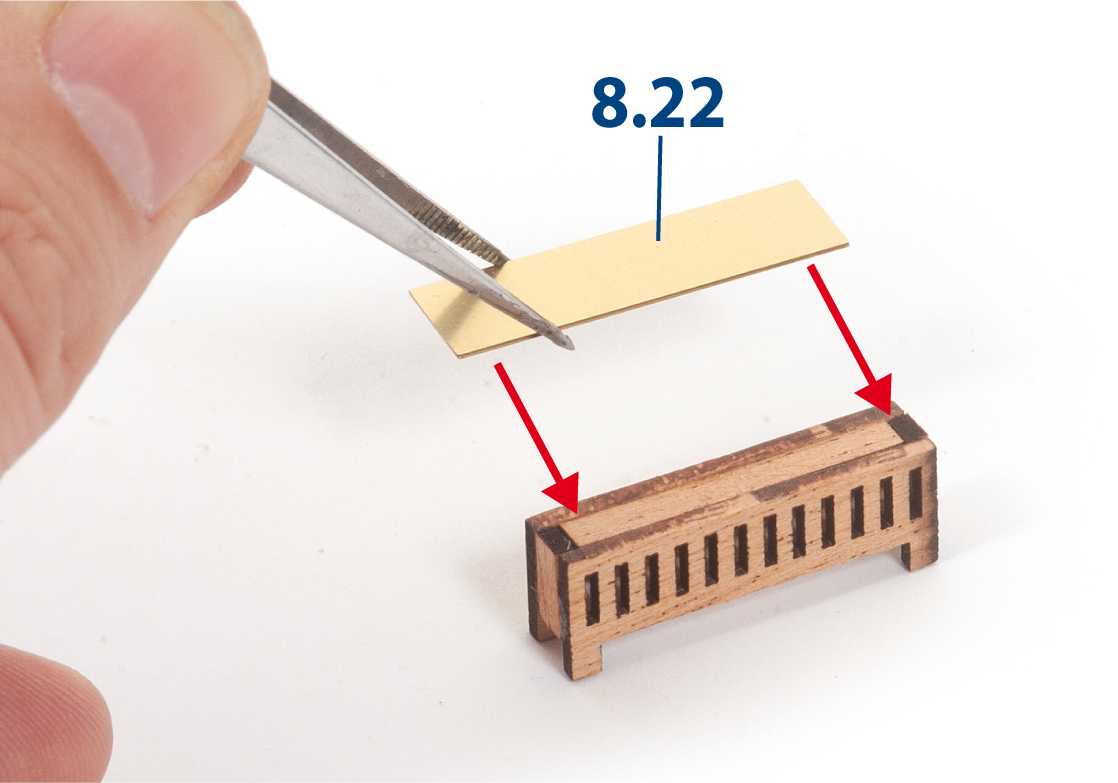
Glue cover 8.22 to the top of the chicken coop, as shown.
Step 7
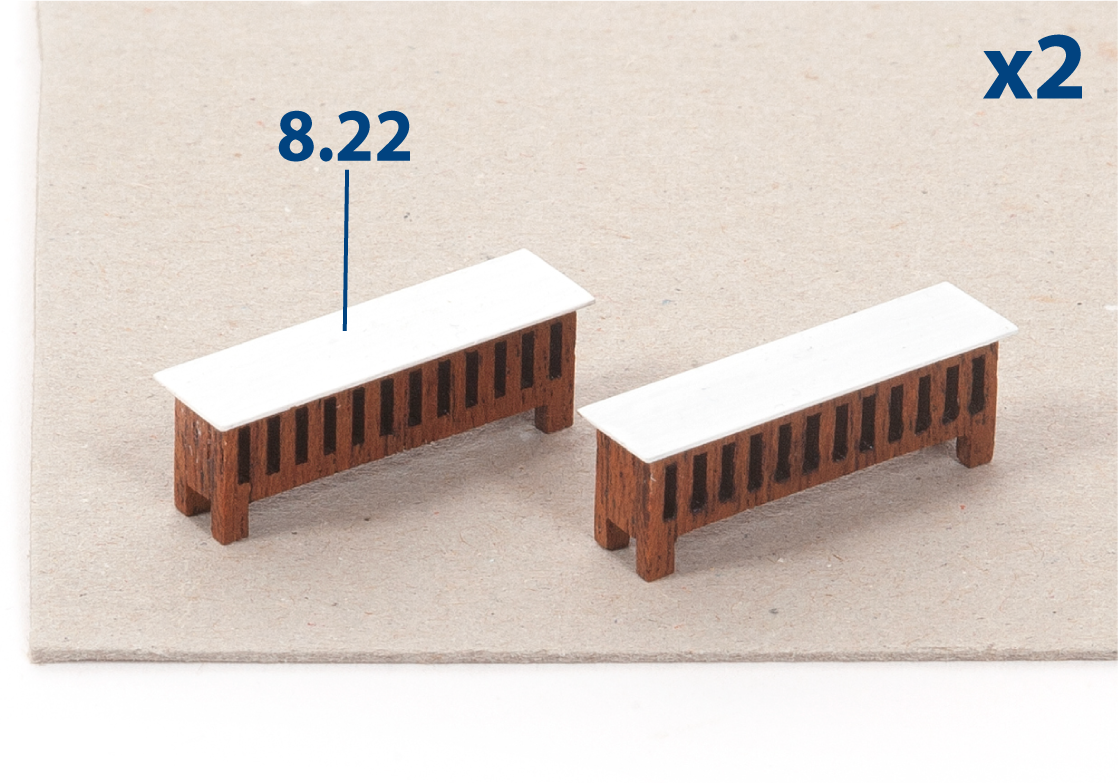
Apply varnish to the wooden parts. Paint cover 8.22 white. Repeat steps 3–6 to build a second chicken coop.
Step 8
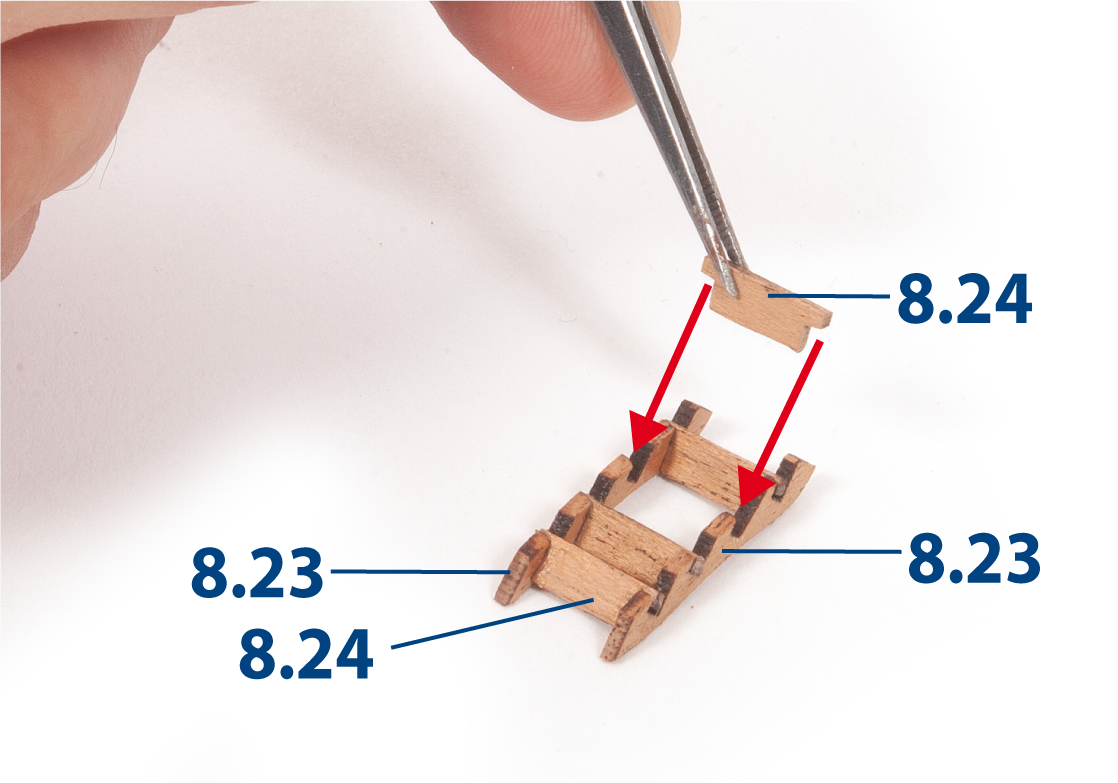
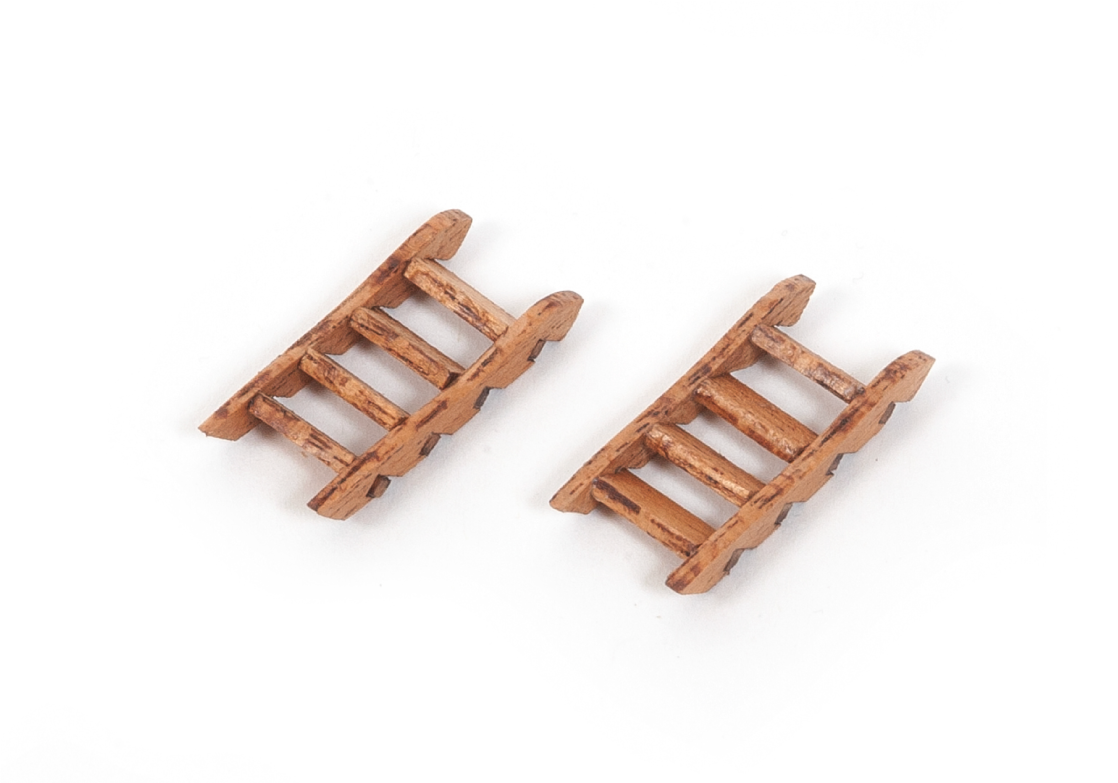
Build a ladder using parts 8.23 and 8.24, as shown.
Step 9
Build a second identical ladder. Then apply varnish to both ladders.
Step 10
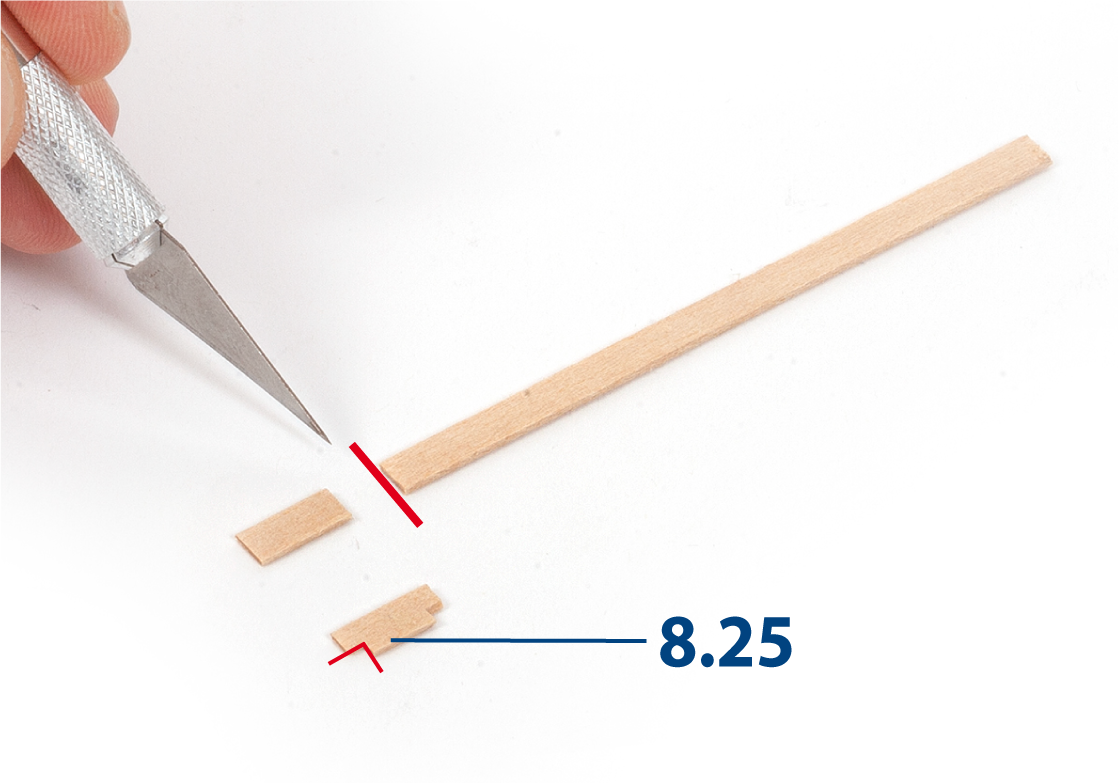
Cut ladder rungs 8.25 to length (1 x 5 x 11 mm lime wood) and cut away the corners as shown.
Step 11
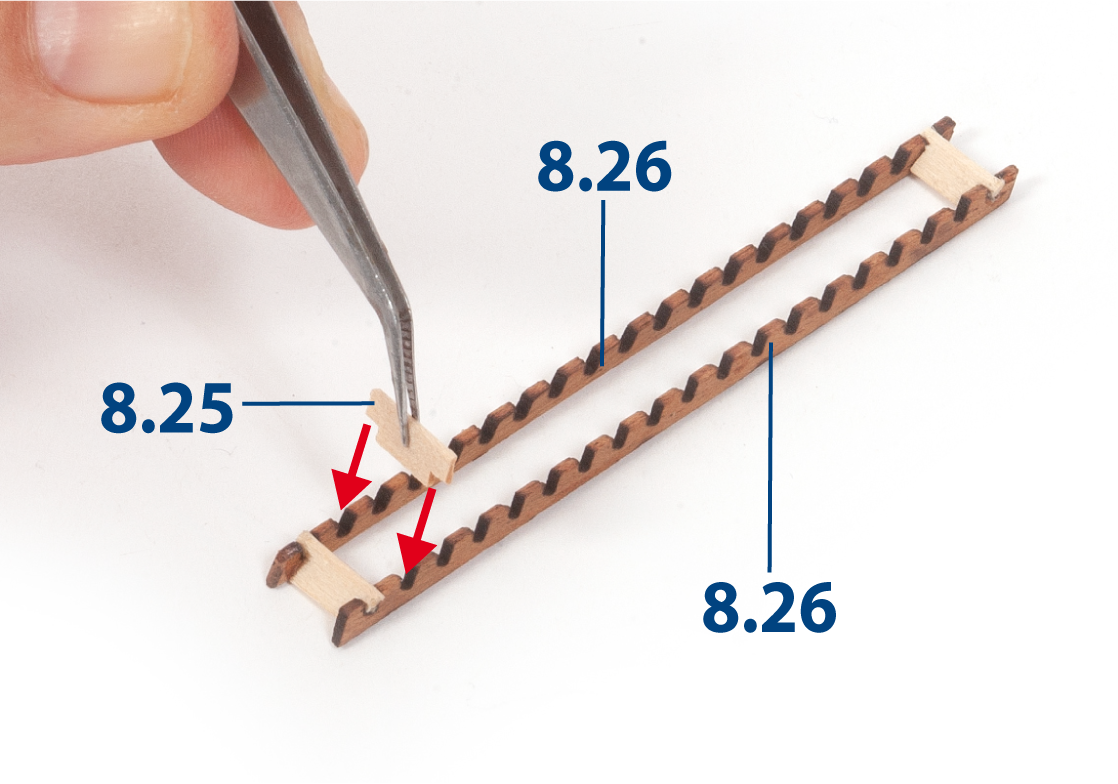
Insert and glue ladder rungs 8.25 into ladder stiles 8.26, as shown.
Step 12
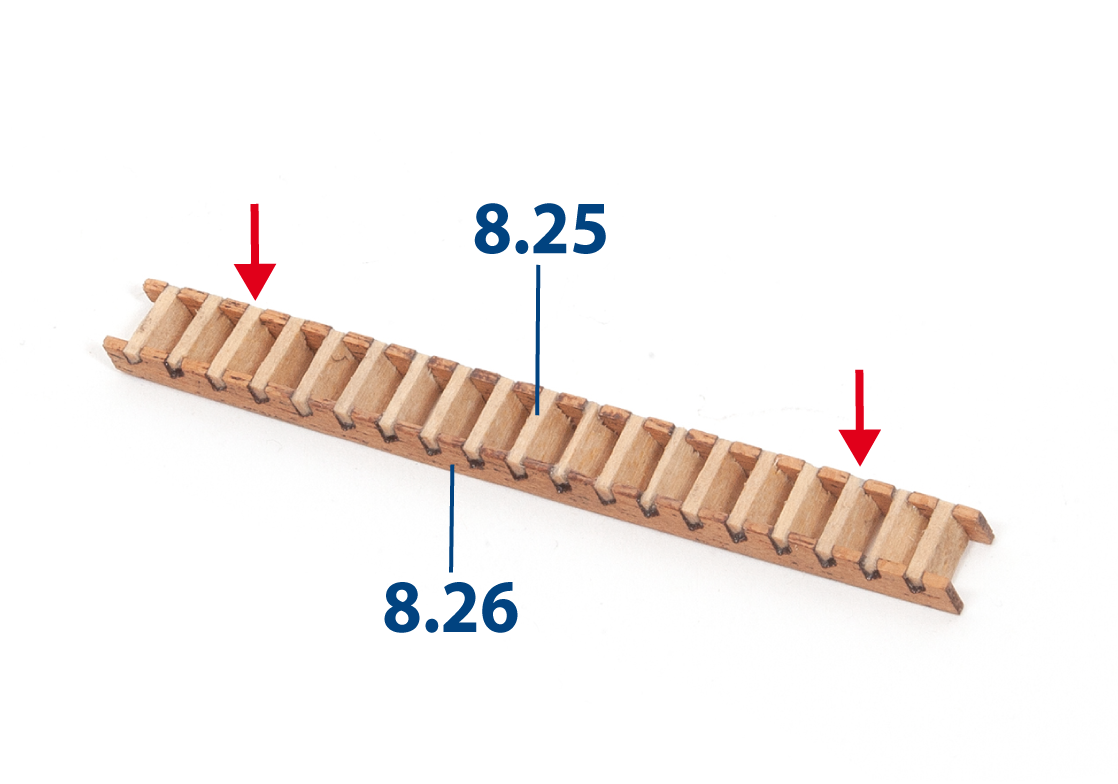
Complete the ladder with the remaining ladder rungs 8.25. Then apply varnish.
Step 13
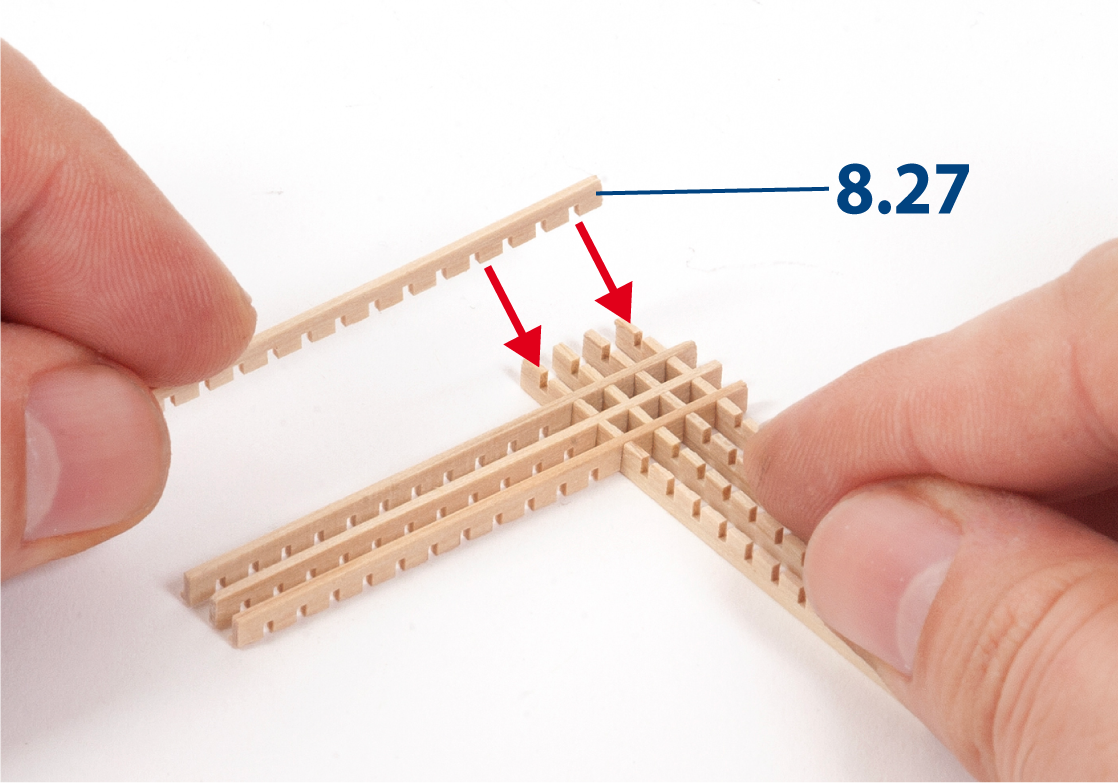
Fit parts 8.27 together to build the deck gratings. Glue the parts with PVA glue.
Parts 8.27 can be located in the parts tray supplied with Pack 5.
Step 14
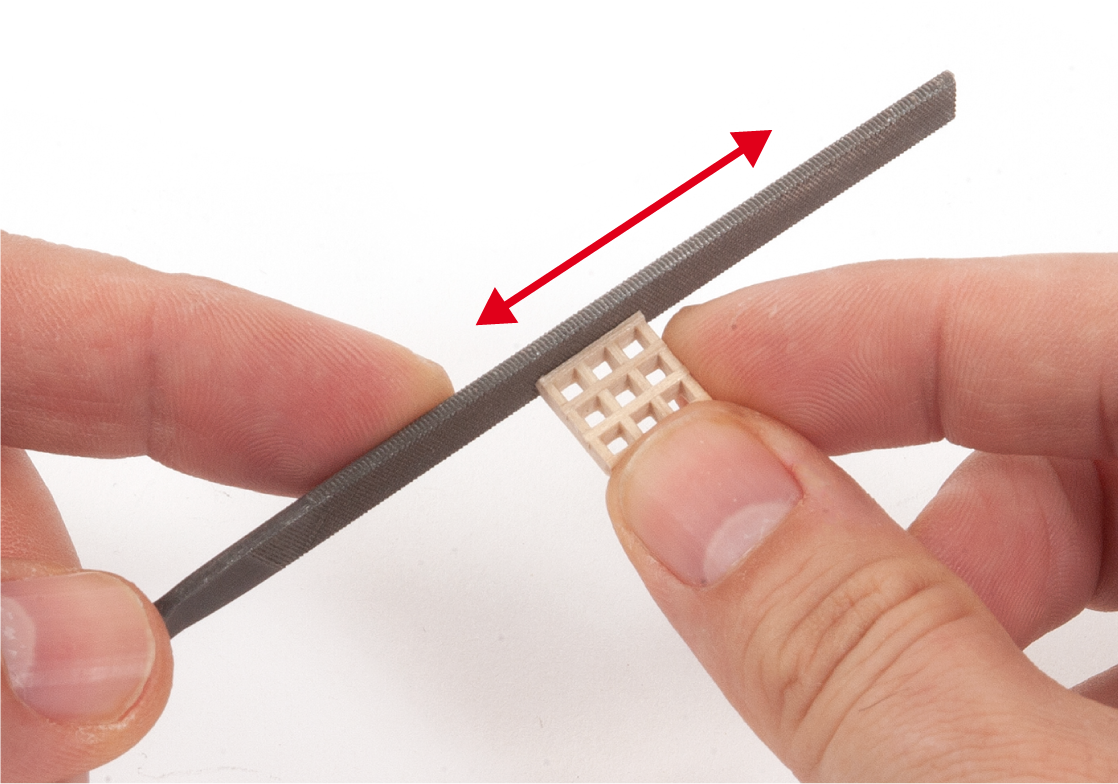
Cut the assembled grating into three pieces as shown, then use a flat file to smooth their edges.
Step 15
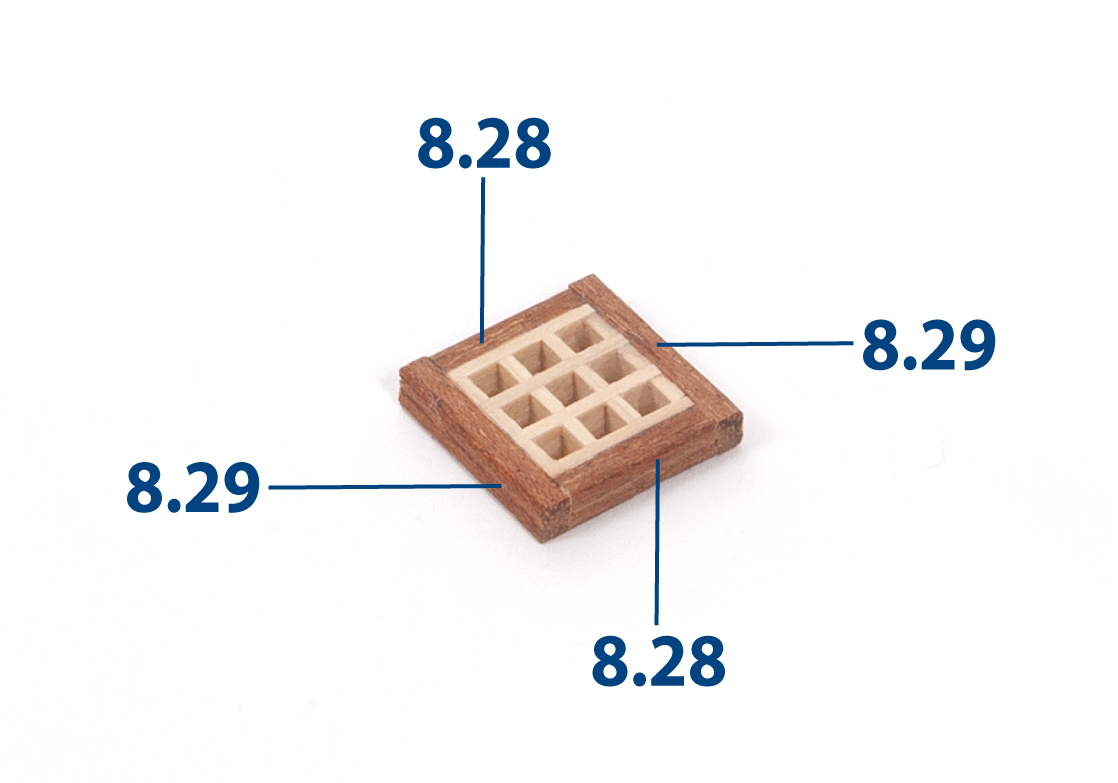
Cut grating coamings 8.28 and 8.29 to the required lengths and glue them around one deck grating.
| 8.28 | 2 x 2 x 11 mm mahogany |
| 8.29 | 2 x 2 x 15 mm mahogany |
Step 16
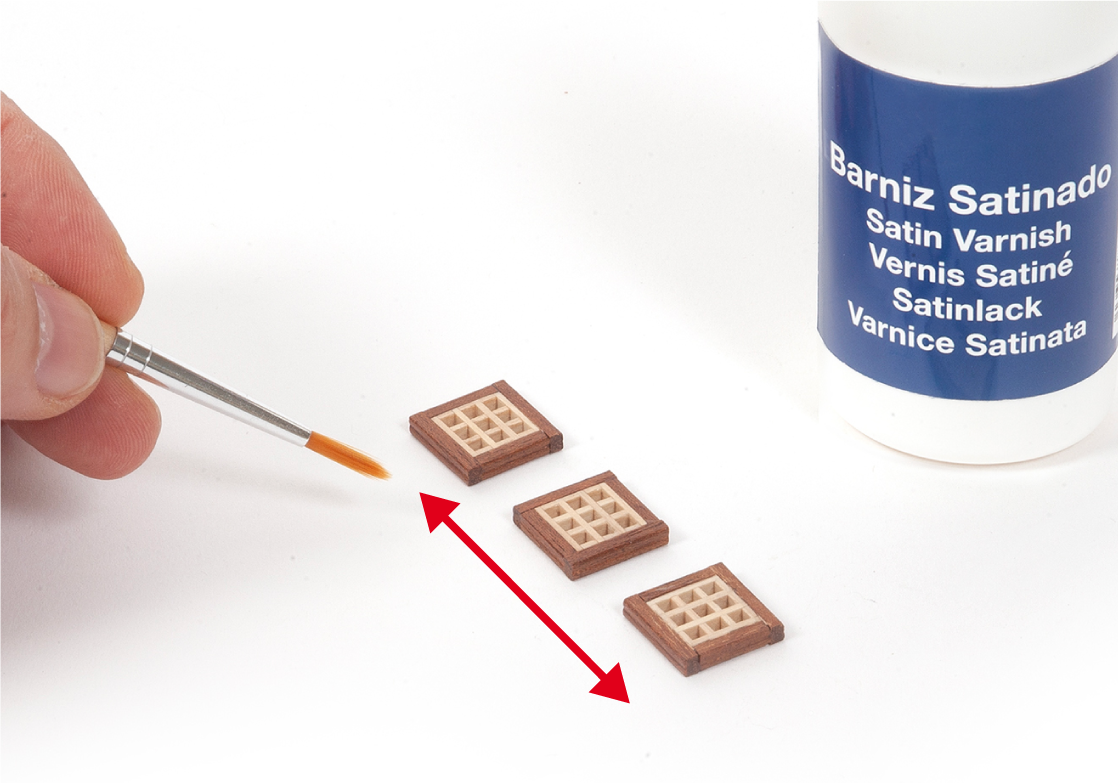
Repeat the previous step for the remaining two deck gratings. Then apply varnish to the gratings.
Step 1
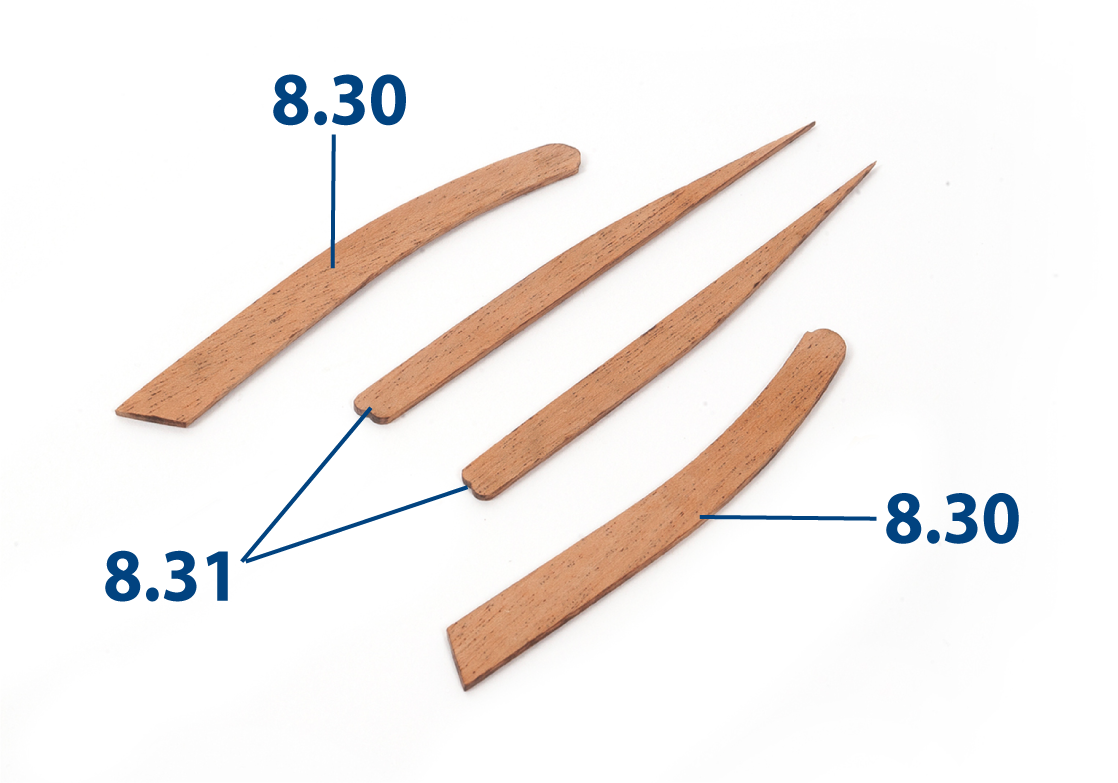
Prepare parts 8.30 and 8.31 for the bow of the hull.
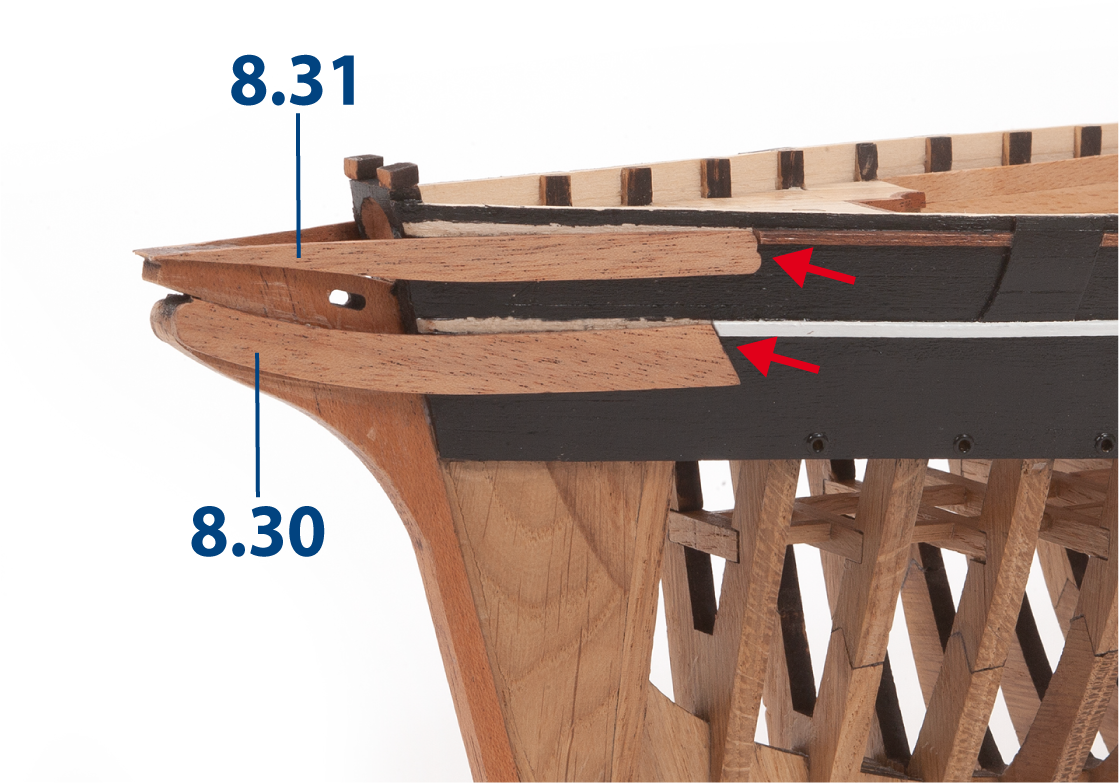
Step 2
Fit and glue parts 8.30 and 8.31 as shown.
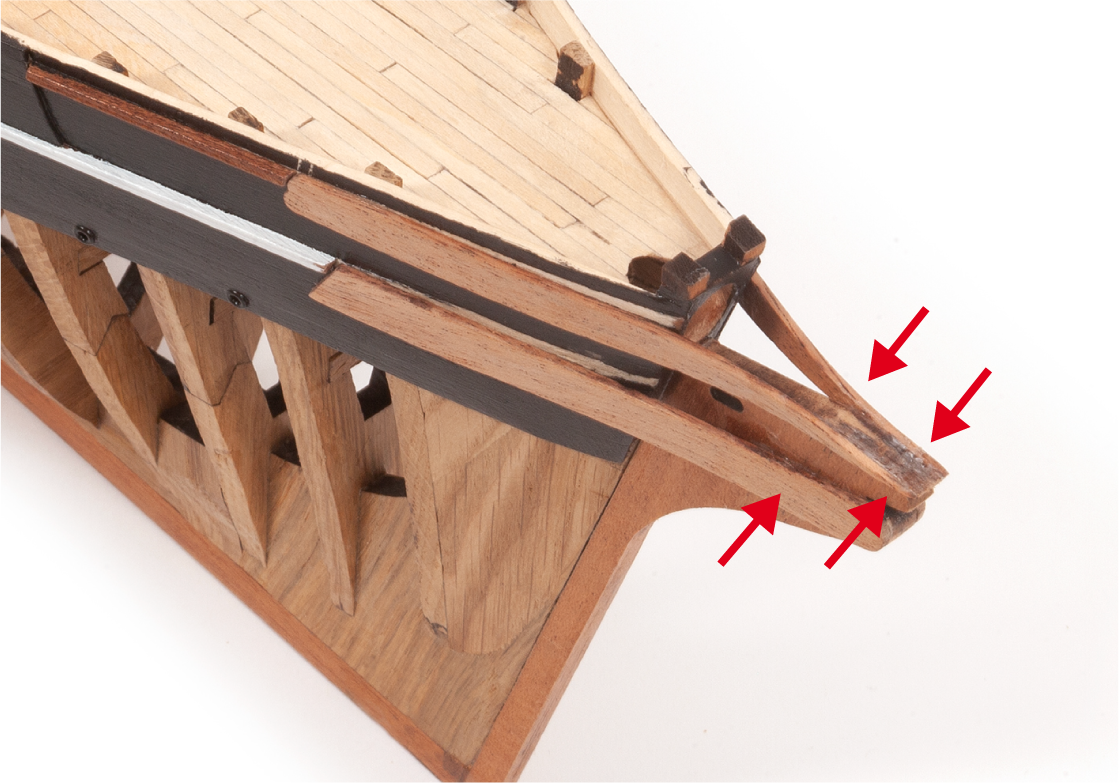
Step 3
Repeat the same process to fit and glue the corresponding parts on the other side of the hull.
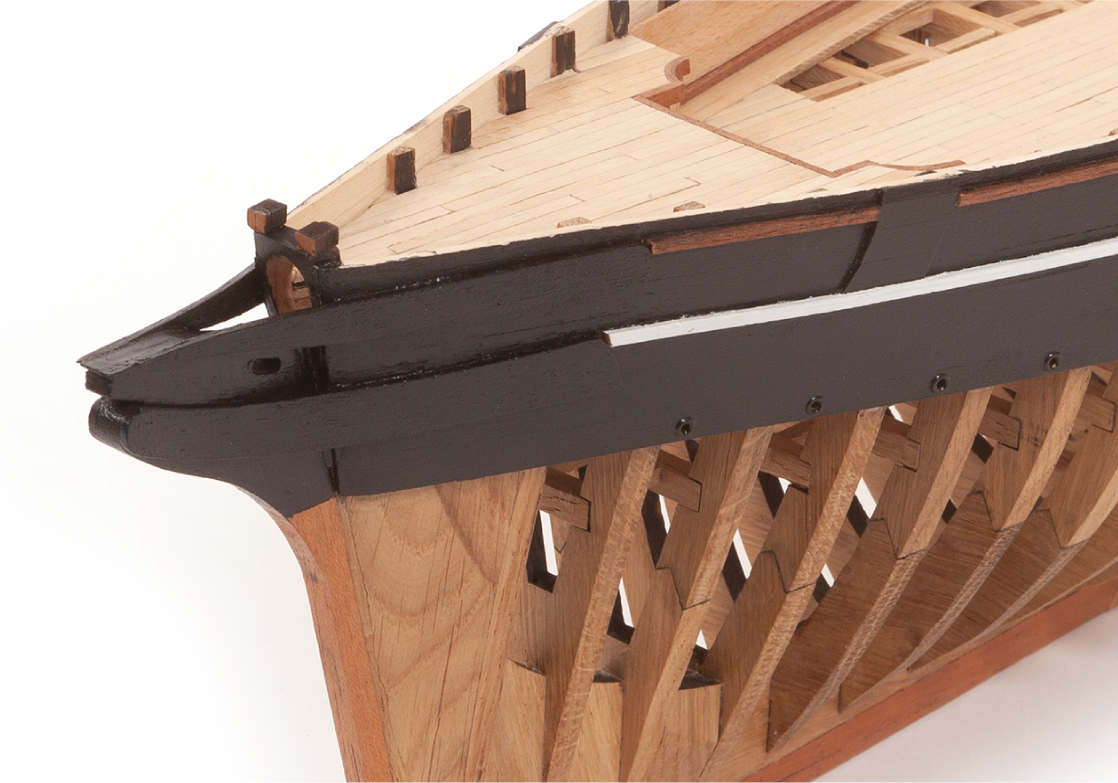
Step 4
Paint the area of the hull shown black.
Step 5
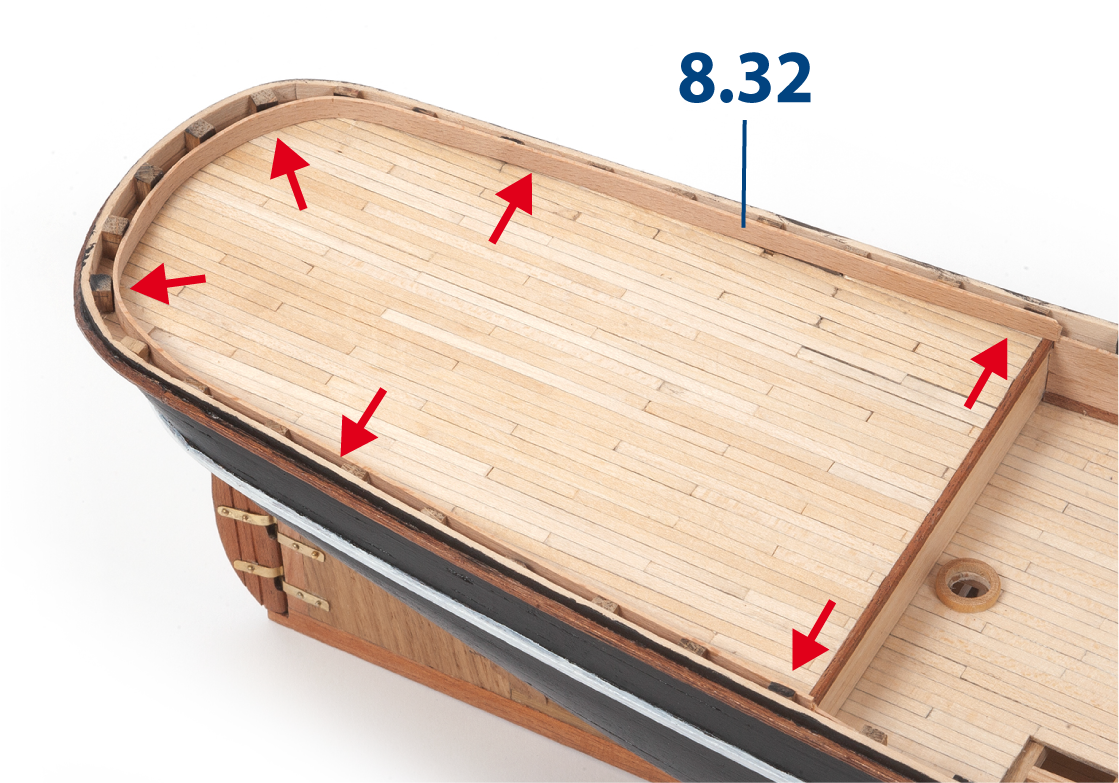
Fit and glue part 8.32 (1 x 5 x 500 mm lime wood) to the inside of the stern frames. You will need to reduce the thickness of the frames to fit this part.
Step 6
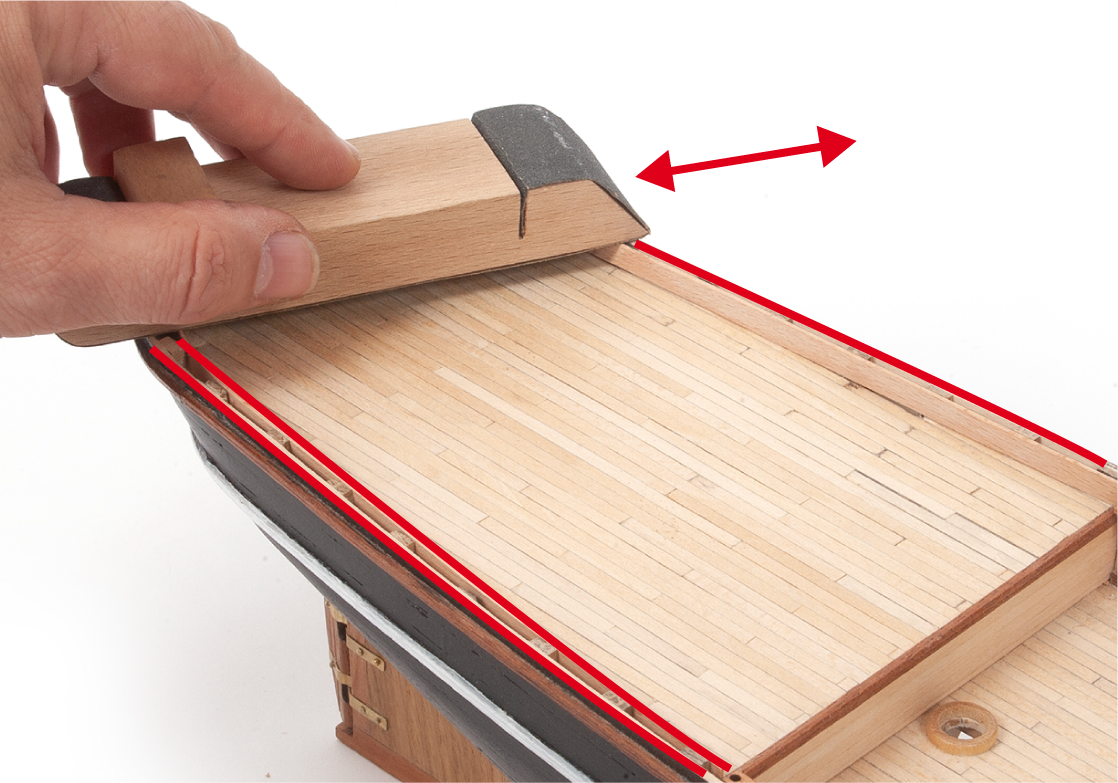
Use a sanding block to even out the height of the stern bulwark lining.
Step 7
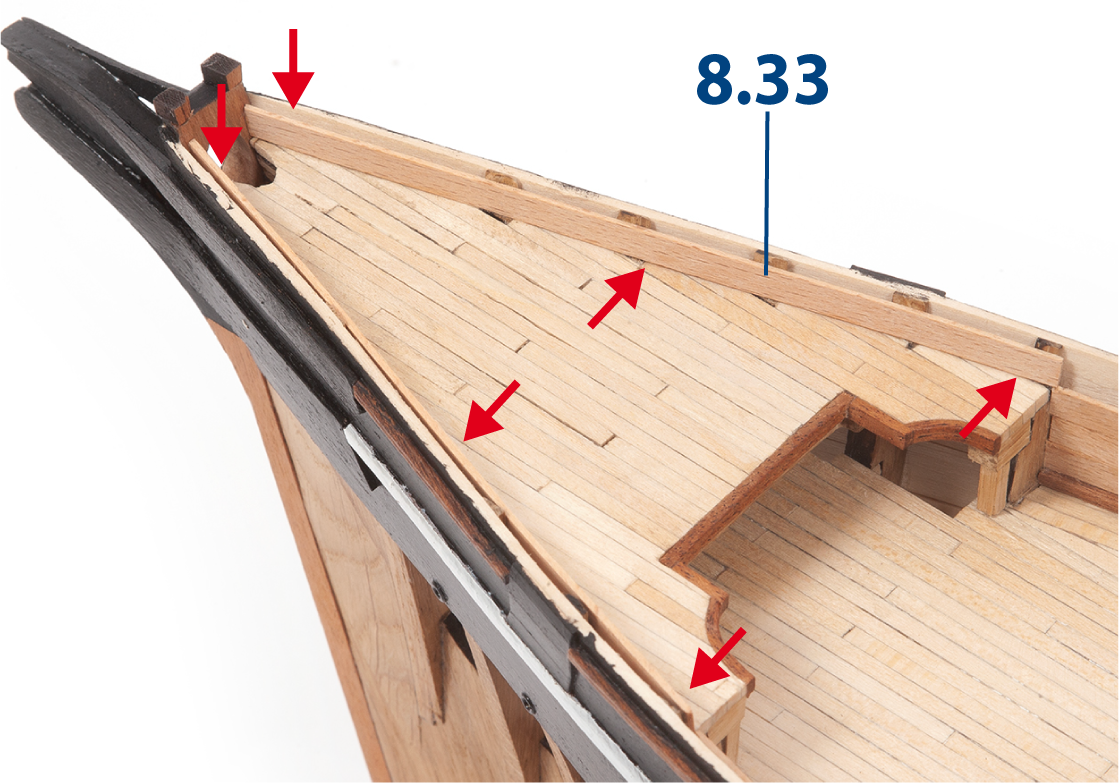
Fit and glue parts 8.33 (1 x 5 x 150 mm lime wood) to the inside of the bow frames. You will need to reduce the thickness of the frames to fit these parts.
Step 8
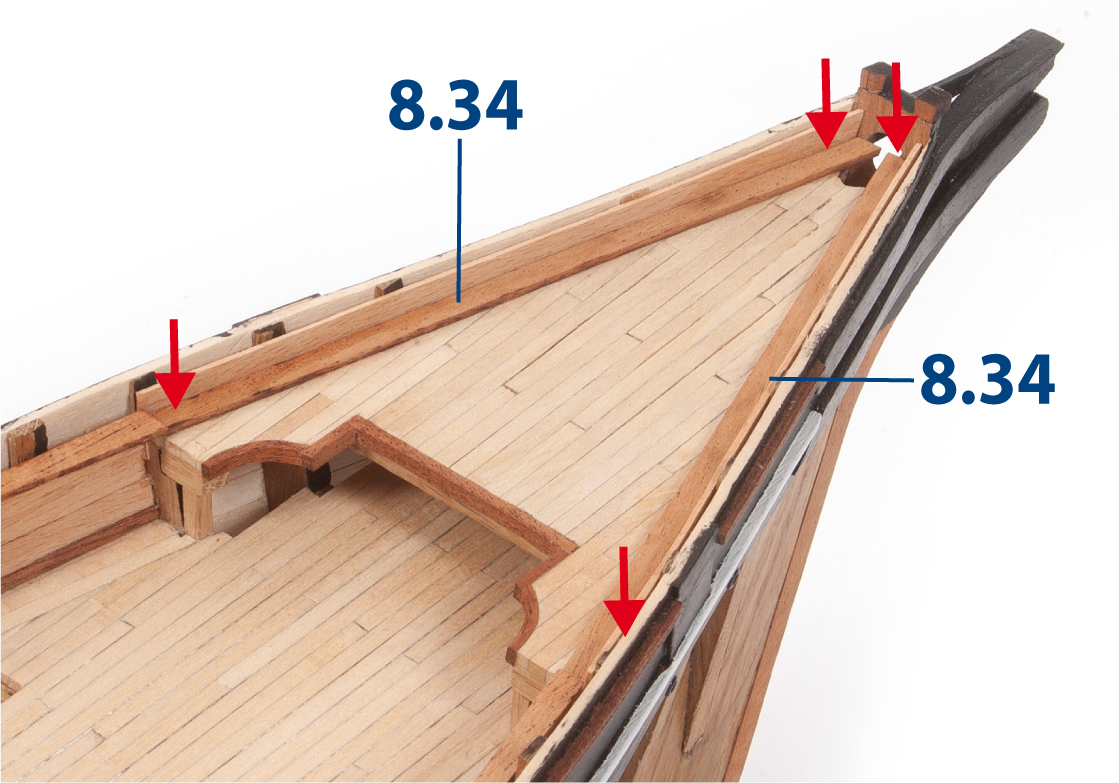
Fit and glue bow waterways 8.34 to the forecastle deck, as shown.
Step 9
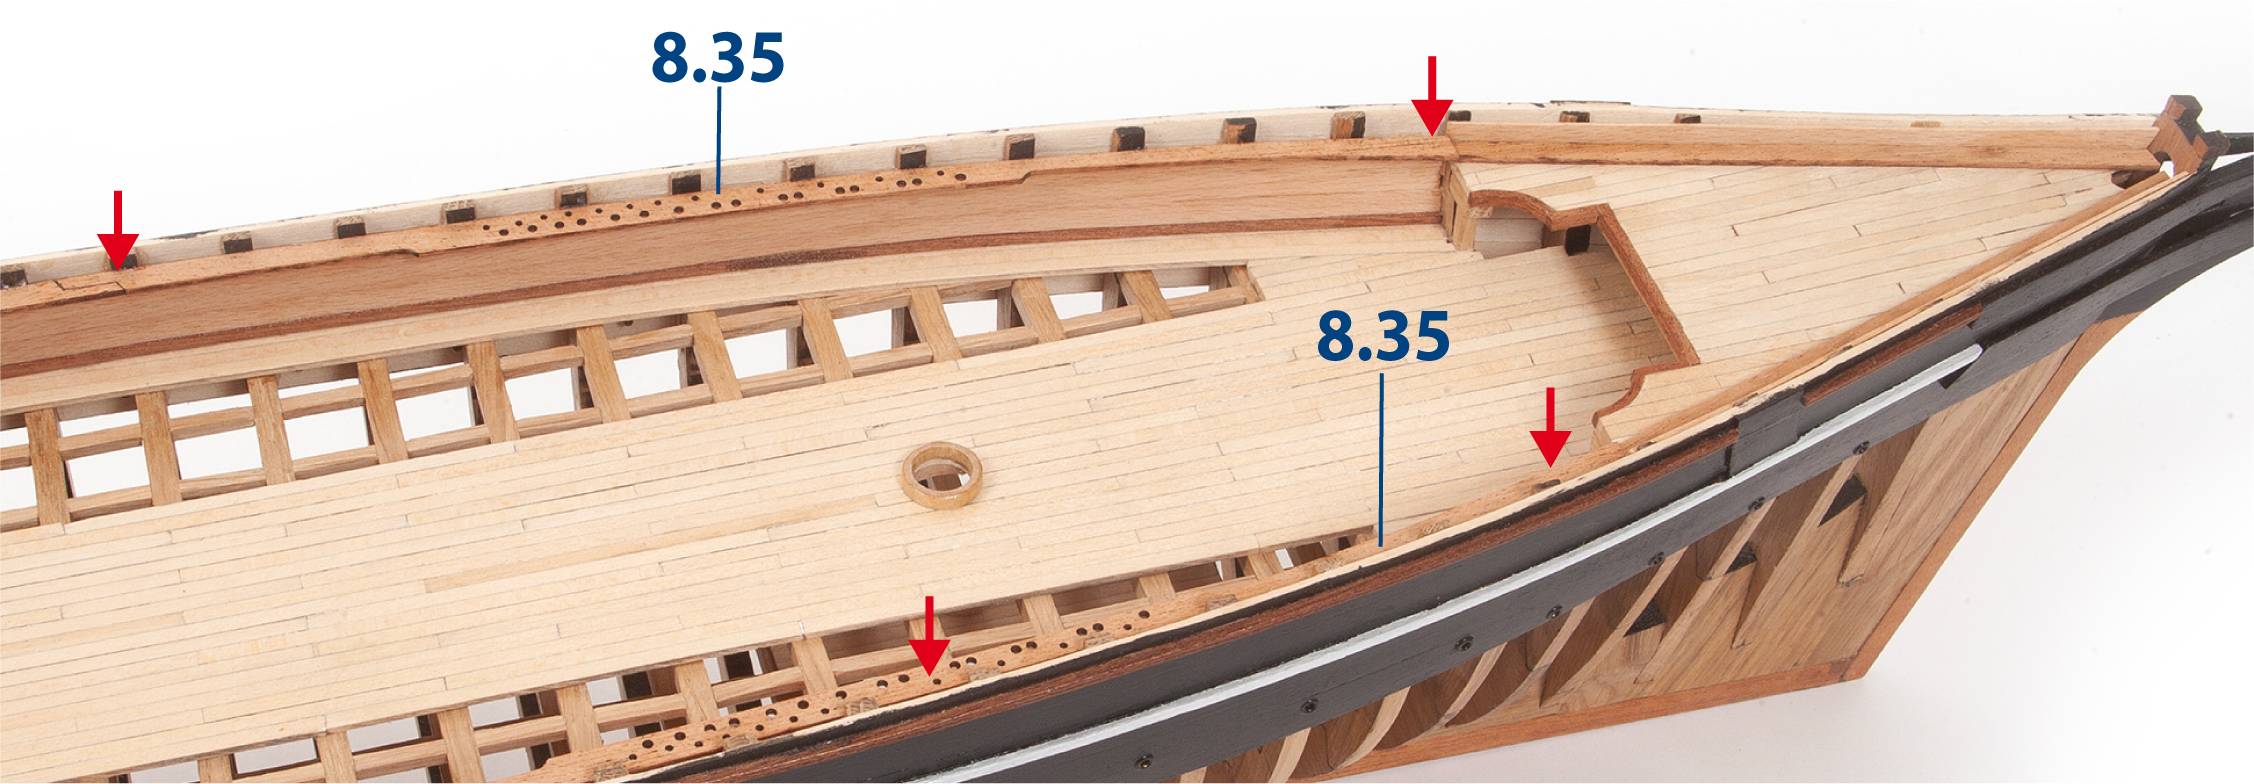
Fit and glue side pin rails 8.35 from bow to stern, as shown.
Step 10
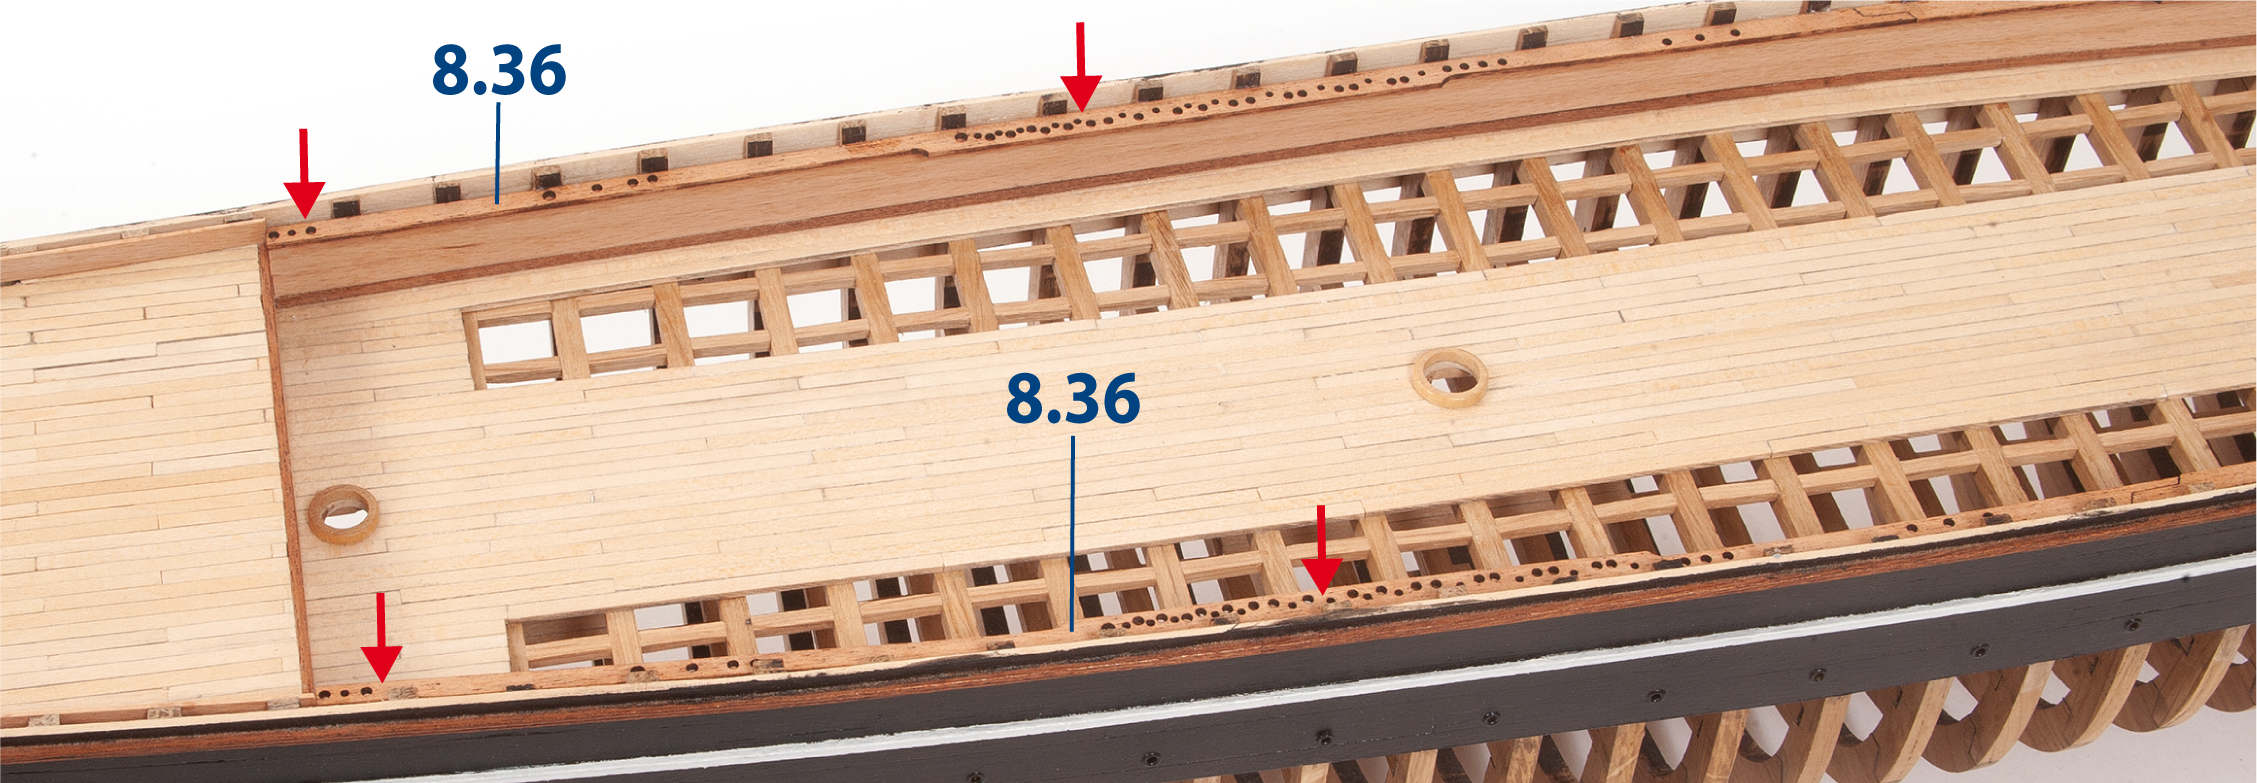
Glue side pin rails 8.36 in line with parts 8.35, as shown.
Step 11
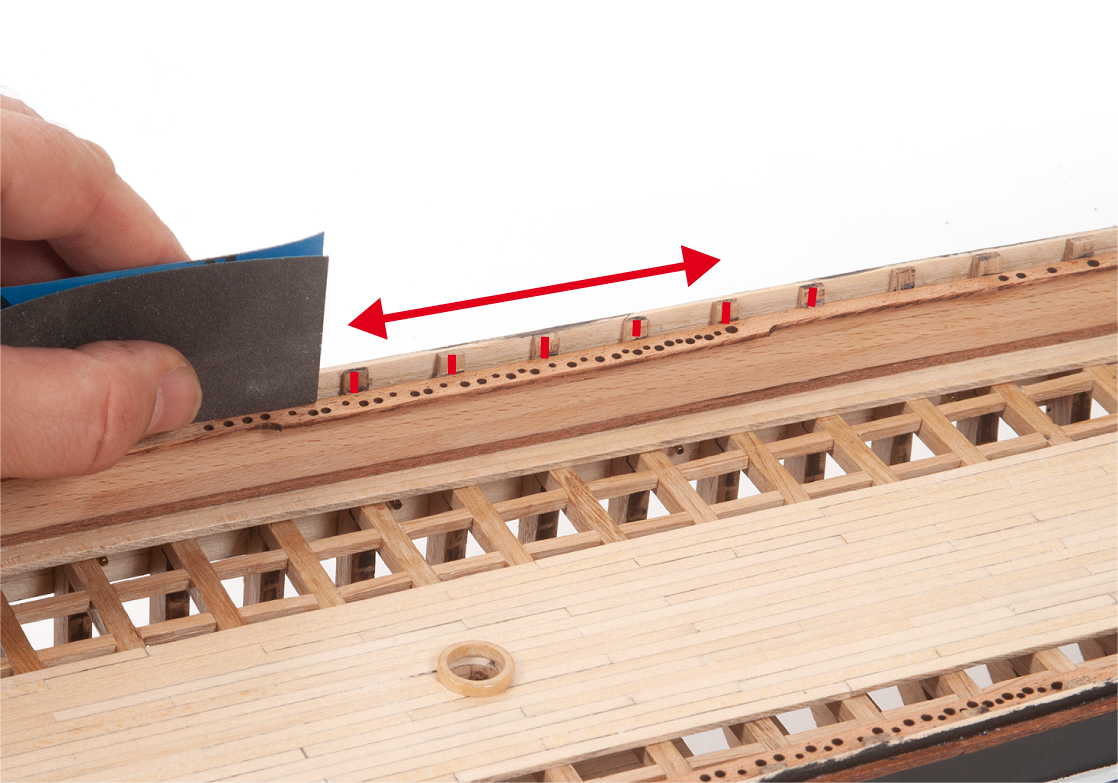
Sand the visible inner surfaces of the frames to remove the black paint.
Step 12
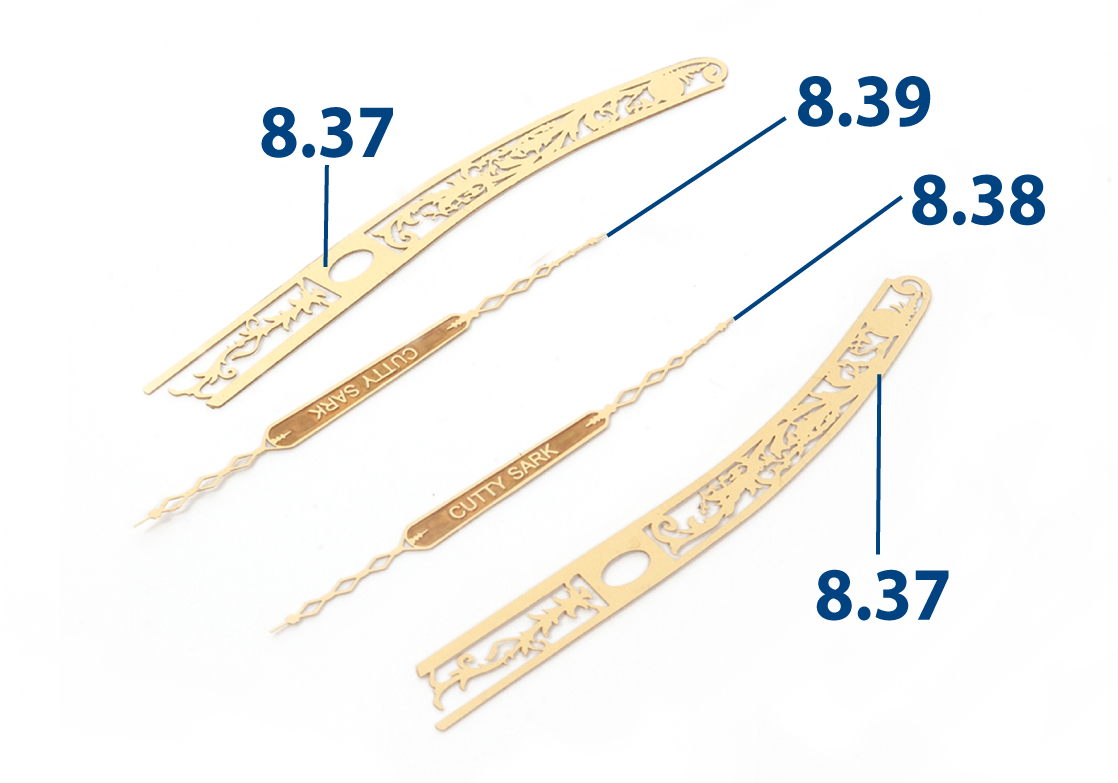
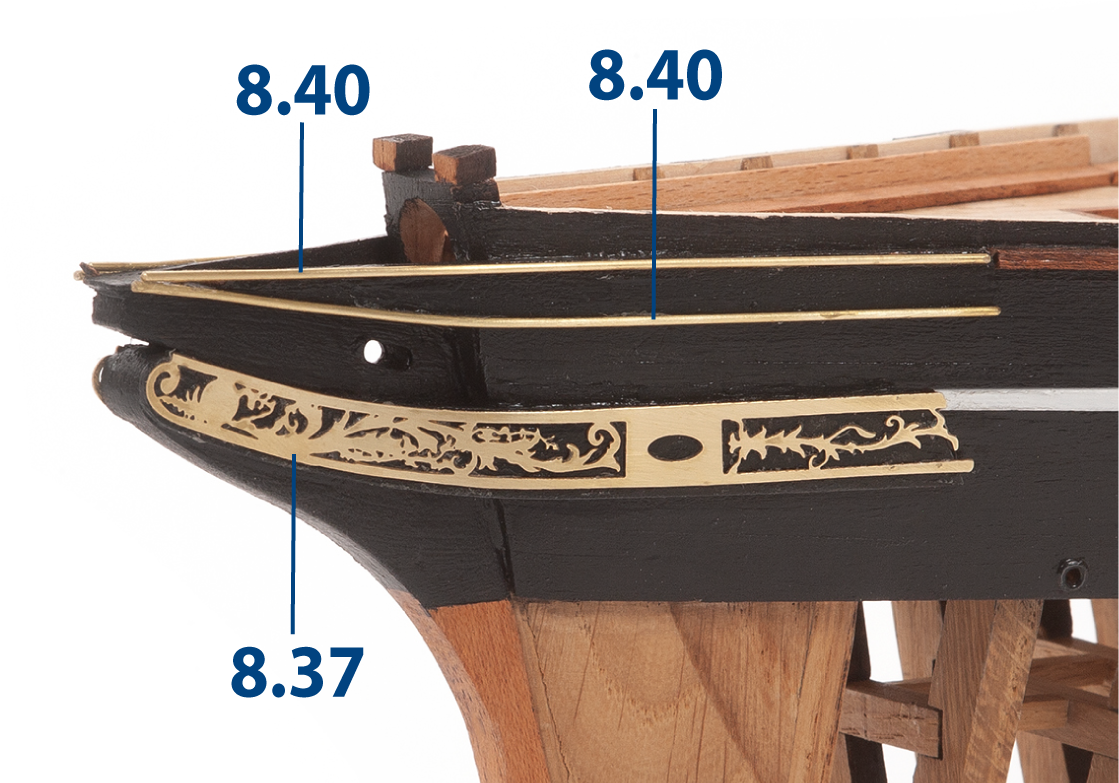
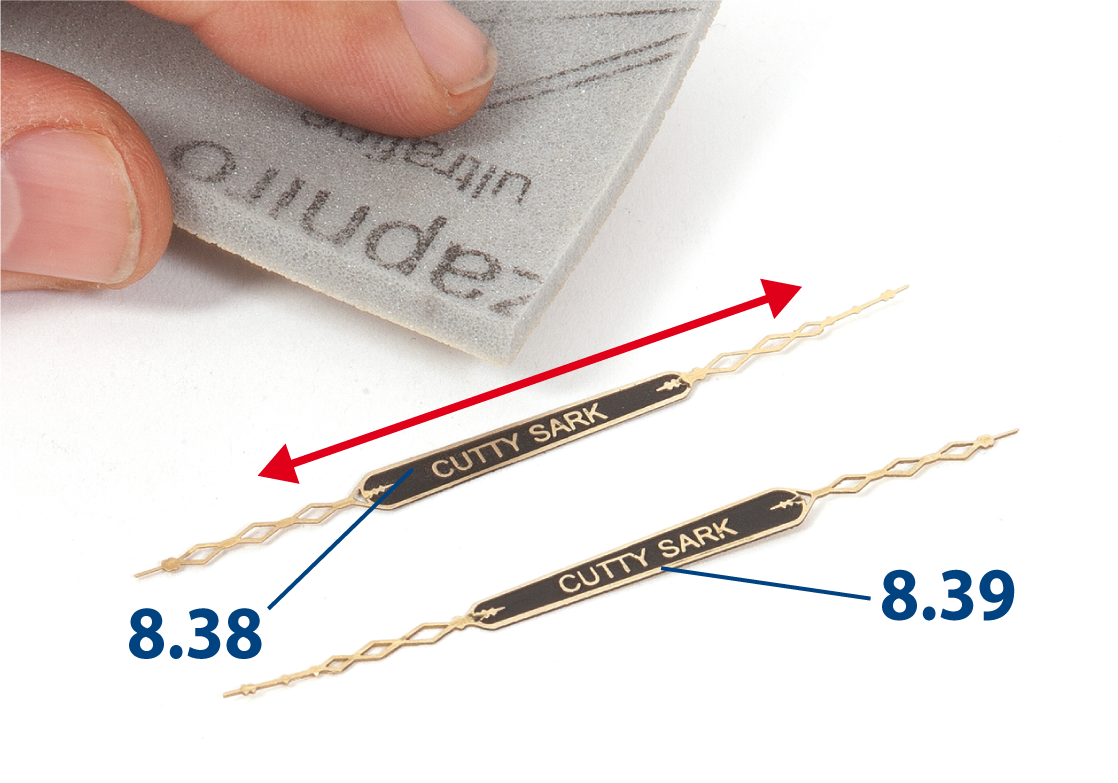
Cut parts 8.37, 8.38 and 8.39 from the brass sheet and sand the reverse side to prepare them for gluing.
Step 13
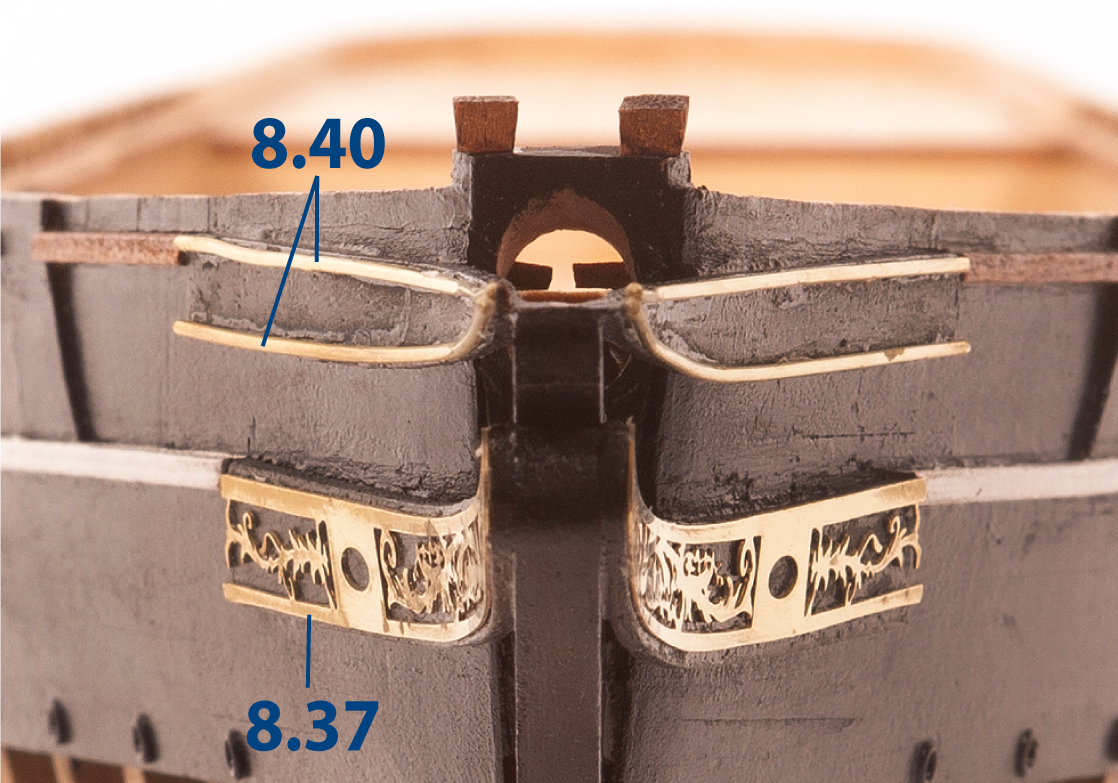
Fit and glue parts 8.37 to the bow of the hull. Cut parts 8.40 to length (ø1 x 98 mm brass wire) and glue them as shown.
Step 14
Repeat the same process on the other side of the hull to achieve a symmetrical finish.
Step 1
Paint parts 8.38 and 8.39 black. Then use a sanding sponge to remove the black paint from the raised details.
Step 2
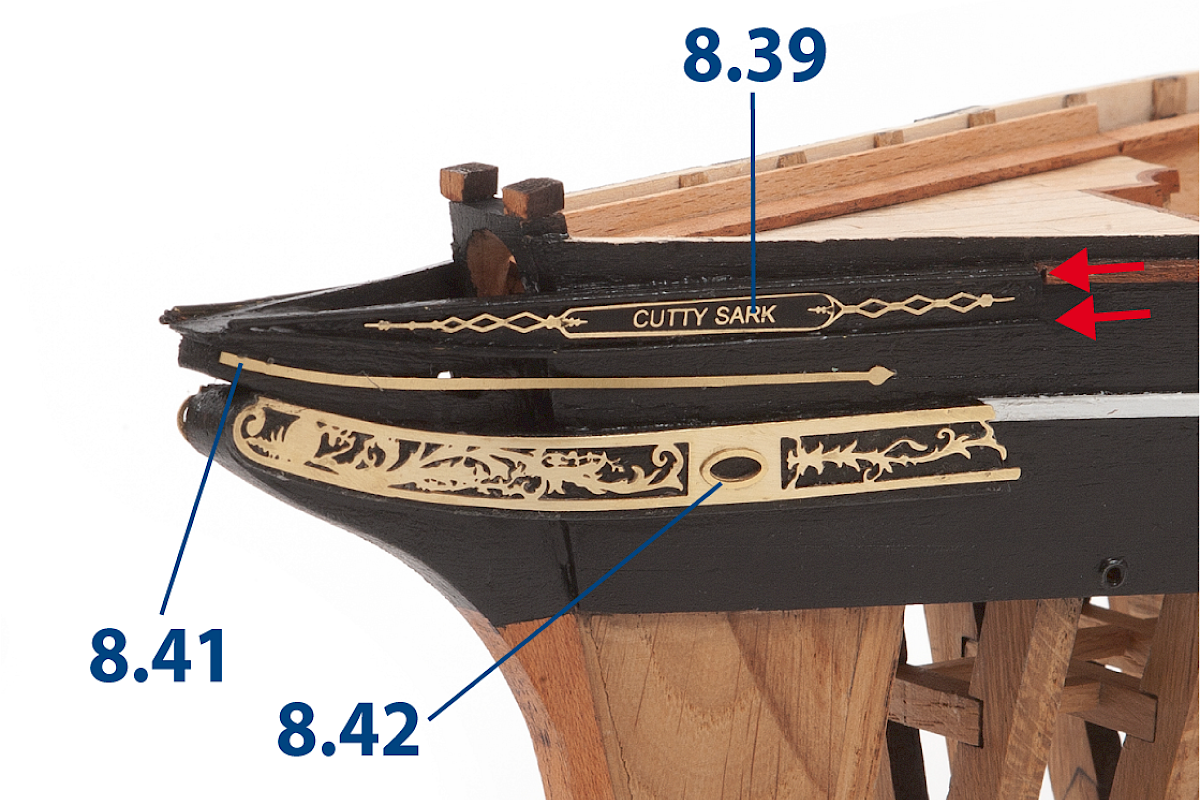
Paint the indicated areas of the bow black. Then fit and glue bow decorations 8.39, 8.41 and 8.42 as shown. Repeat the same process on the other side of the hull to achieve a symmetrical finish.
Step 3
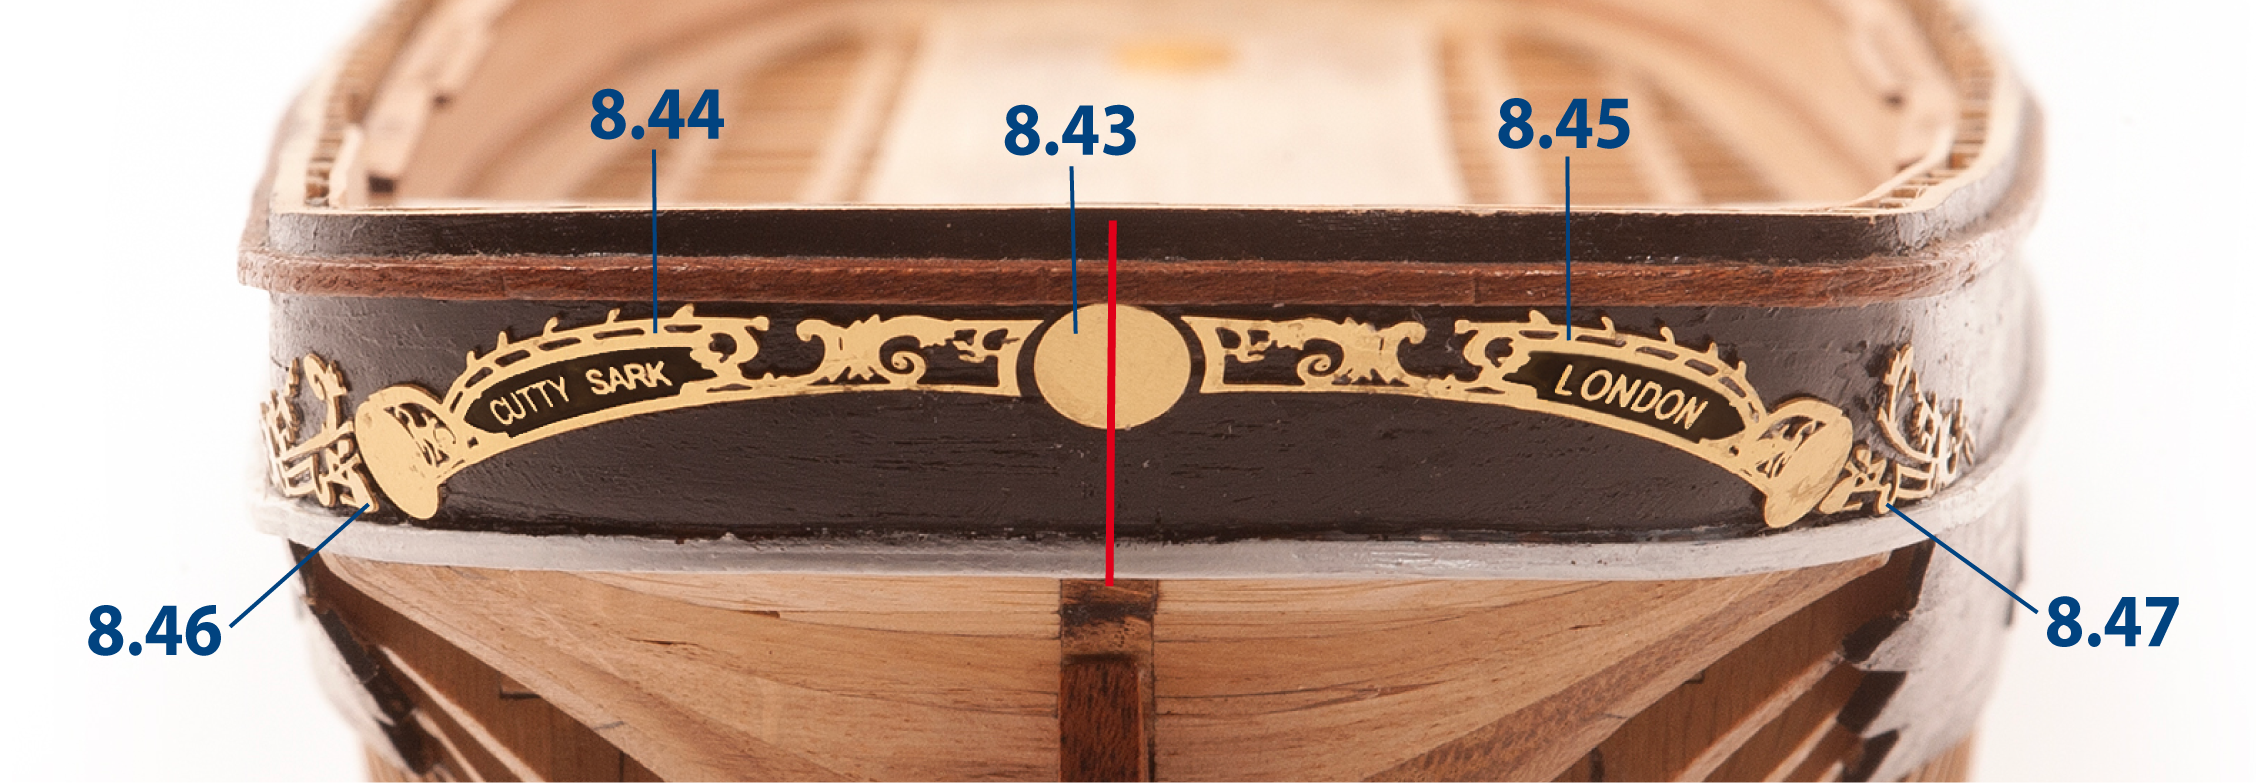
At the stern, fit and glue parts 8.43, 8.44, 8.45, 8.46 and 8.47 along the centre line, as shown. Note that parts 8.44 and 8.45 must also be painted black.
Step 4
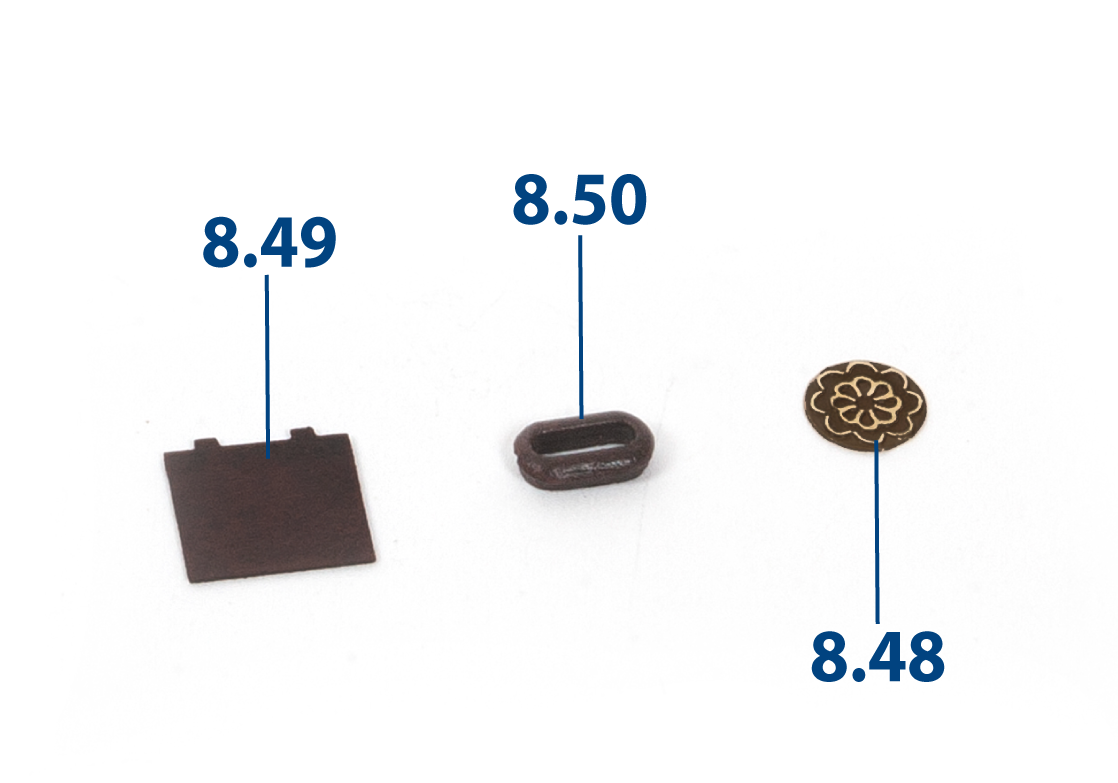
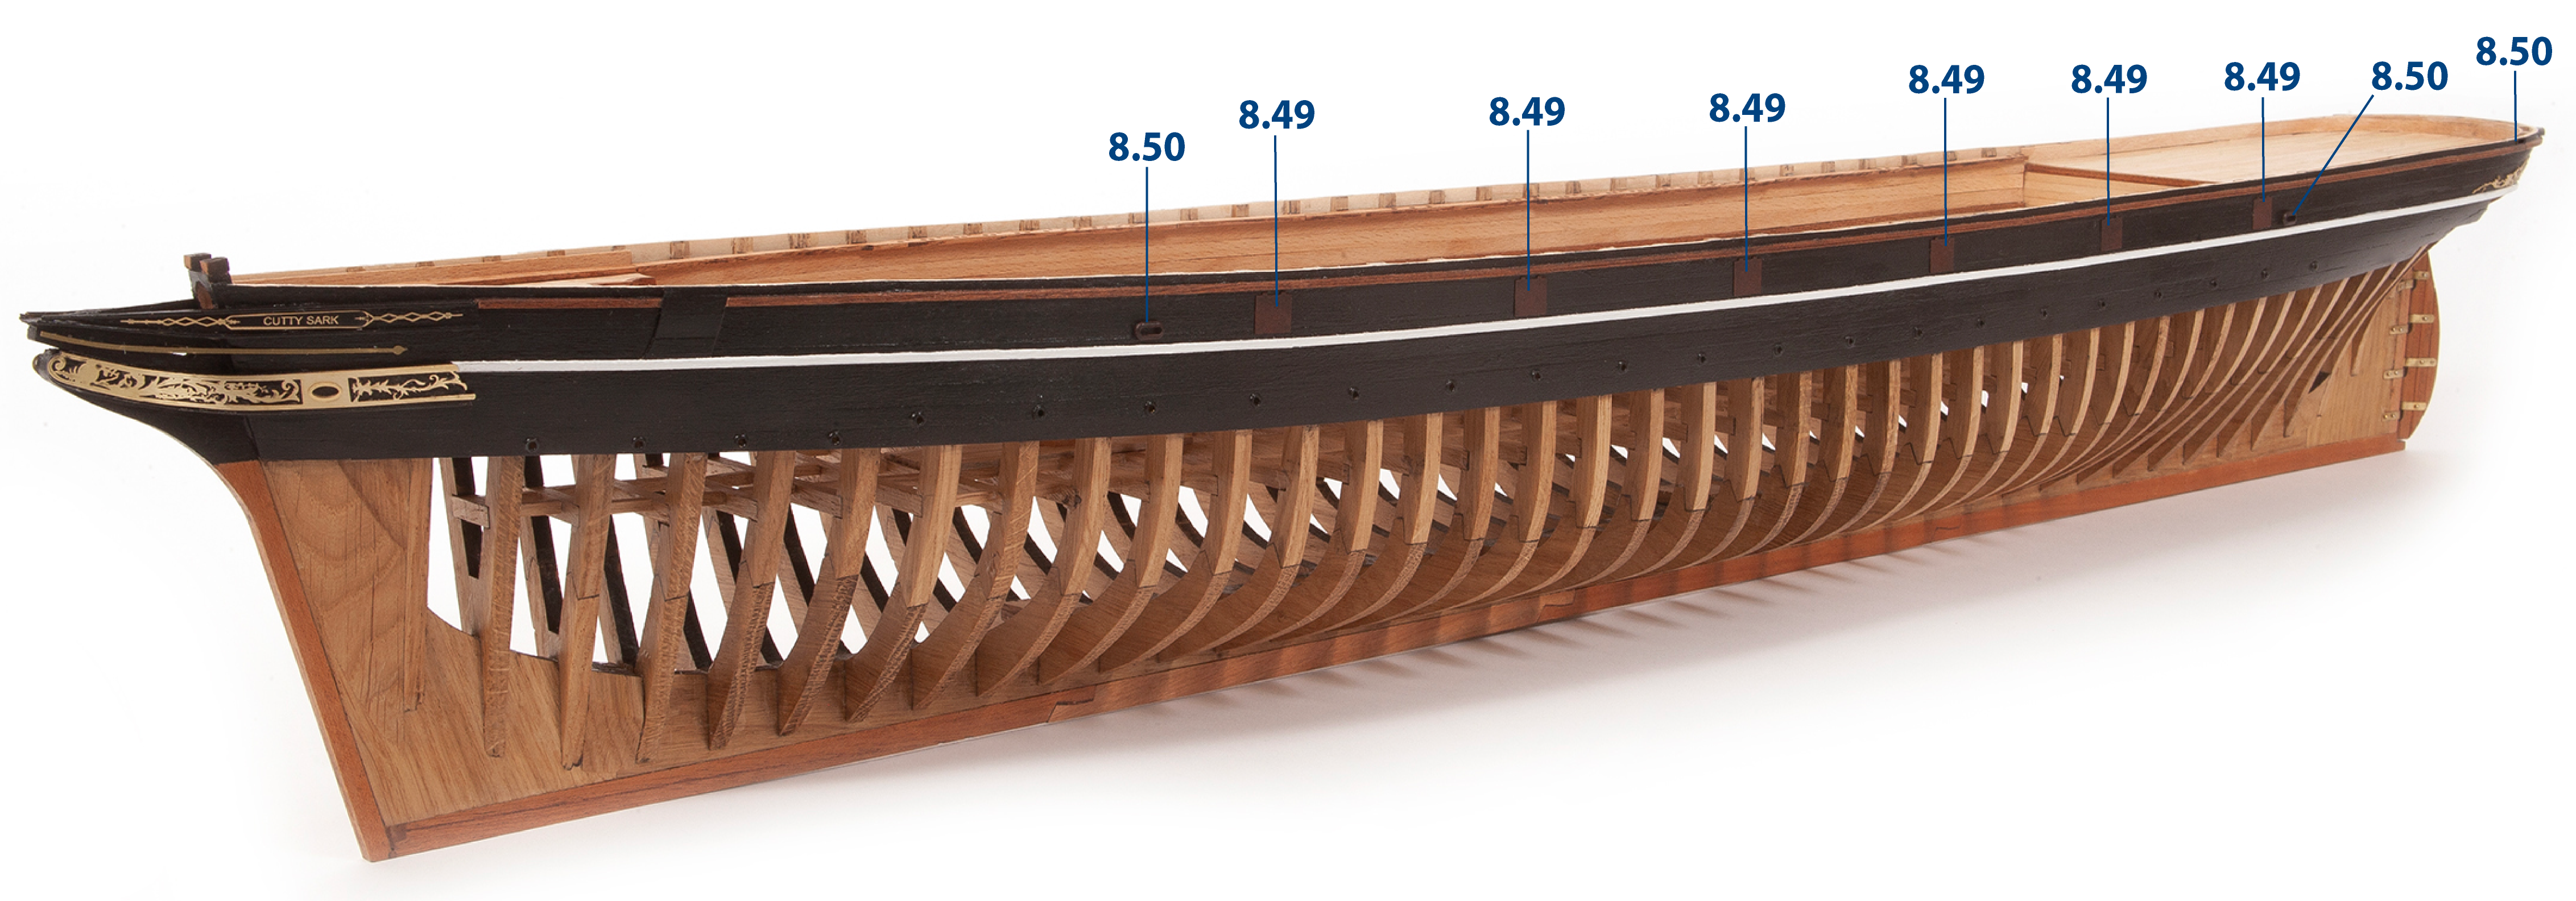
Paint parts 8.49 and 8.50 black, then dry-brush them with dark red paint to highlight the raised details. Leave part 8.48 unpainted.
Step 5
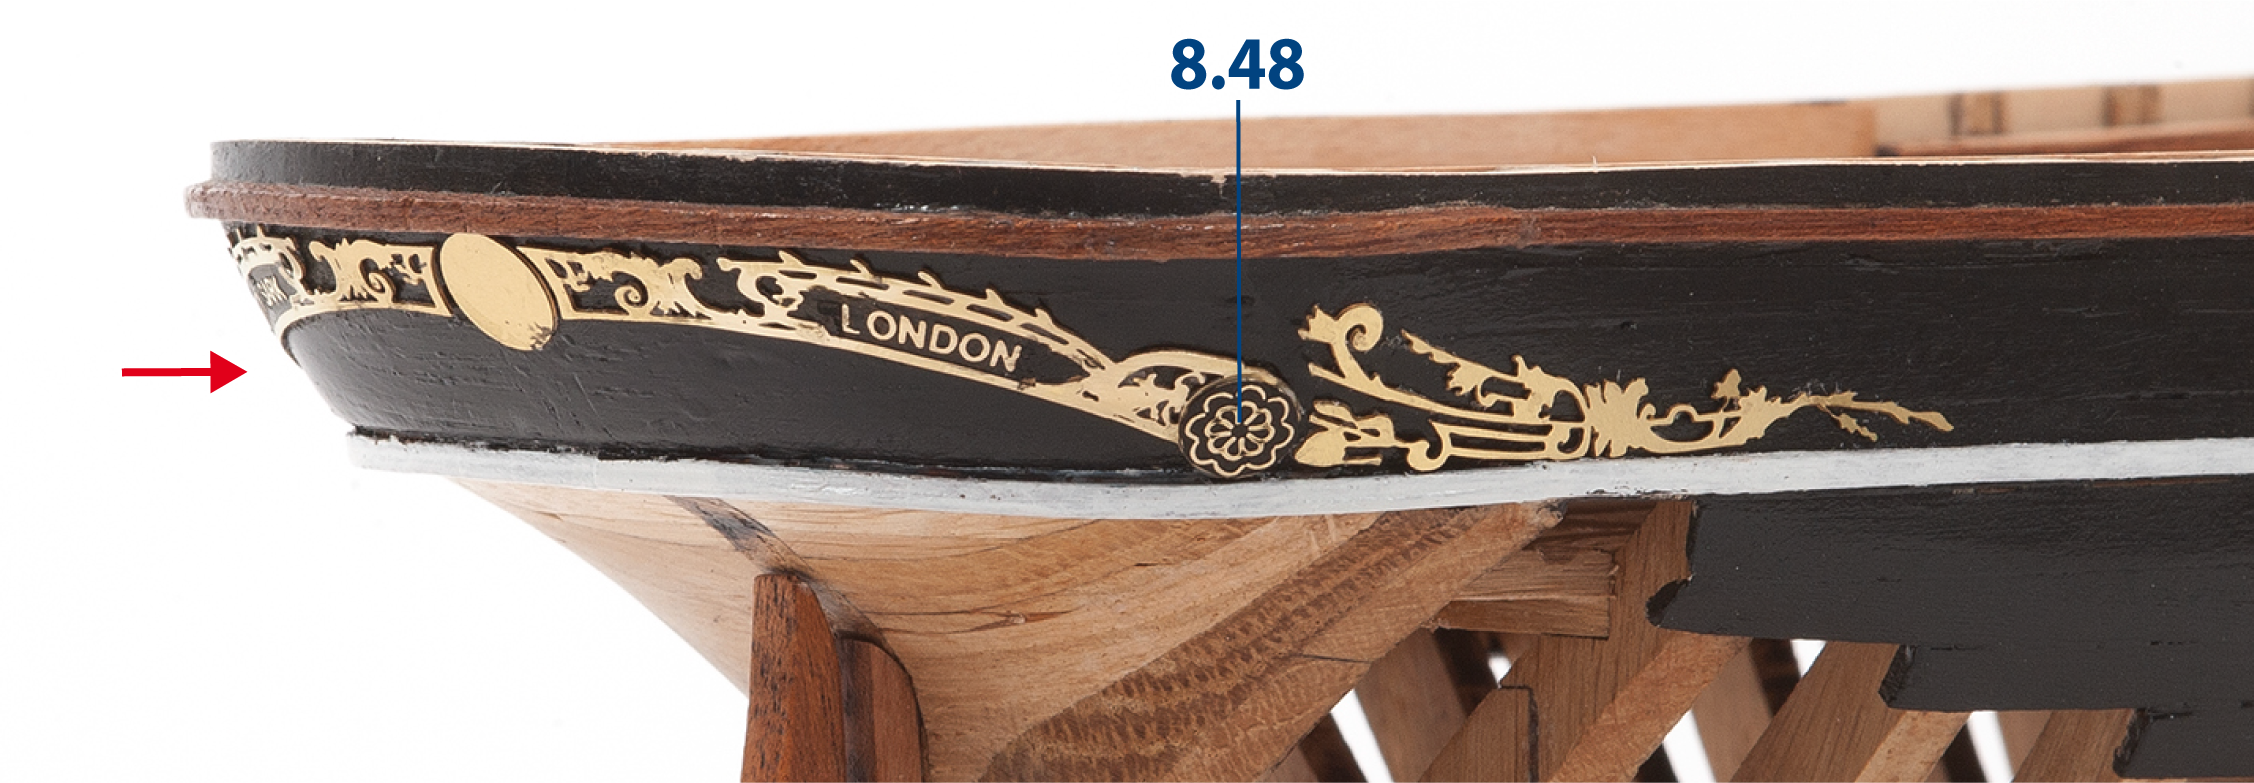
Glue stern flower decorations 8.48, one on each side of the stern of the hull.
Step 6
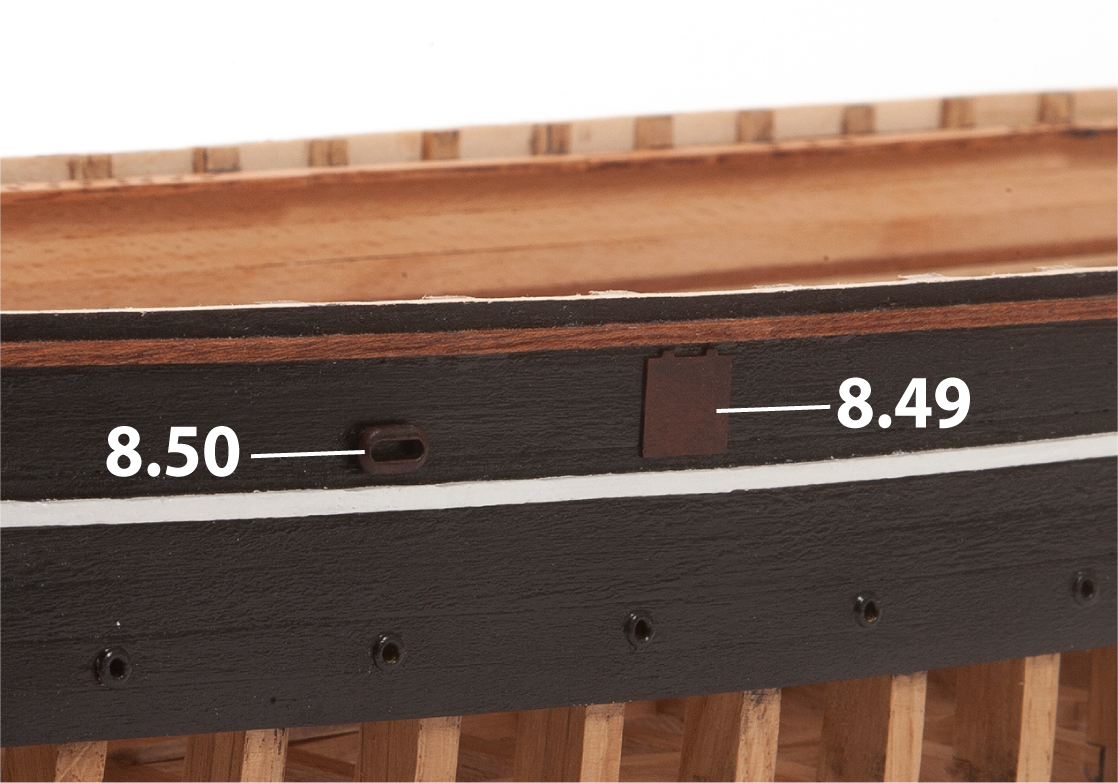
Refer to the elevation drawing when gluing parts 8.49 and hawseholes 8.50.
Hawseholes 8.50 can be located in the parts tray supplied with Pack 5.
Step 7
This image shows the positions of the parts after they have been glued to the hull.
PACK 08 IDENTIFICATION SHEETS