Pack 5
BUILD INSTRUCTIONS
Instructions for building your USS Constitution model ship
Your model of the USS Constitution is divided into 12 packs.
You will need to follow the step-by-step assembly photos, the plans and the explanatory texts below.
Please save the leftover materials from each pack for use when instructed to do so at a later stage of the assembly instructions.
The IP sheets displayed below are drawings of laser-cut parts and photo-etched brass parts and will serve as a guide for identification of some parts.
Use the PARTS REFERENCE table to help locate the parts.
The PL-00 templates (printed at 1/1 scale) included in each pack will serve as a guide for building the model.
Please check the list below to ensure you have all the tools required for building your wooden ship.
When removing a part, cut the ribs that join the part to the wooden plate with a cutter.
Remove the parts carefully so as not to break them.
Keep and store the parts in their frames. Only remove the parts you are working on in each step.
Extra support can be found on our forum or from the Expert Directory page of our website.
PARTS LIST
| Material | Quantity | |
| Board 2001-37 | Wood | 1 |
| Wooden Strips | ||
| 2 x 6 x 600 mm | Mahogany | 4 |
| 2 x 3 x 600 mm | African walnut | 4 |
| 2 x 3 x 600 mm | Lime wood | 20 |
| 4 x 4 x 600 mm | Mahogany | 2 |
| 2 x 2 x 600 mm | Mahogany | 15 |
| 2 x 2 x 600 mm | African walnut | 2 |
| 1 x 5 x 600 mm | Lime wood | 15 |
| 2 x 5 x 600 mm | African walnut | 2 |
| 2 x 5 x 600 mm* | Mahogany | 60 |
| Templates | ||
| Gunport template PL-09 | 1 | |
| Gunport template PL-10 | 1 | |
| Deck plan reference sheet | 1 | |
| Whole ship elevation reference sheet | 1 | |
| Other Parts | ||
| Cannon barrels | 15 | |
| Wire (ø 1.5 mm x 100 mm) | Brass | 10 |
| Large wheel | 70 | |
| Small wheel | 70 | |
| Eyebolt (B) | 575 | |
| Ring (ø 3mm) | 50 | |
| Chain (1000 mm) | 1 | |
| Stanchion | 12 | |
| Belaying pin (10 mm) | 275 | |
| Paints | ||
| Primer (30ml) | Acrylic | 1 |
| Black (30ml) | Acrylic | 1 |
| White (30ml) | Acrylic | 1 |
| Dark Red (30ml) | Acrylic | 1 |
* The 2 x 5 x 600 mm mahogany strips are used for lining the underside of the hull in Pack 6.
Tools you will need: cutting mat, pencil, cutting knife, fine-grit sandpaper or sponge sandpaper, file, white wood glue, super glue (cyanoacrylate glue), masking tape, set square, hacksaw, sanding block, 30 cm steel ruler, clamps, drill, moulding scriber tool
PACK 5 IDENTIFICATION SHEETS

PARTS REFERENCE
PART NO. | IP-SHEET LOCATION | PART NO. | IP-SHEET LOCATION |
| 5.1 | 2001-5 | 5.6 | 2001-37 |
| 5.2 | 2001-5 | 5.7 | 2001-37 |
| 5.3 | 2001-5 | 5.13 | 2001-38 |
| 5.5 | 2001-37 |
When cutting parts to length, approximate measurements have been given, but please check against your model to ensure a precise fit. The actual measurements required will be subject to individual differences in construction.
Step 1
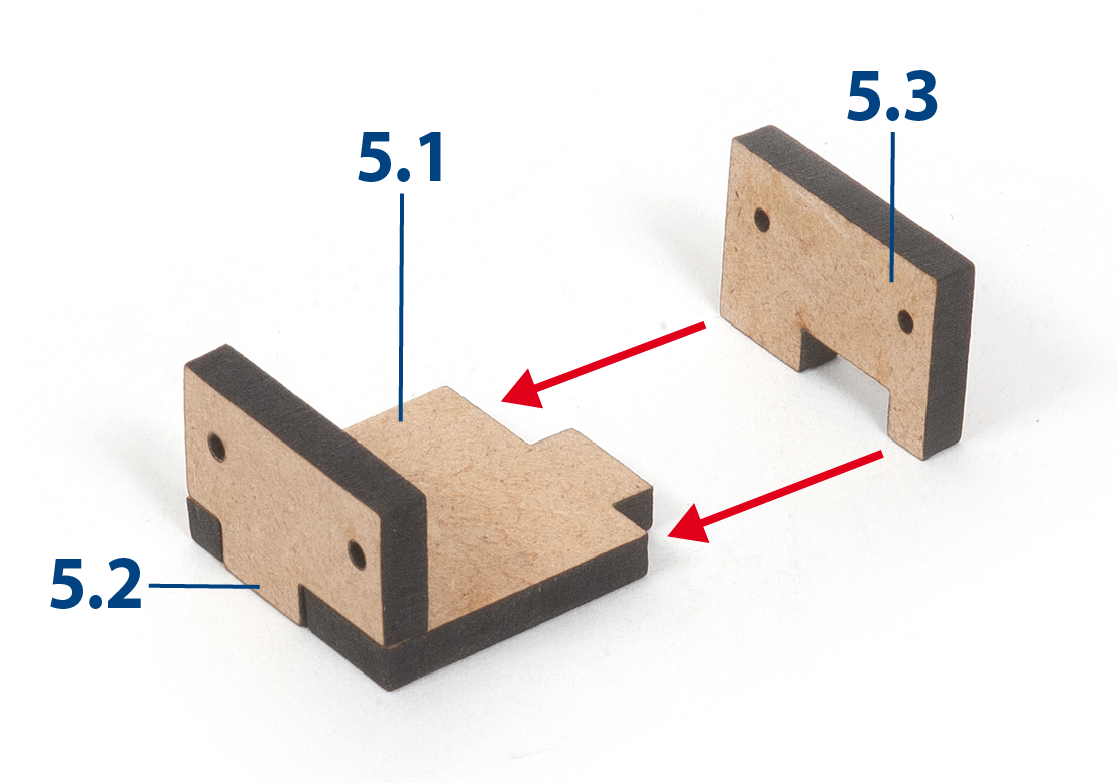
Glue pieces 5.1 to 5.3 together to form the template for the gun carriages.
Step 2
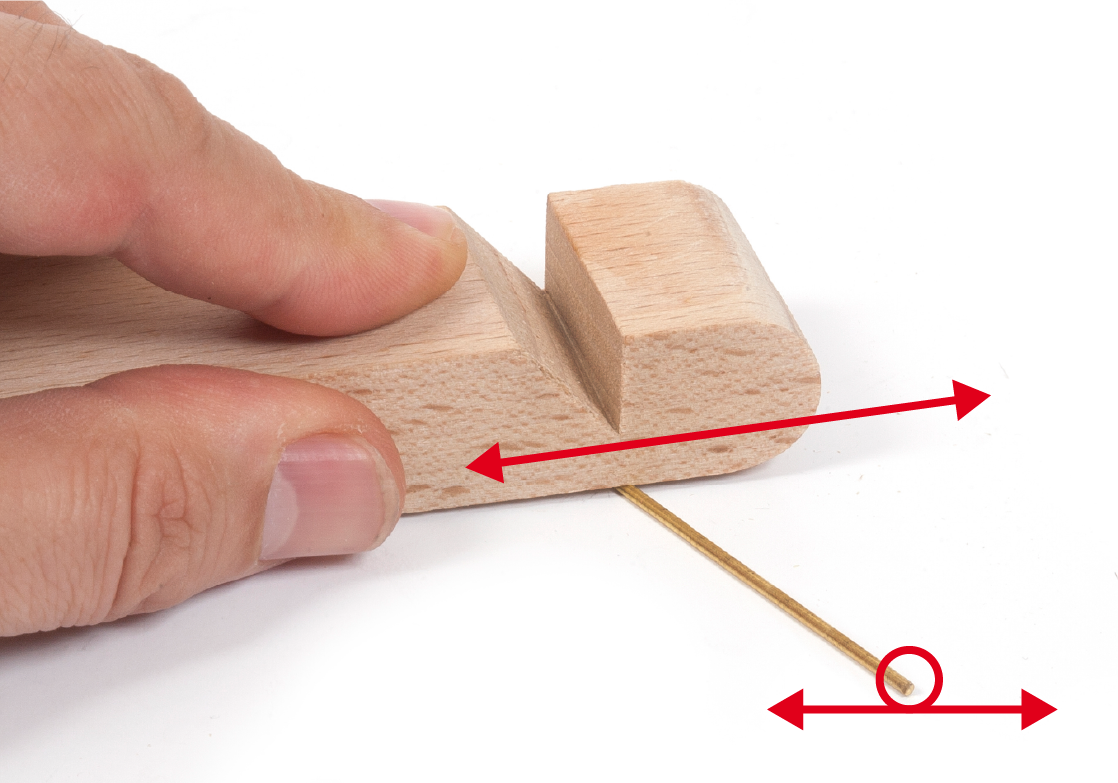
Use a flat object to roll the brass wire on a flat surface and straighten it.
Step 3
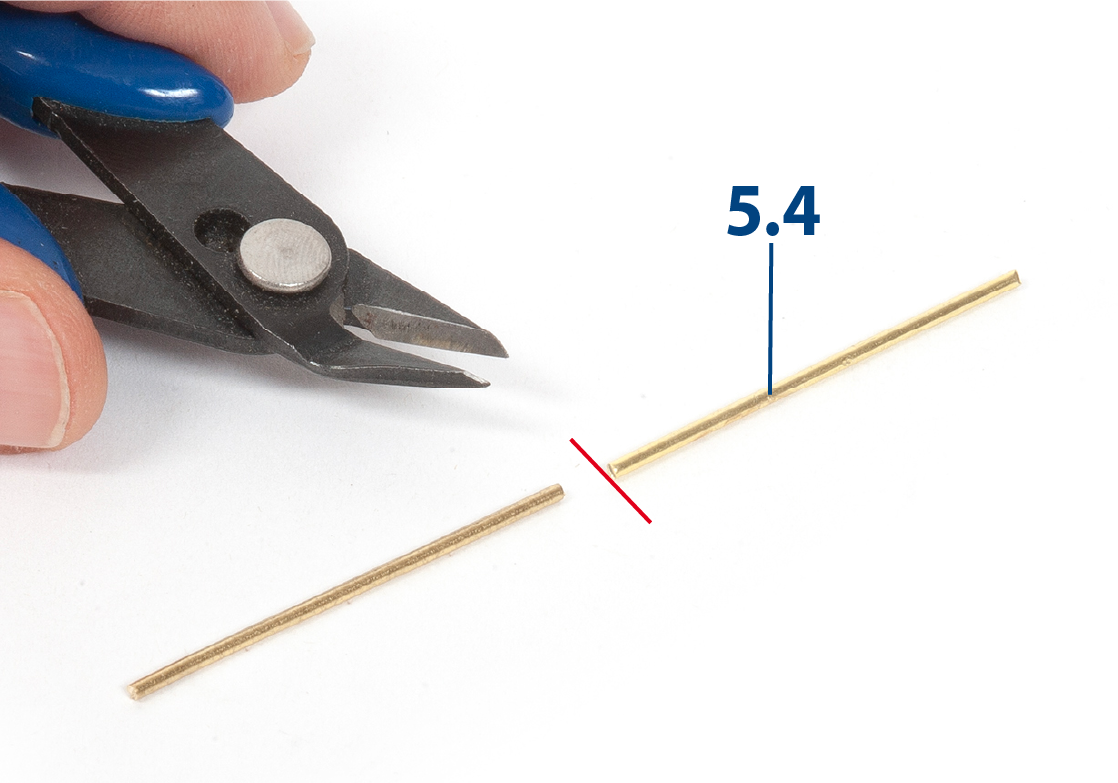
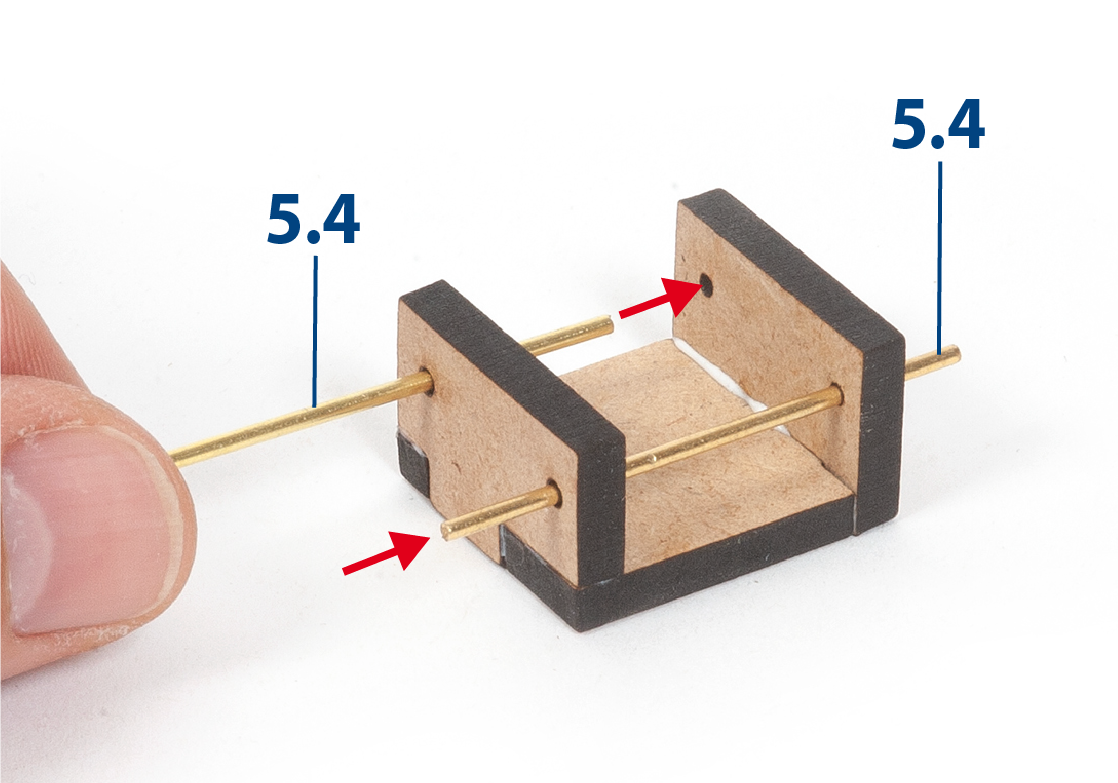
Cut a brass wire in half to make two pieces 5.4.
Step 4
Insert, without gluing, the two pieces 5.4 through the holes in the template.
Step 5
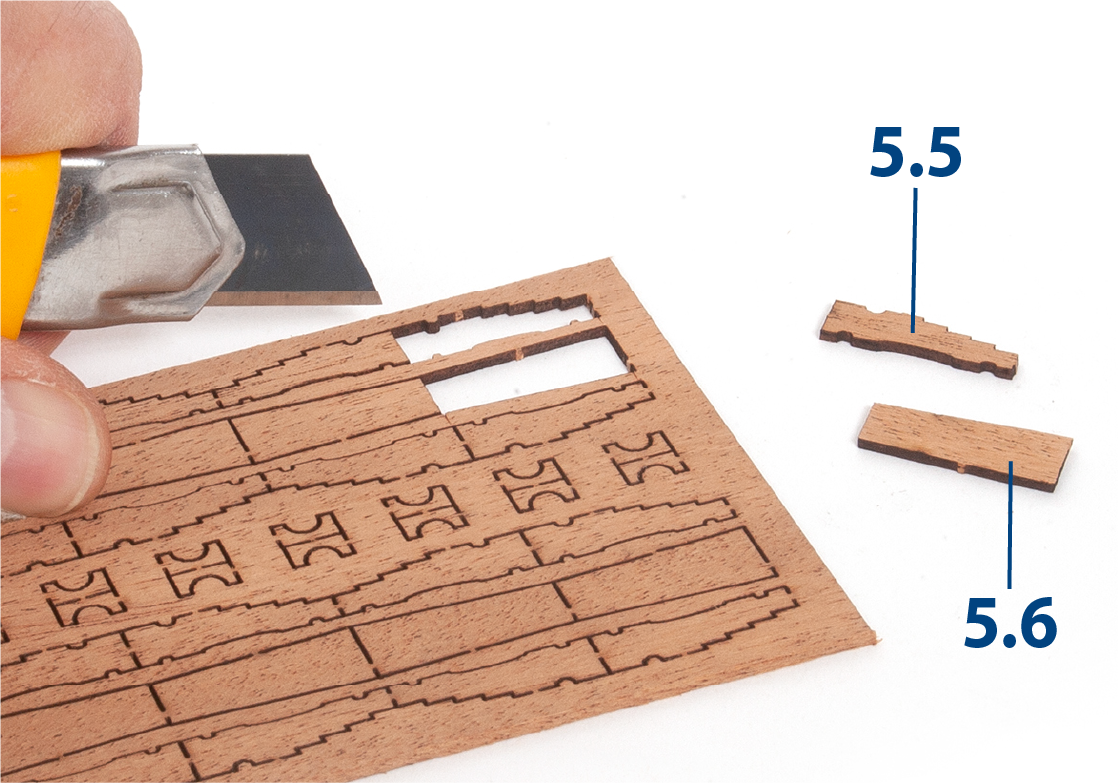
Cut the connecting ribs and remove parts 5.5 and 5.6.
Step 6
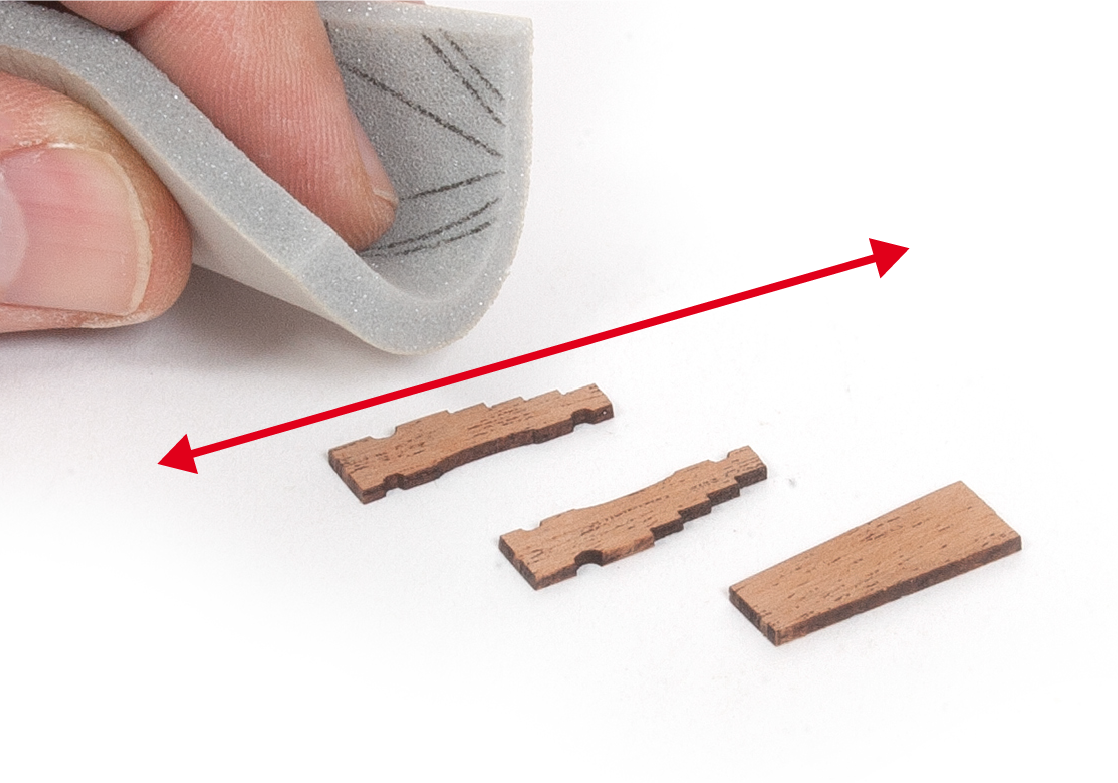
Sand them with fine-grit sponge-sandpaper.
Step 7
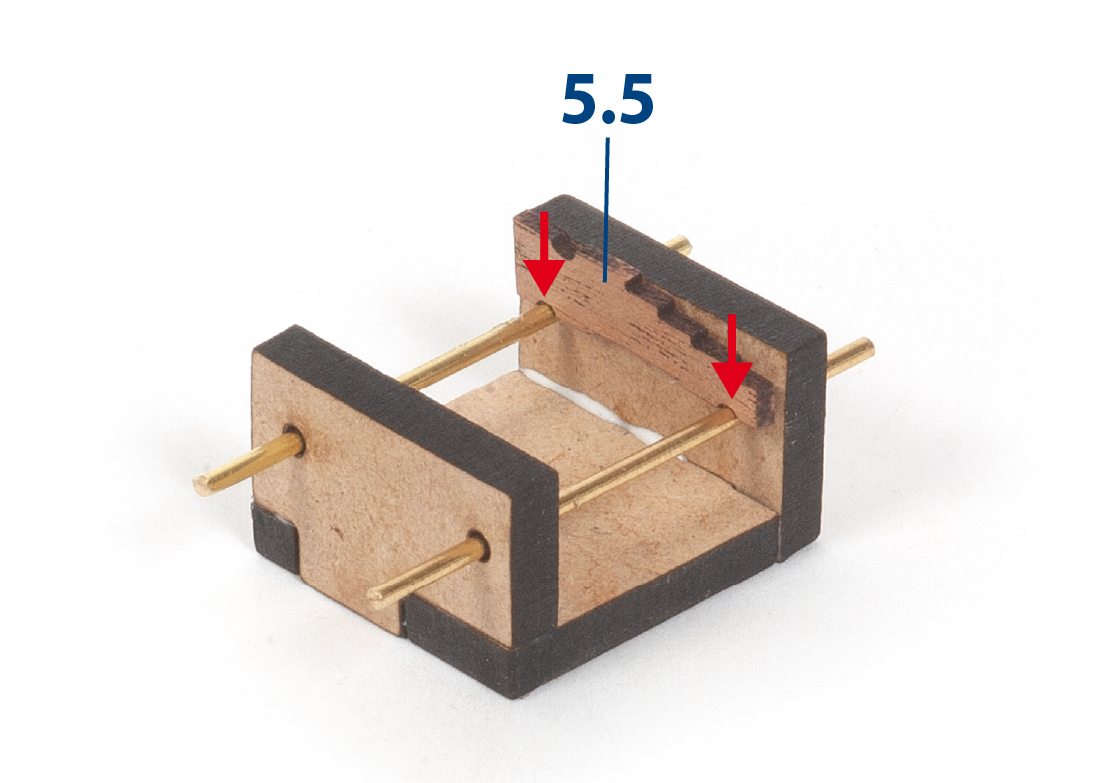
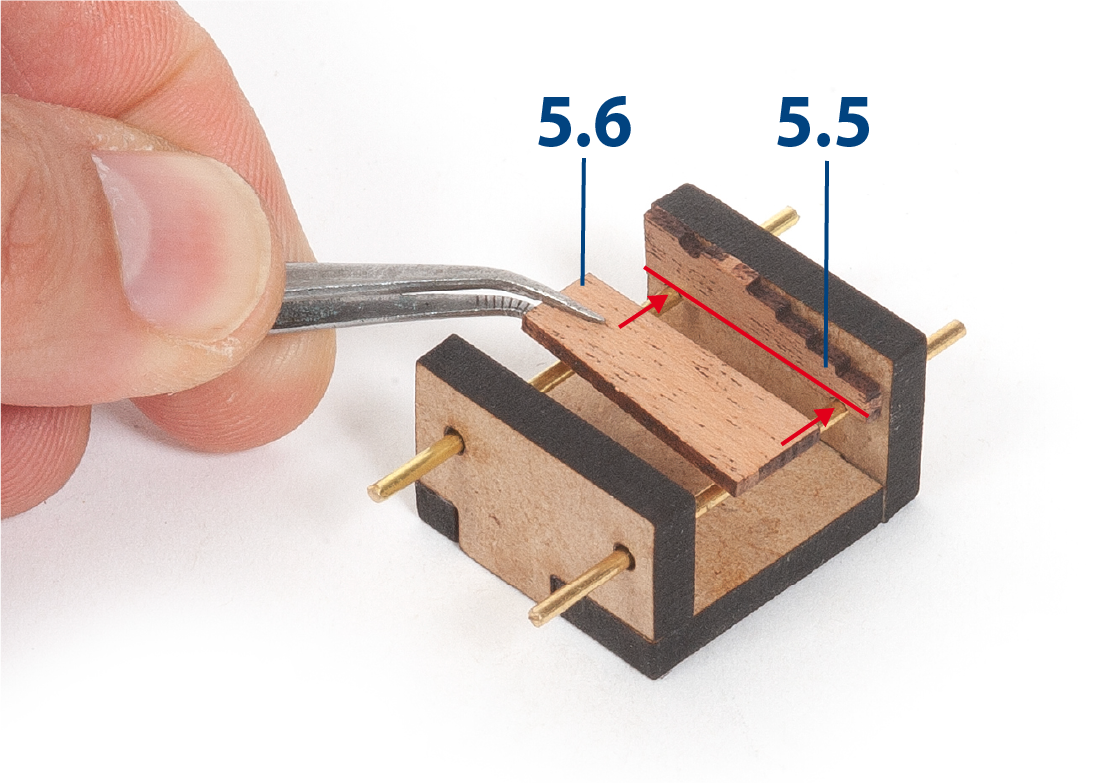
Place an unglued part 5.5 on top of the template to align it with the pieces 5.4.
Step 8
Apply glue and fit part 5.6 against part 5.5.
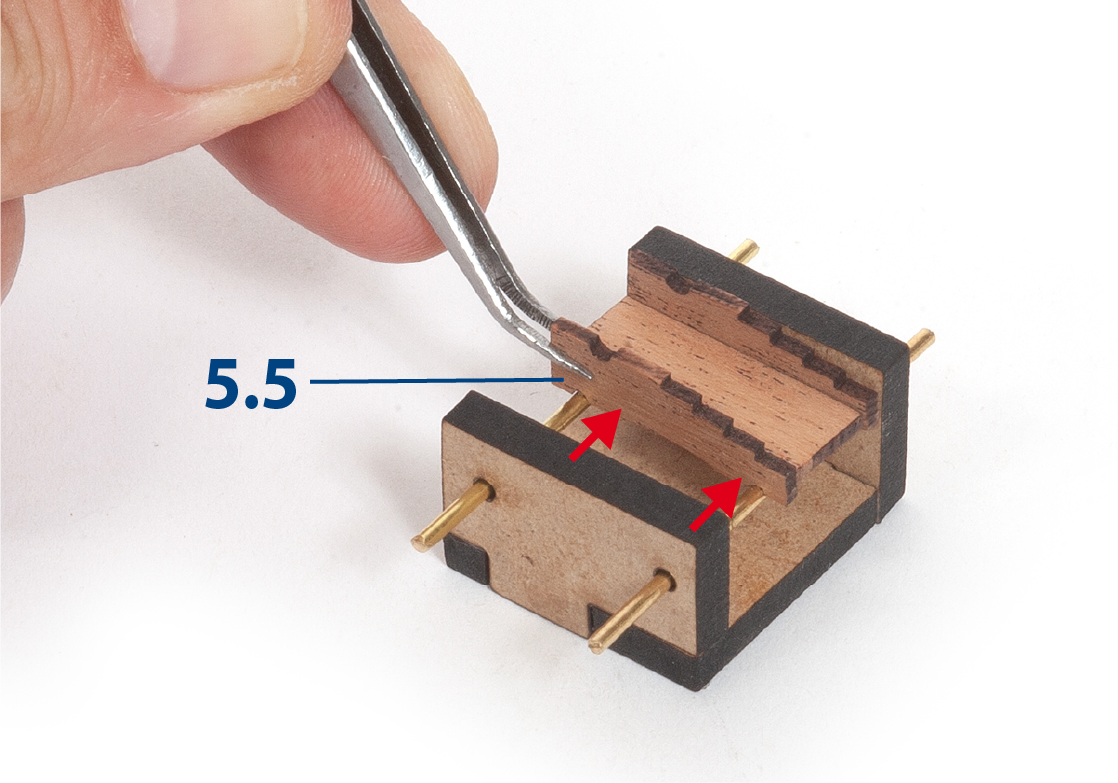
Step 9
Glue another part 5.5 to the other side of part 5.6.
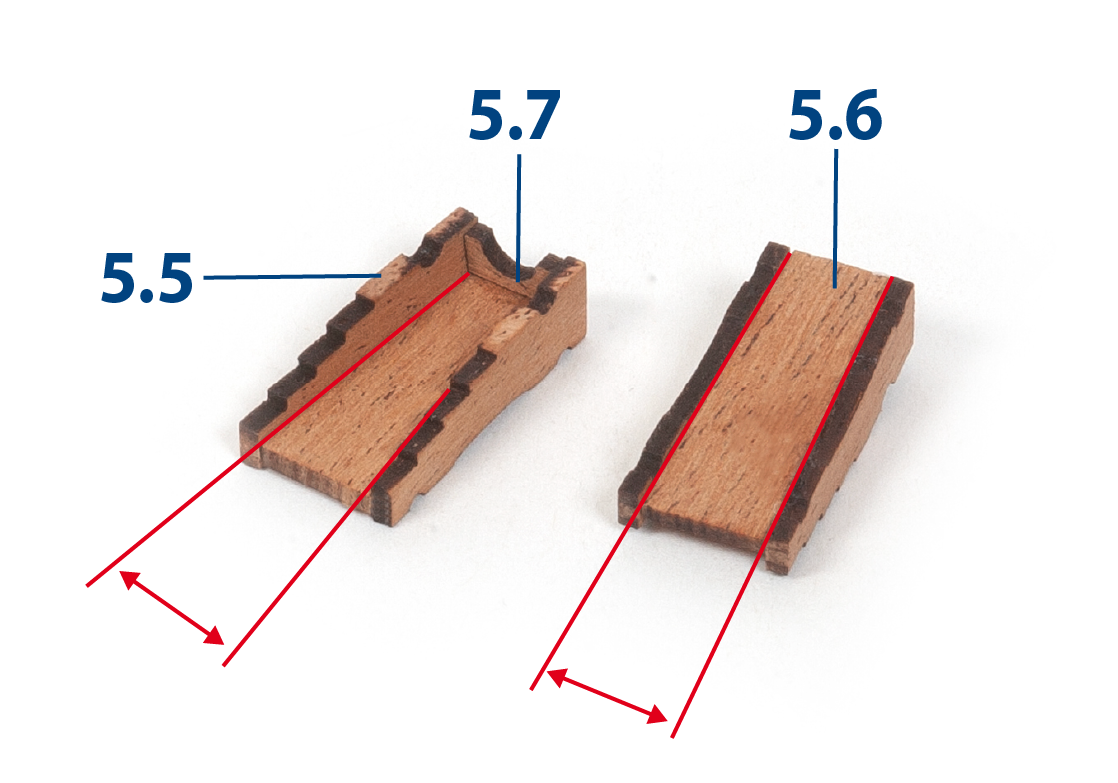
Step 10
Fit and glue a 5.7 piece as shown. You must build a total of 32 identical gun carriages.
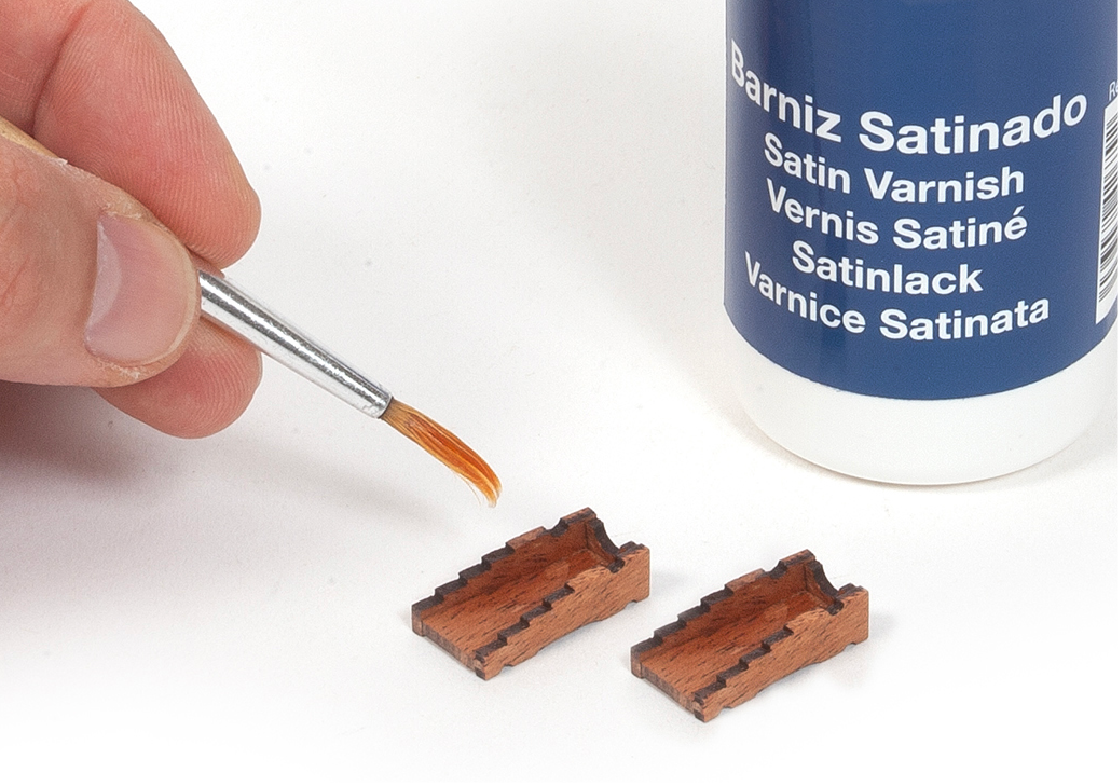
Step 11
Sand and varnish the gun carriages.
Step 12
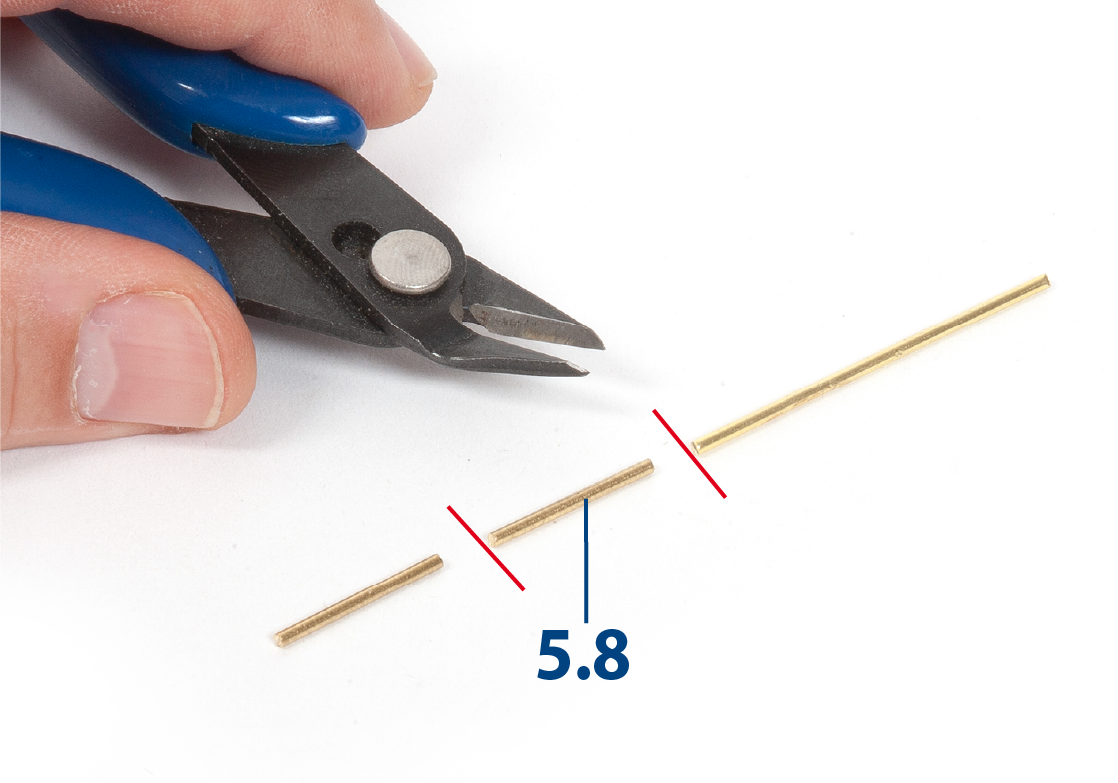
Use pliers to cut the brass wires 5.8 (appx. 17 mm).
Step 13
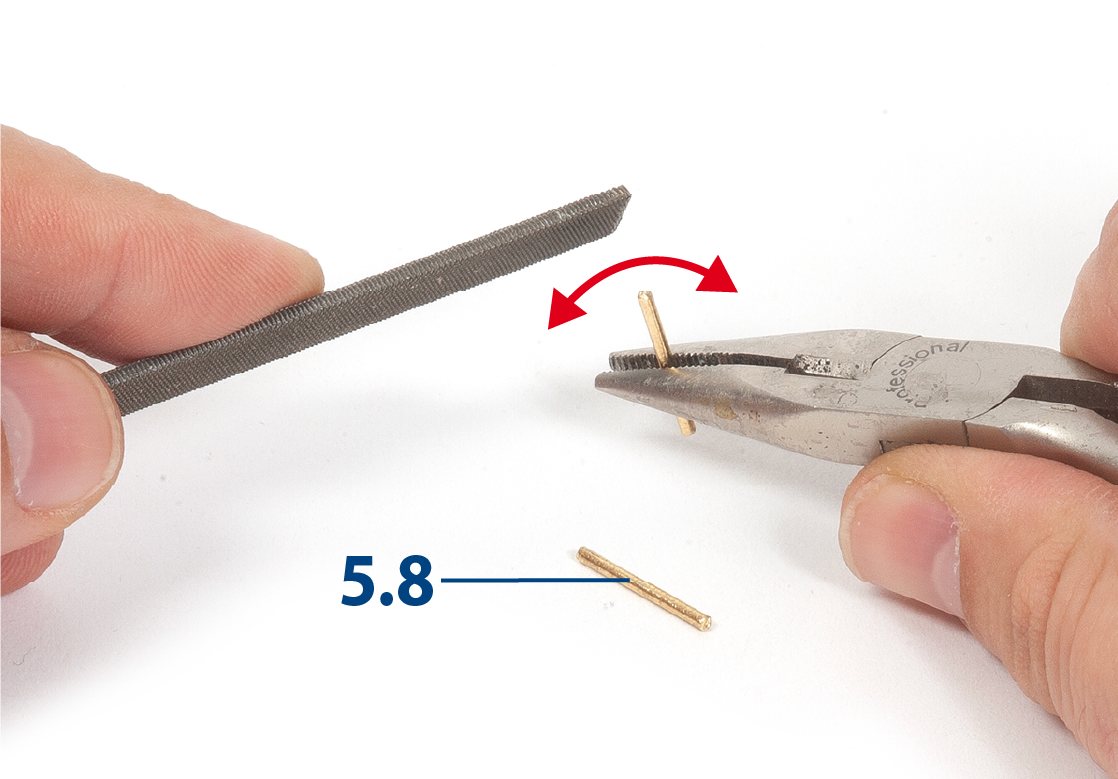
Use a flat file to round the ends of the brass wires 5.8.
Step 14
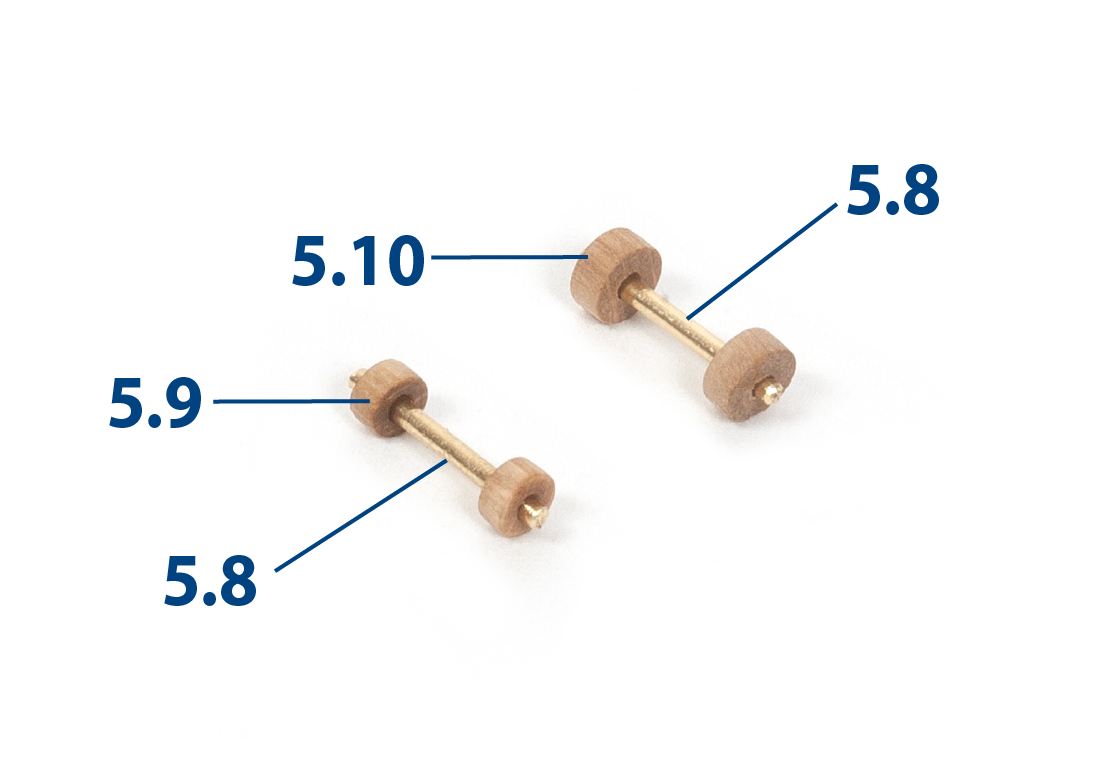
Insert and glue wheels 5.9 and 5.10 onto the brass wires.
Step 15
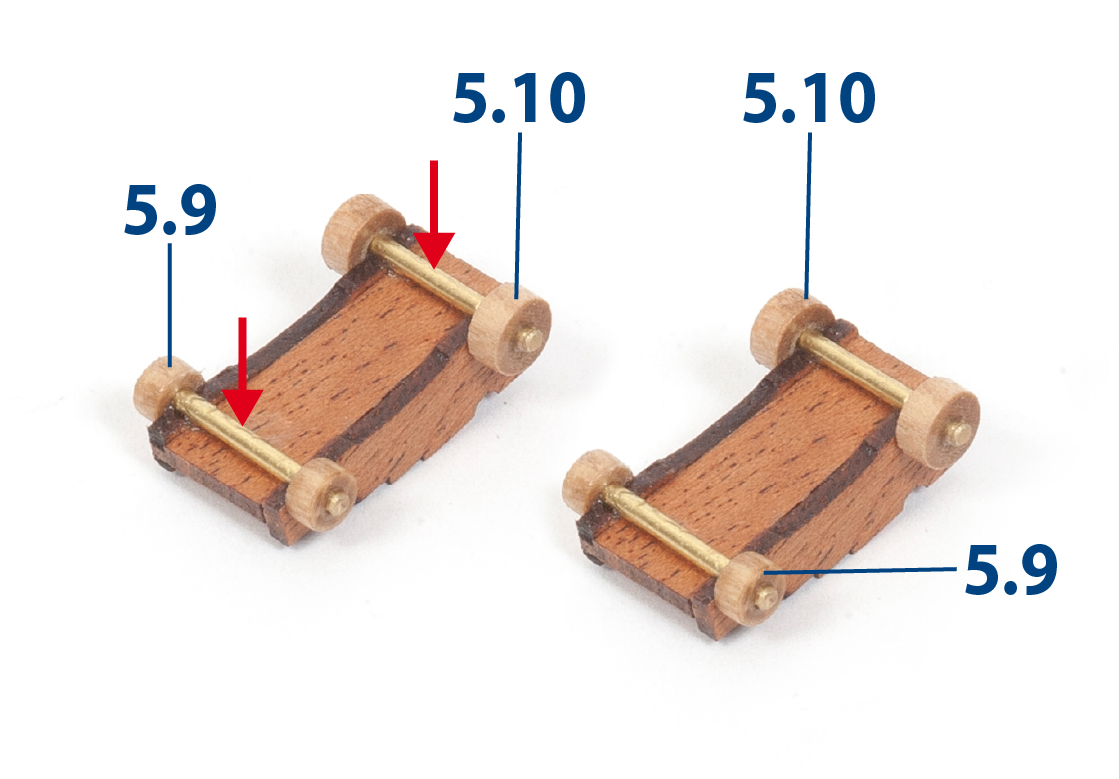
Glue the wheel axles to the bottom of the gun carriages.
Step 16
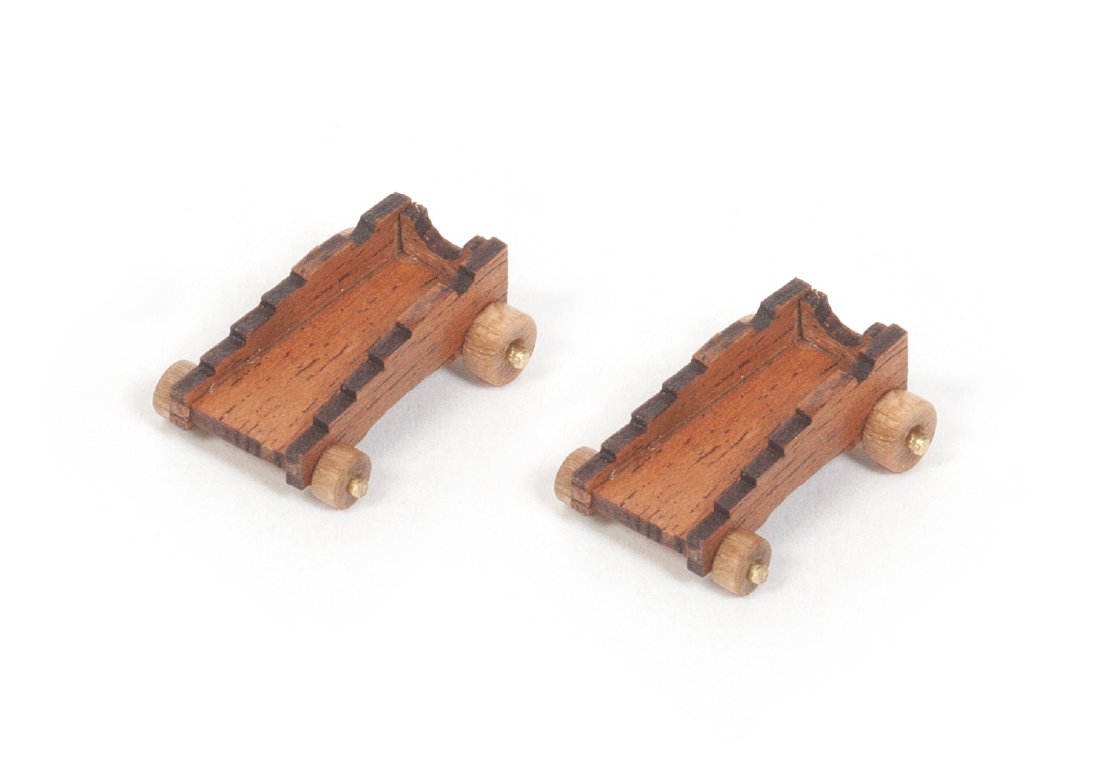
Note the finished gun carriages in the picture.
Step 1
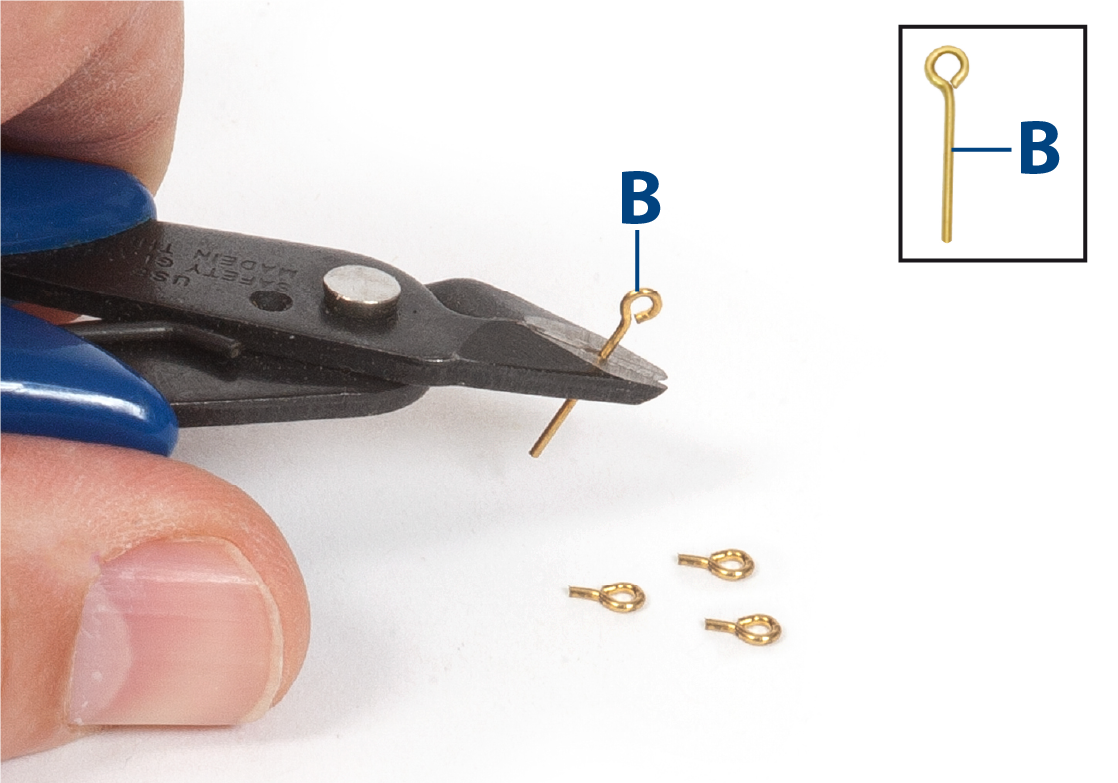
Use pliers to cut the tails of the eyebolts B.
Step 2
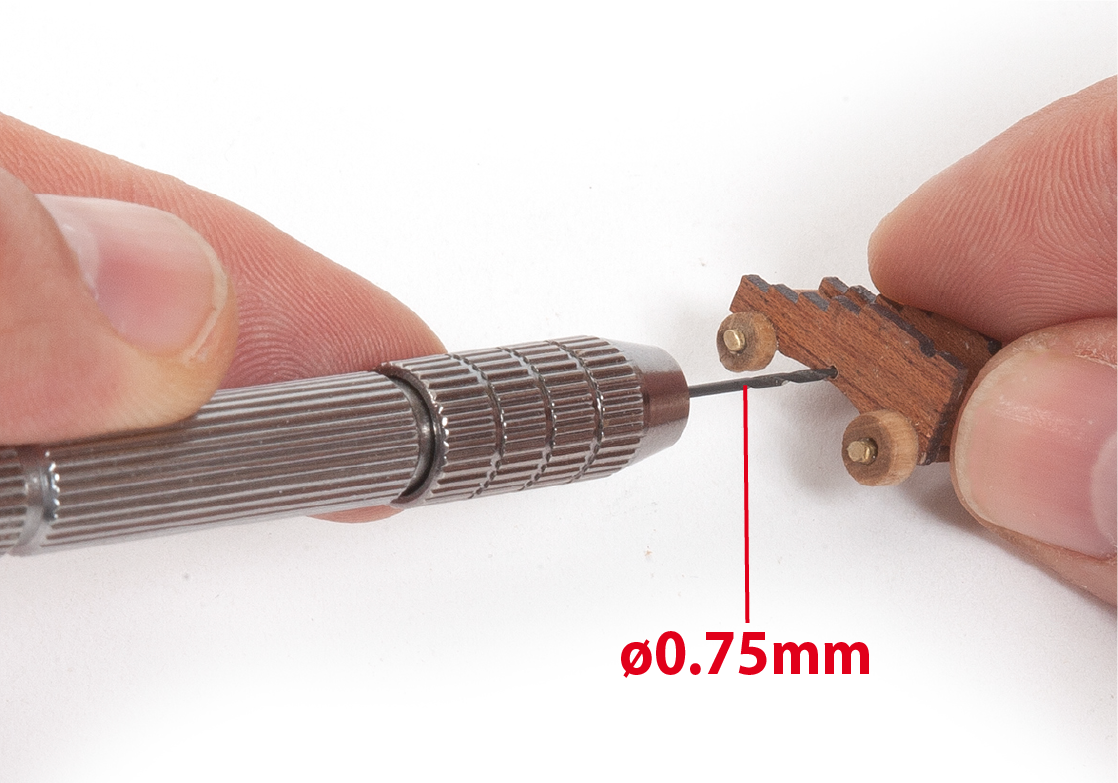
Drill the holes in the gun carriages.
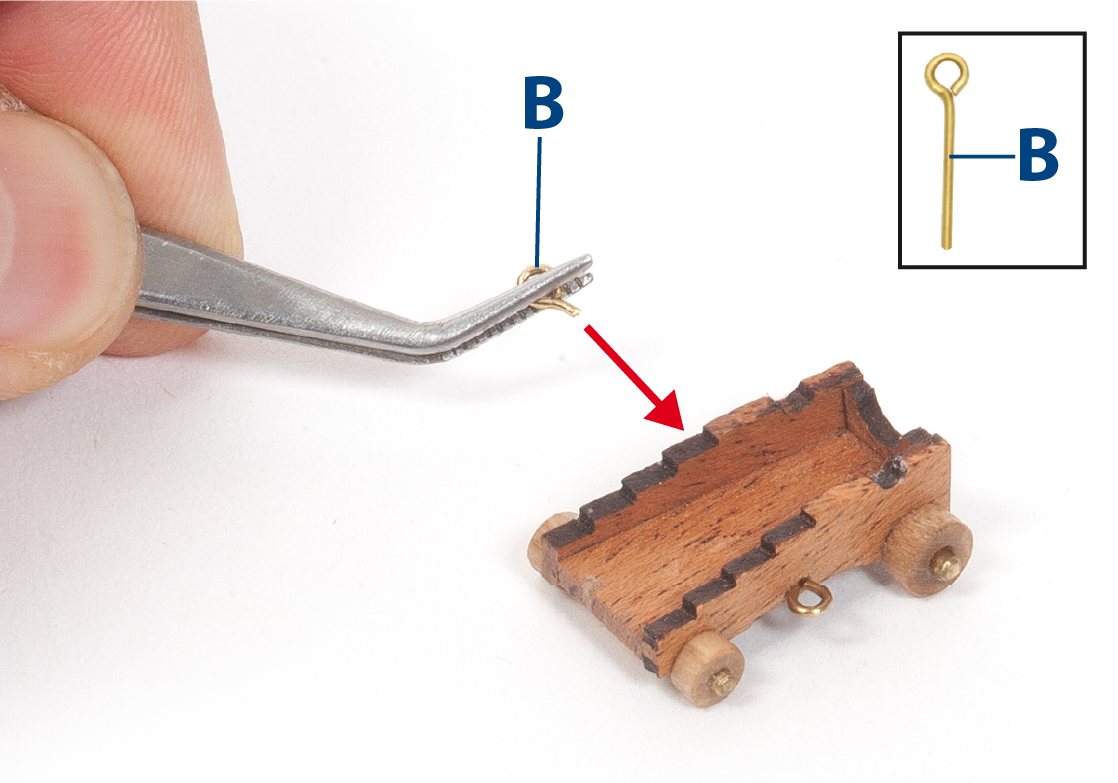
Step 3
Insert and glue the eyebolts B into the gun carriages.
Step 4
Repeat to add the eyebolts to each gun carriage.
Step 5
Insert eyebolts B into parts 5.11 (appx. 9mm).
Step 6
Glue 5.11 parts under each of the gun carriages.

Step 7
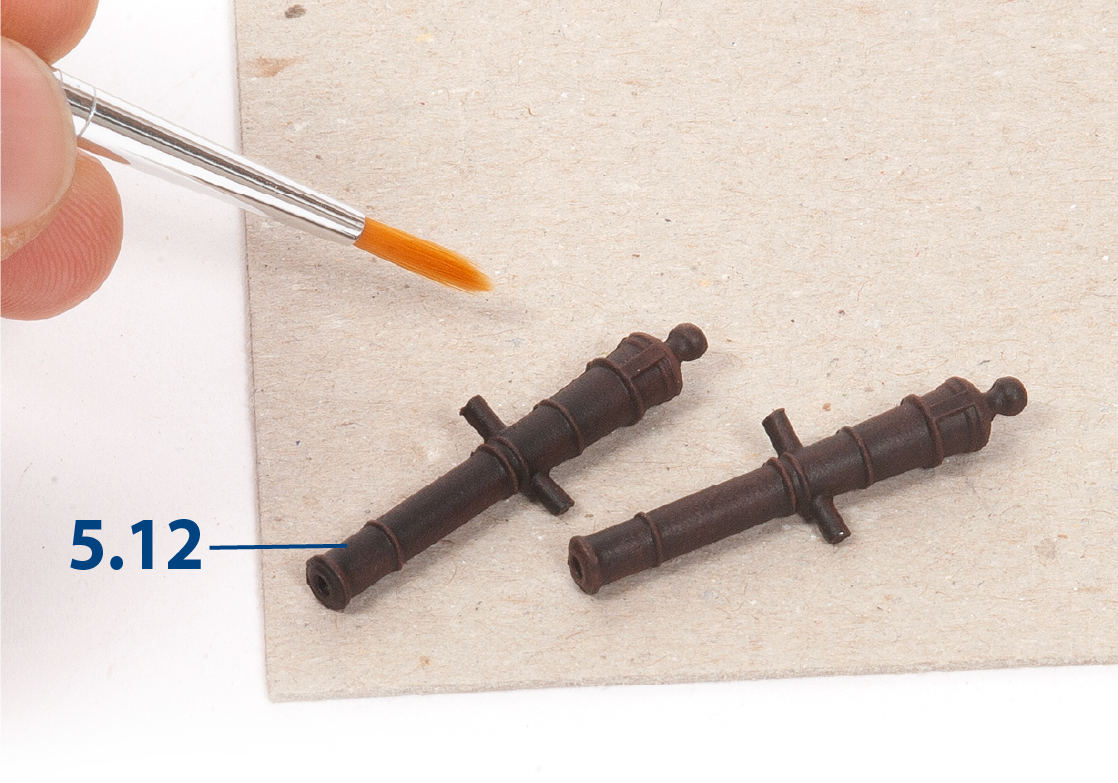
If you do not like the colour of the barrels, you can paint them. First apply primer.
Step 8
Then paint the barrels black.
Step 9
Use the dry brush technique to highlight the reliefs of the barrels with red paint.
Step 10
Apply glue and fit the barrels on the gun carriages.
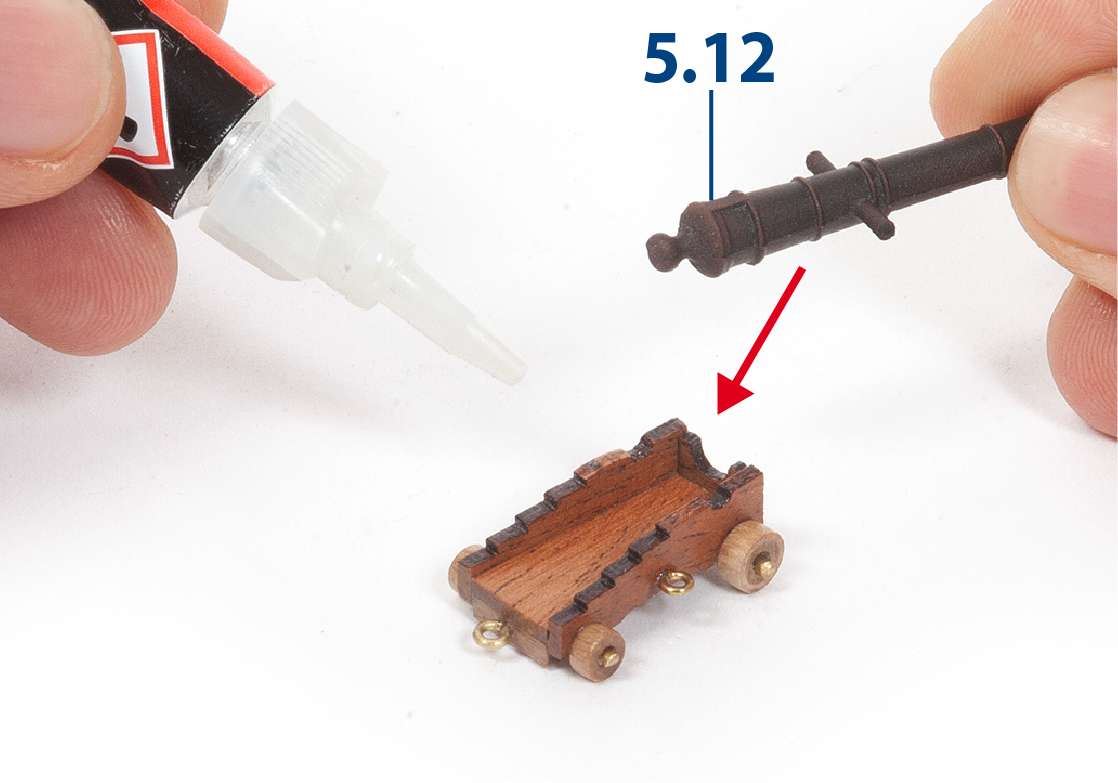
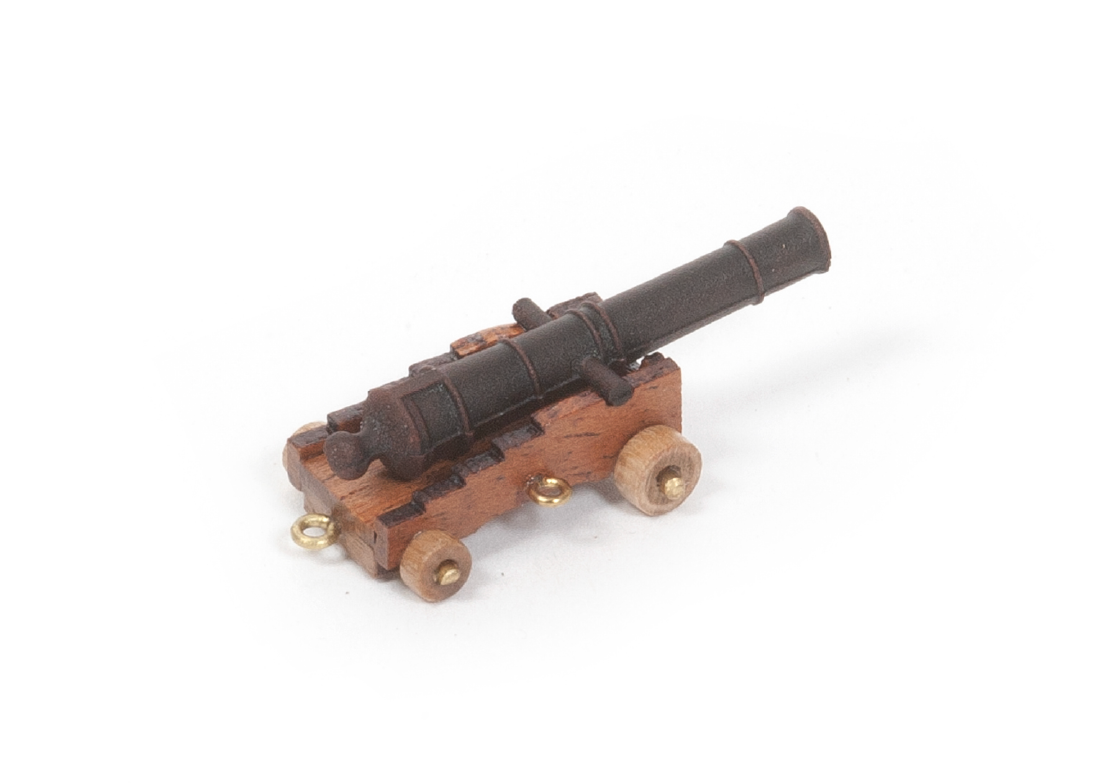
Step 11
This is approximately the position of the barrels on the gun carriages.
Step 12
Remove parts 5.13 from the brass sheet supplied with Pack 4, grouping them together.
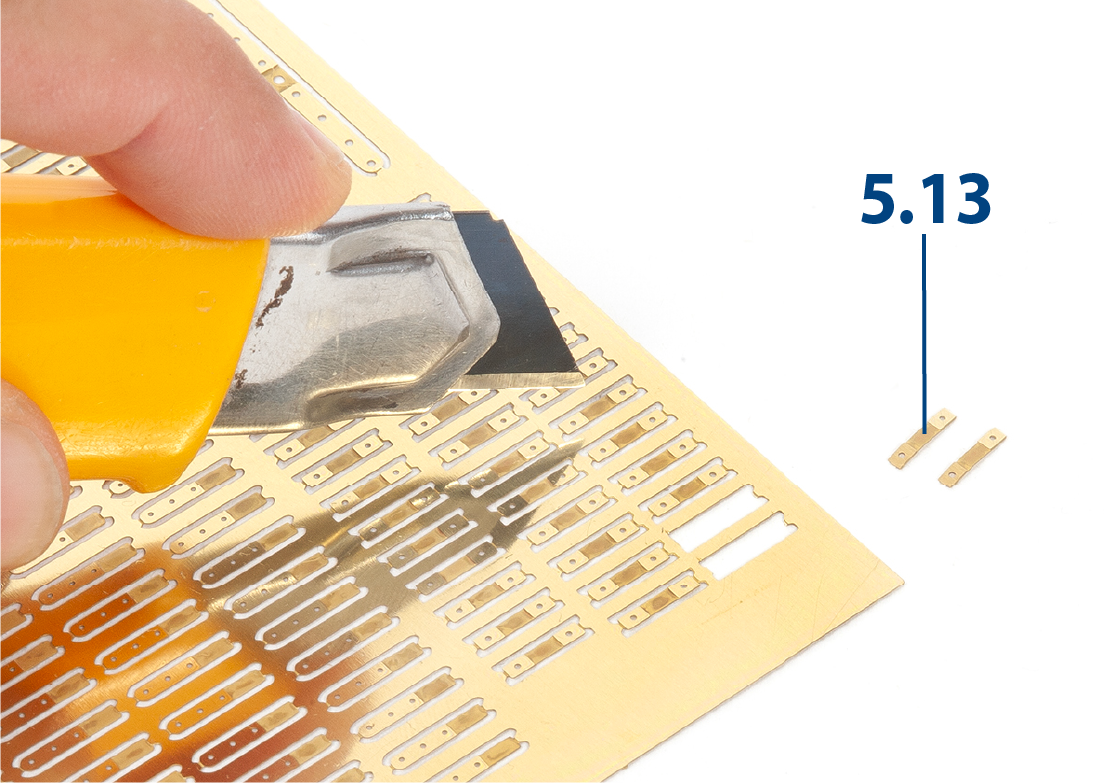
Step 13
Use a brass wire and flat pliers to shape parts 5.13.
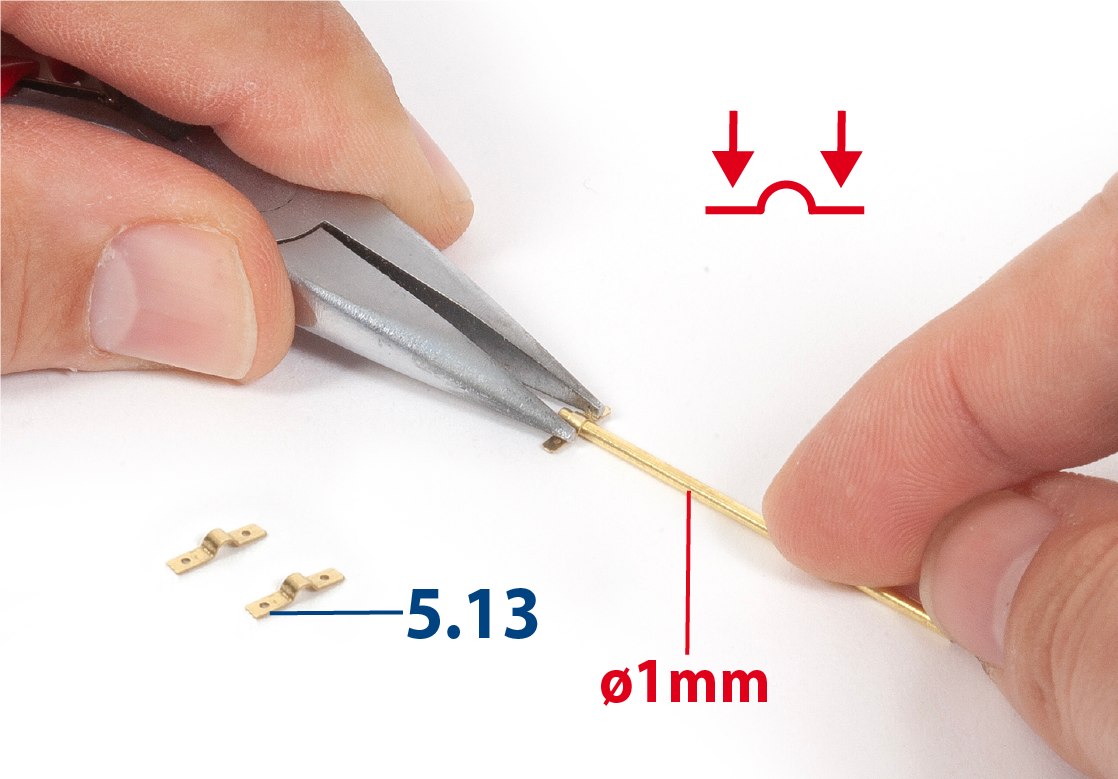
Step 14
Apply glue and fit parts 5.13 on the barrel shafts.
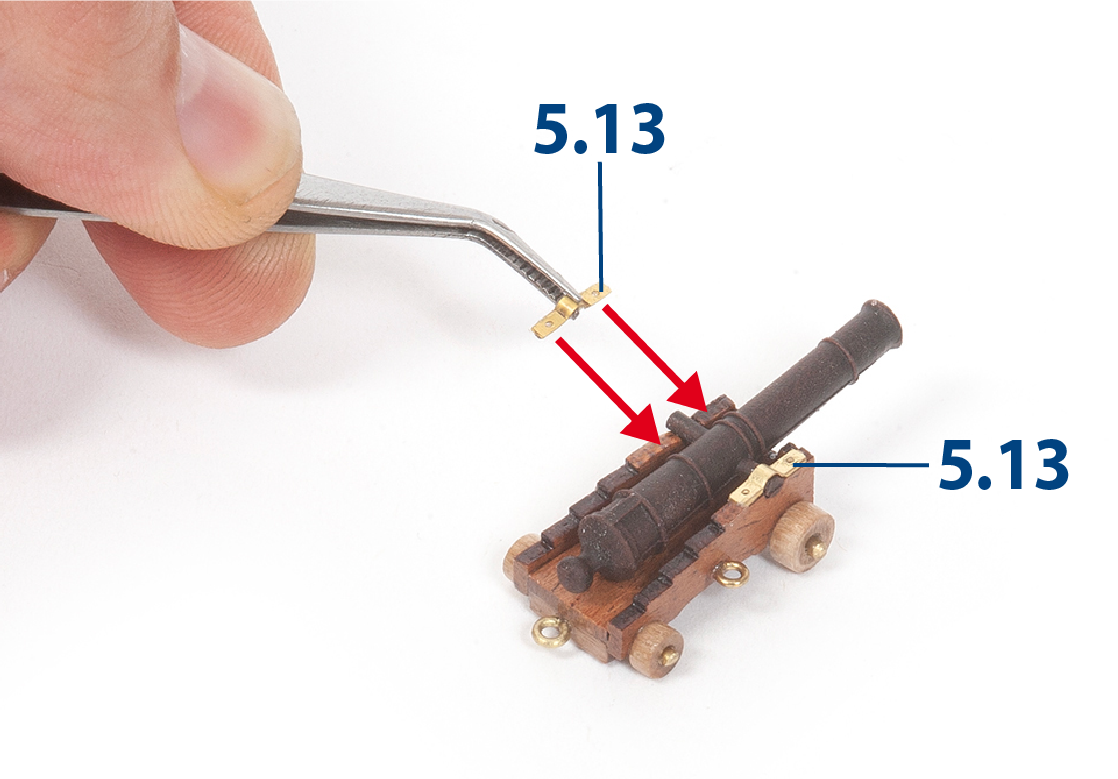
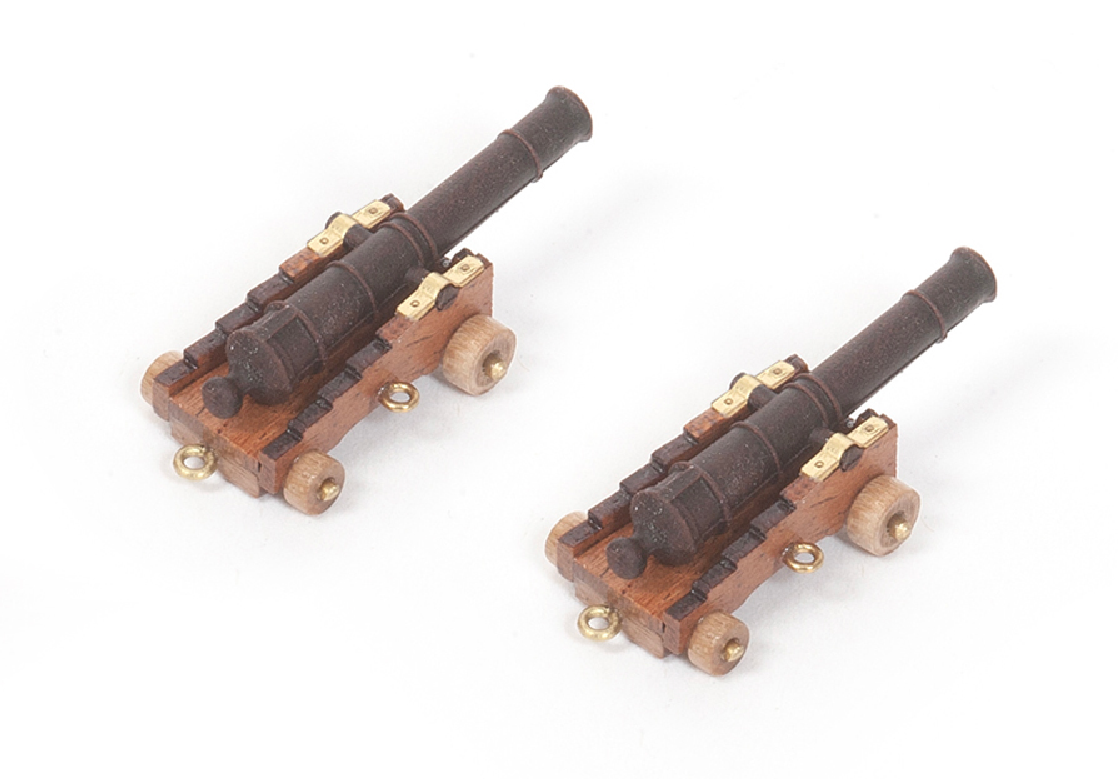
Step 15
You must complete 15 cannons. Set them aside for later use.
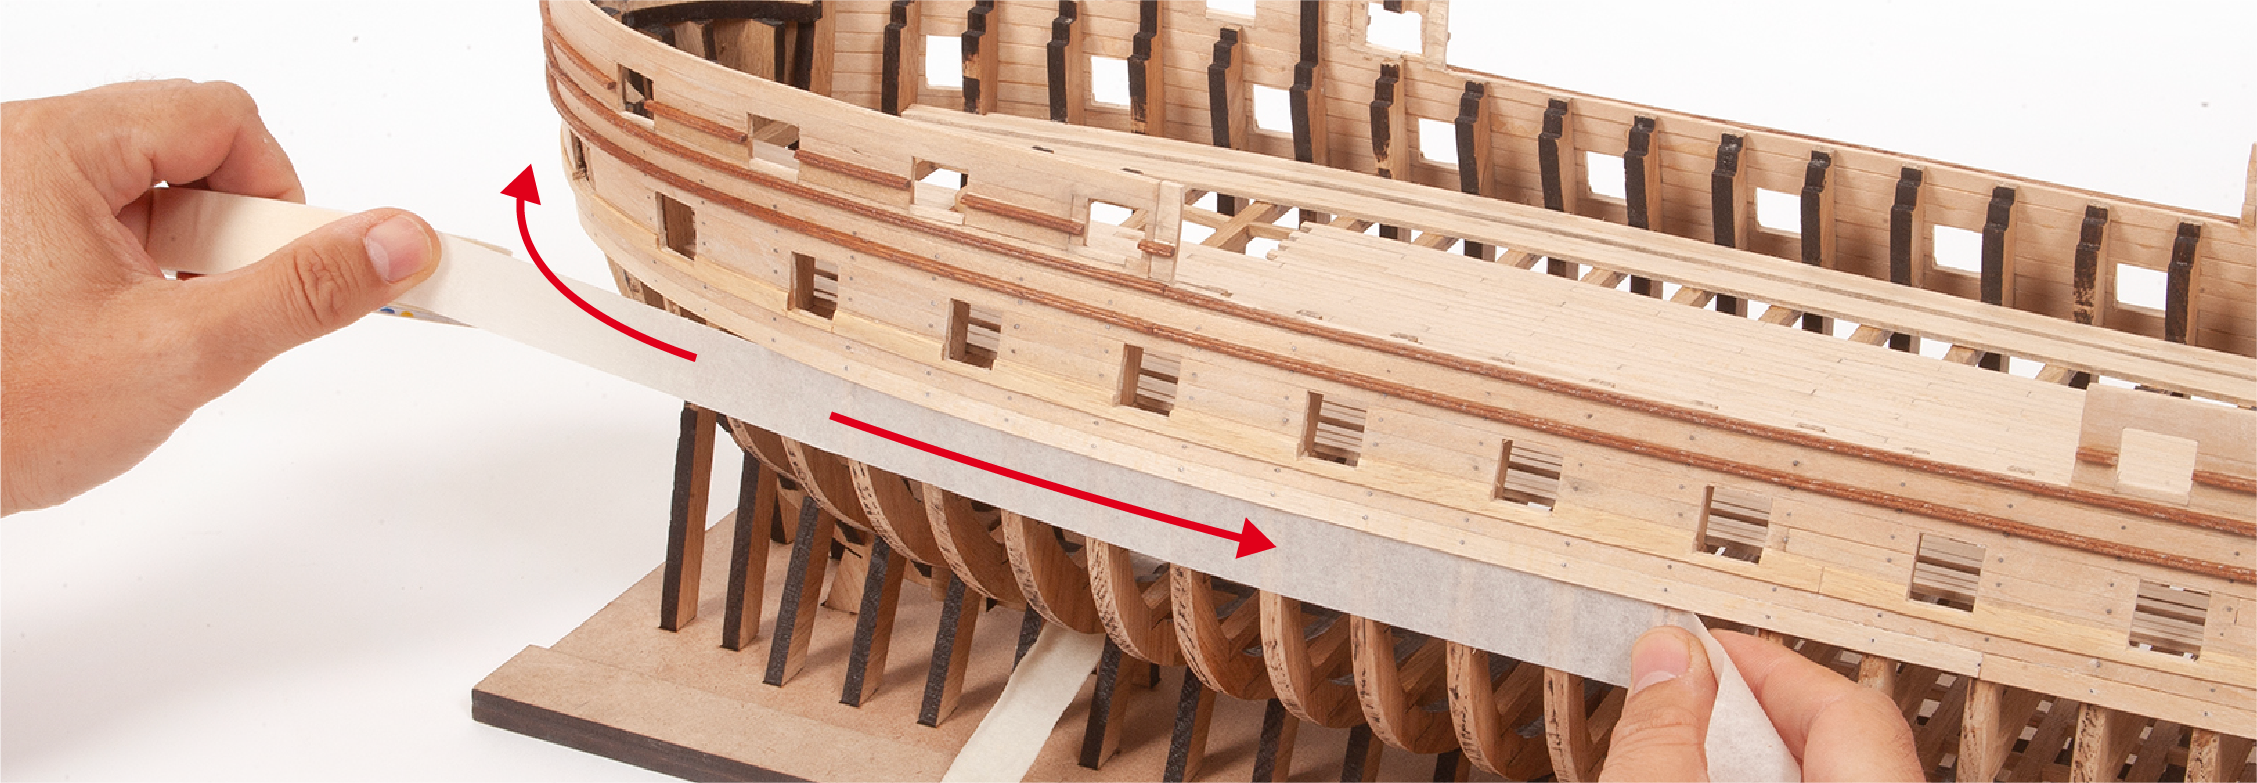
Step 1
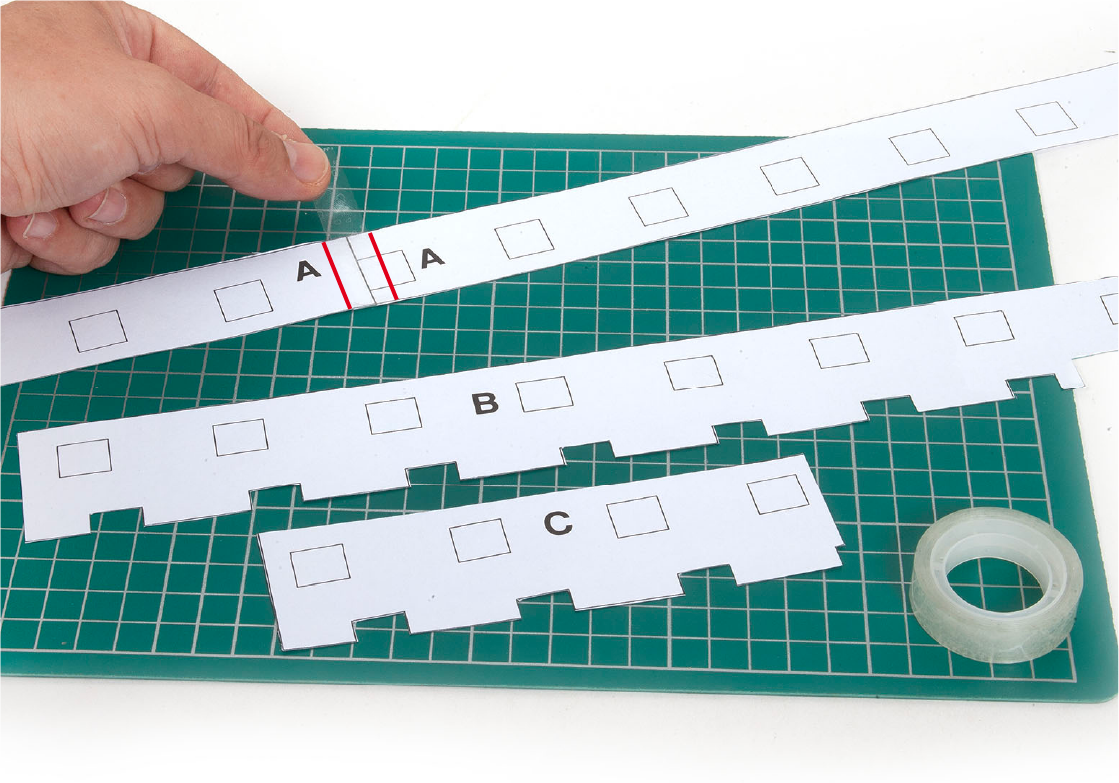
Use scissors to cut out the templates from the PL-09 sheet.
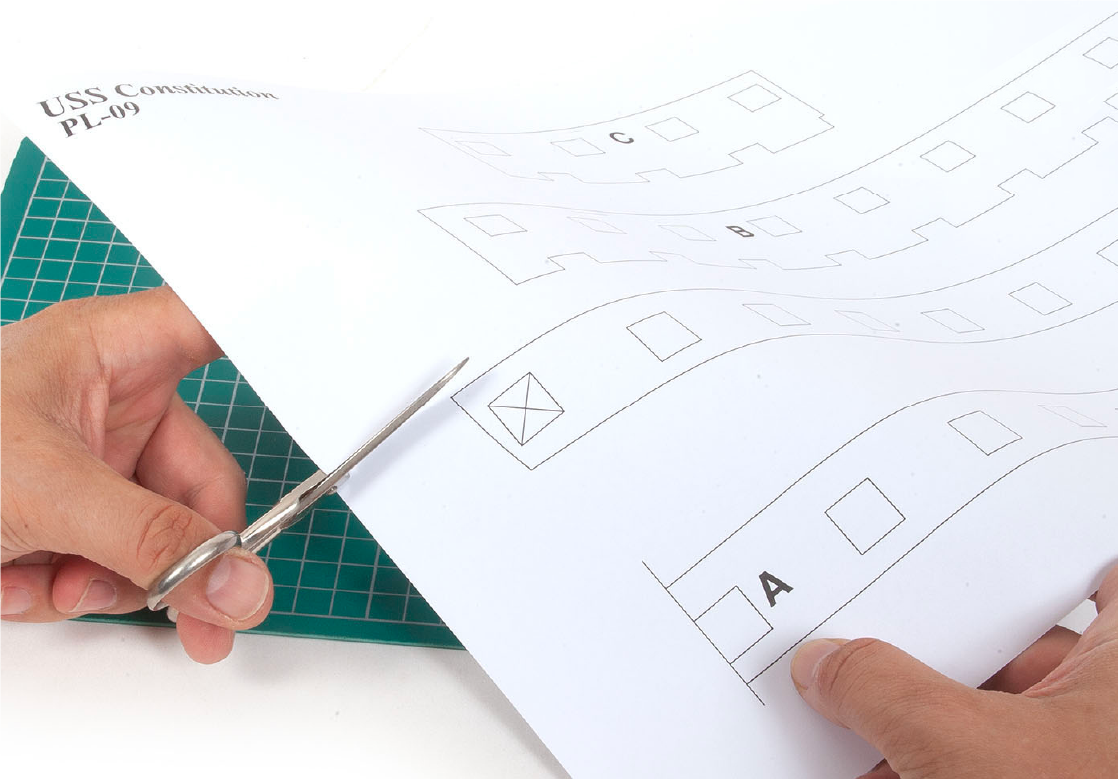
Step 2
Tape the parts of the templates together with transparent tape.
Step 3
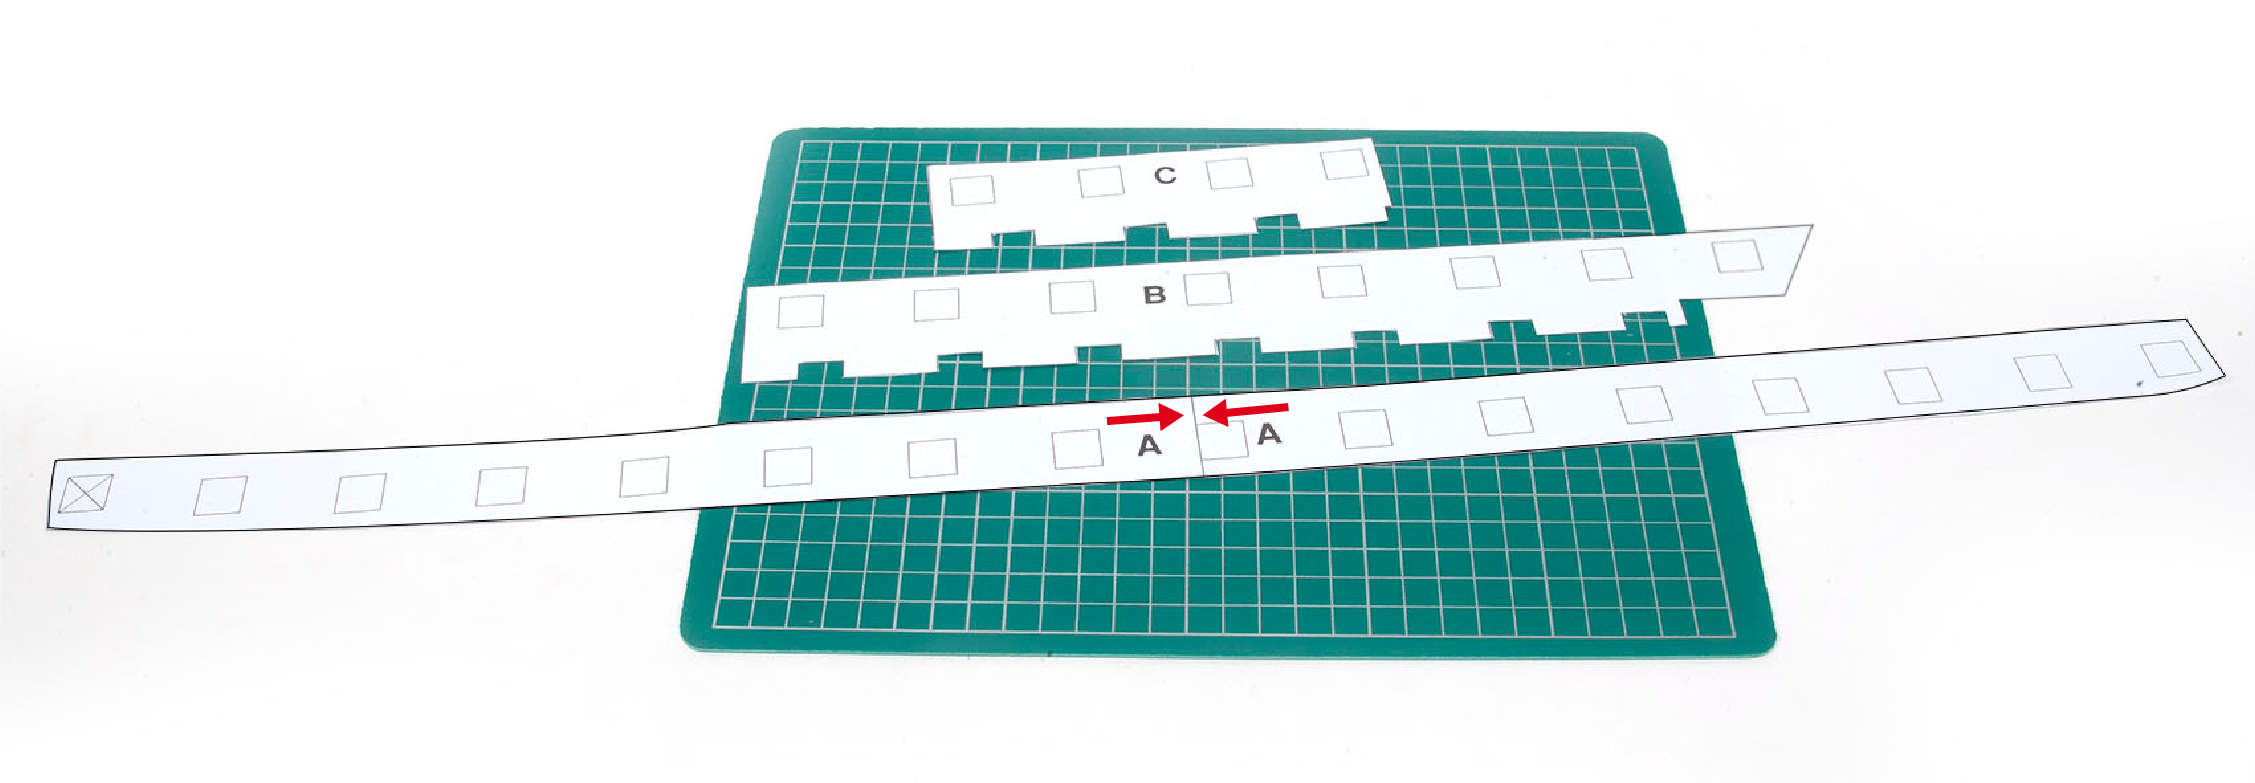
Note how the templates should be joined together.
Step 4
Apply white glue to the inside of the planking. This is to reinforce the bonding of the parts to each other and to the frames. Set aside until dry.
Step 5
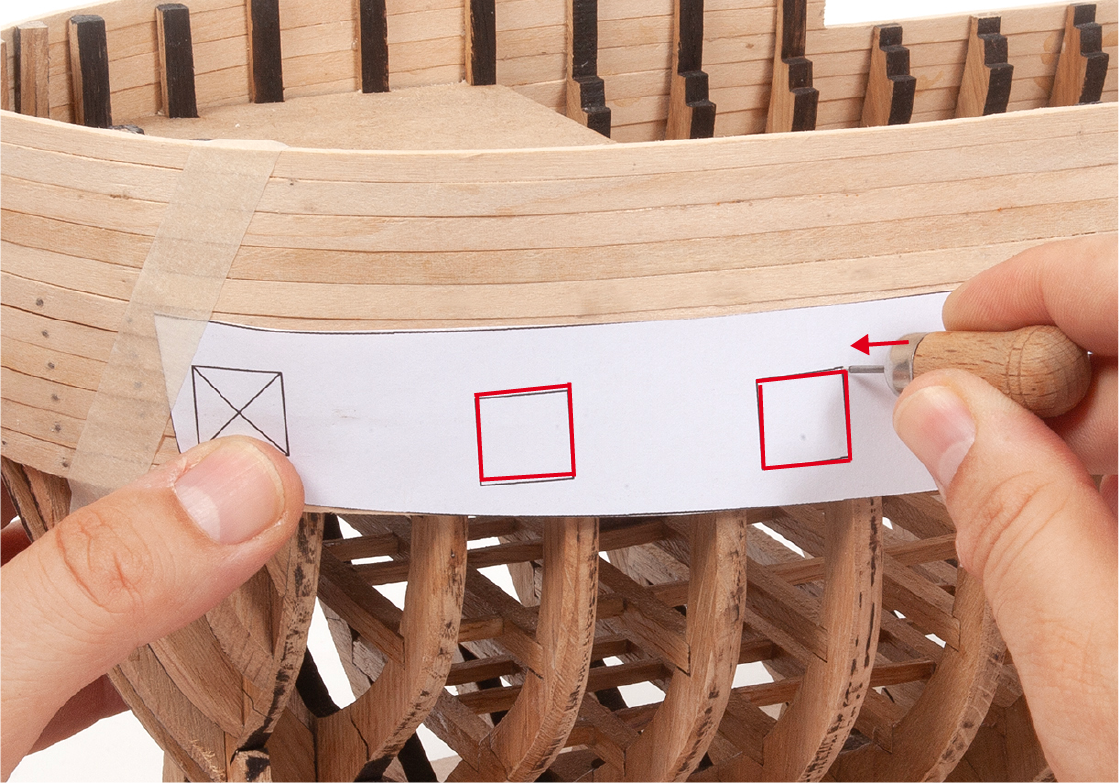
Present template A, fitted to the lower part of the hull planking, from the outside of the last frame to the outside of the first frame. Secure it with masking tape or clamps.
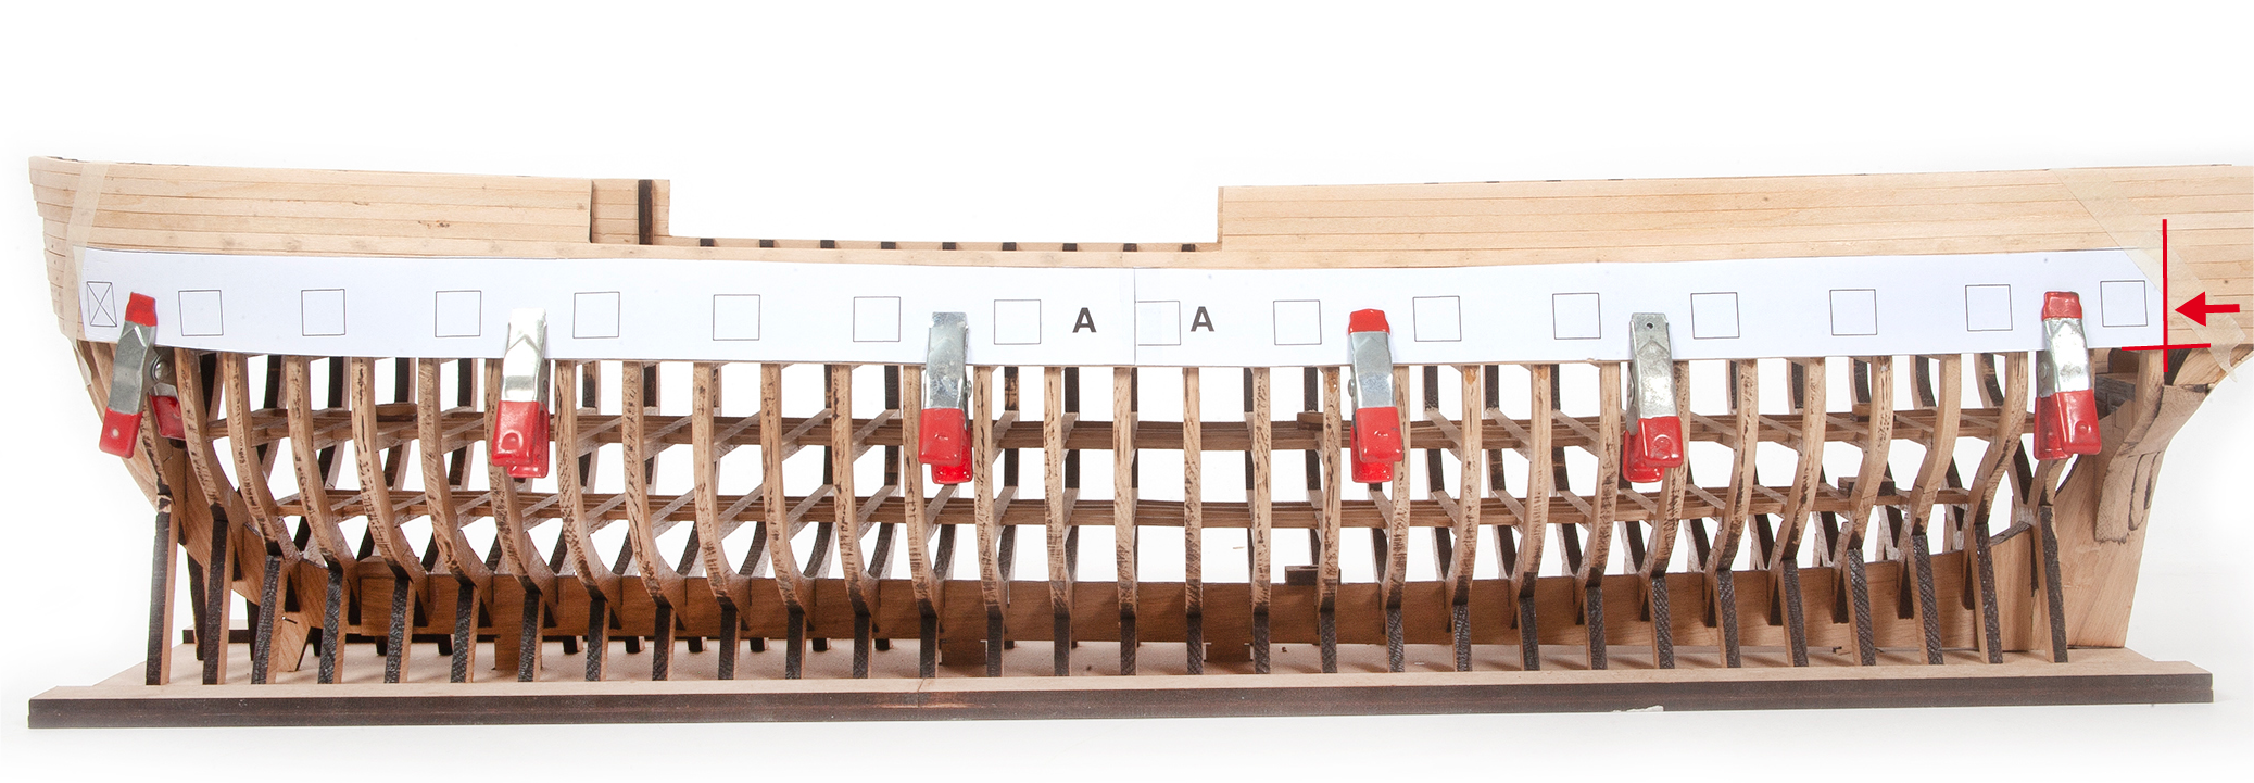
Step 6
Use an awl to mark the planking with the outline of each square using dots.
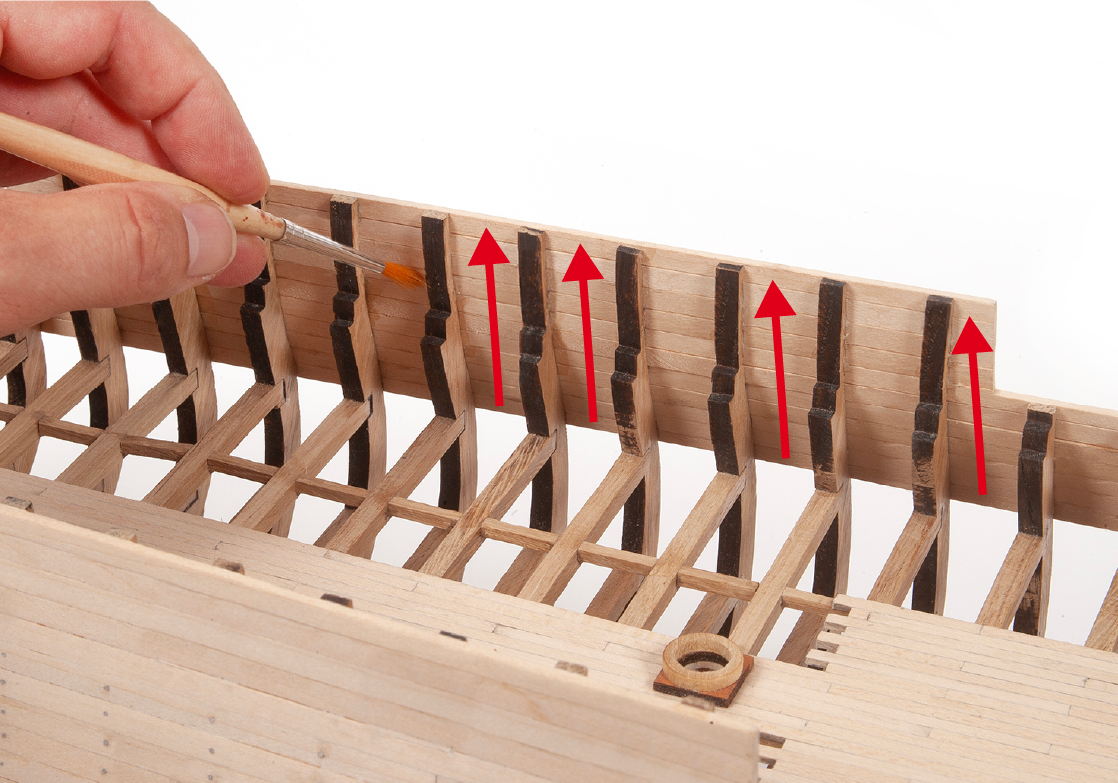
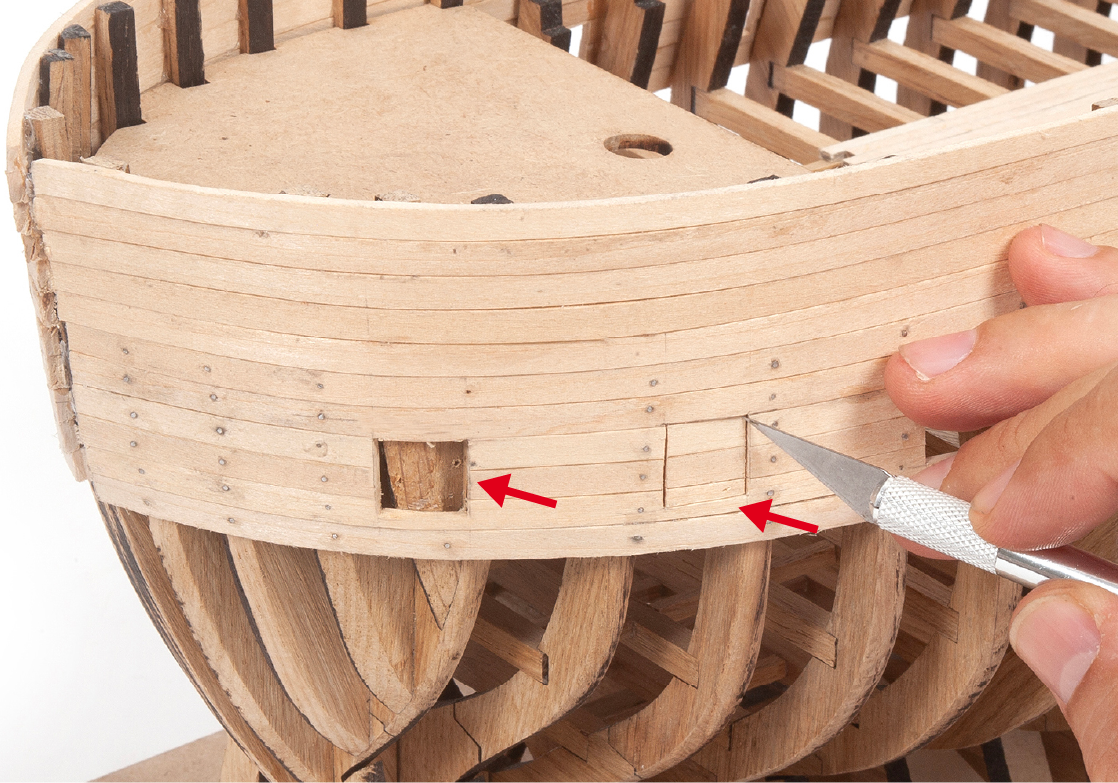
Step 7
Remove the template and use a cutting tool to open the gunports gradually. In some cases you will also have to cut the frame. Note the frame for the gunport at the front does not need to be cut.
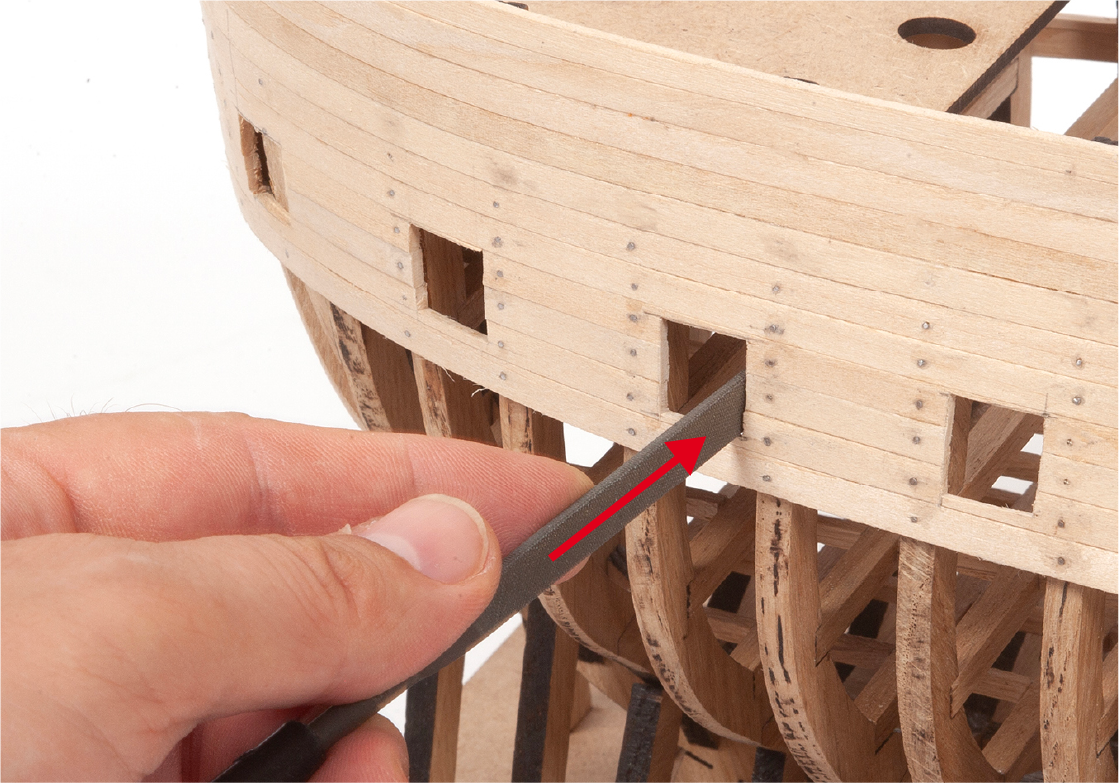
Step 8
Touch up the gunports with a flat file to align them properly.
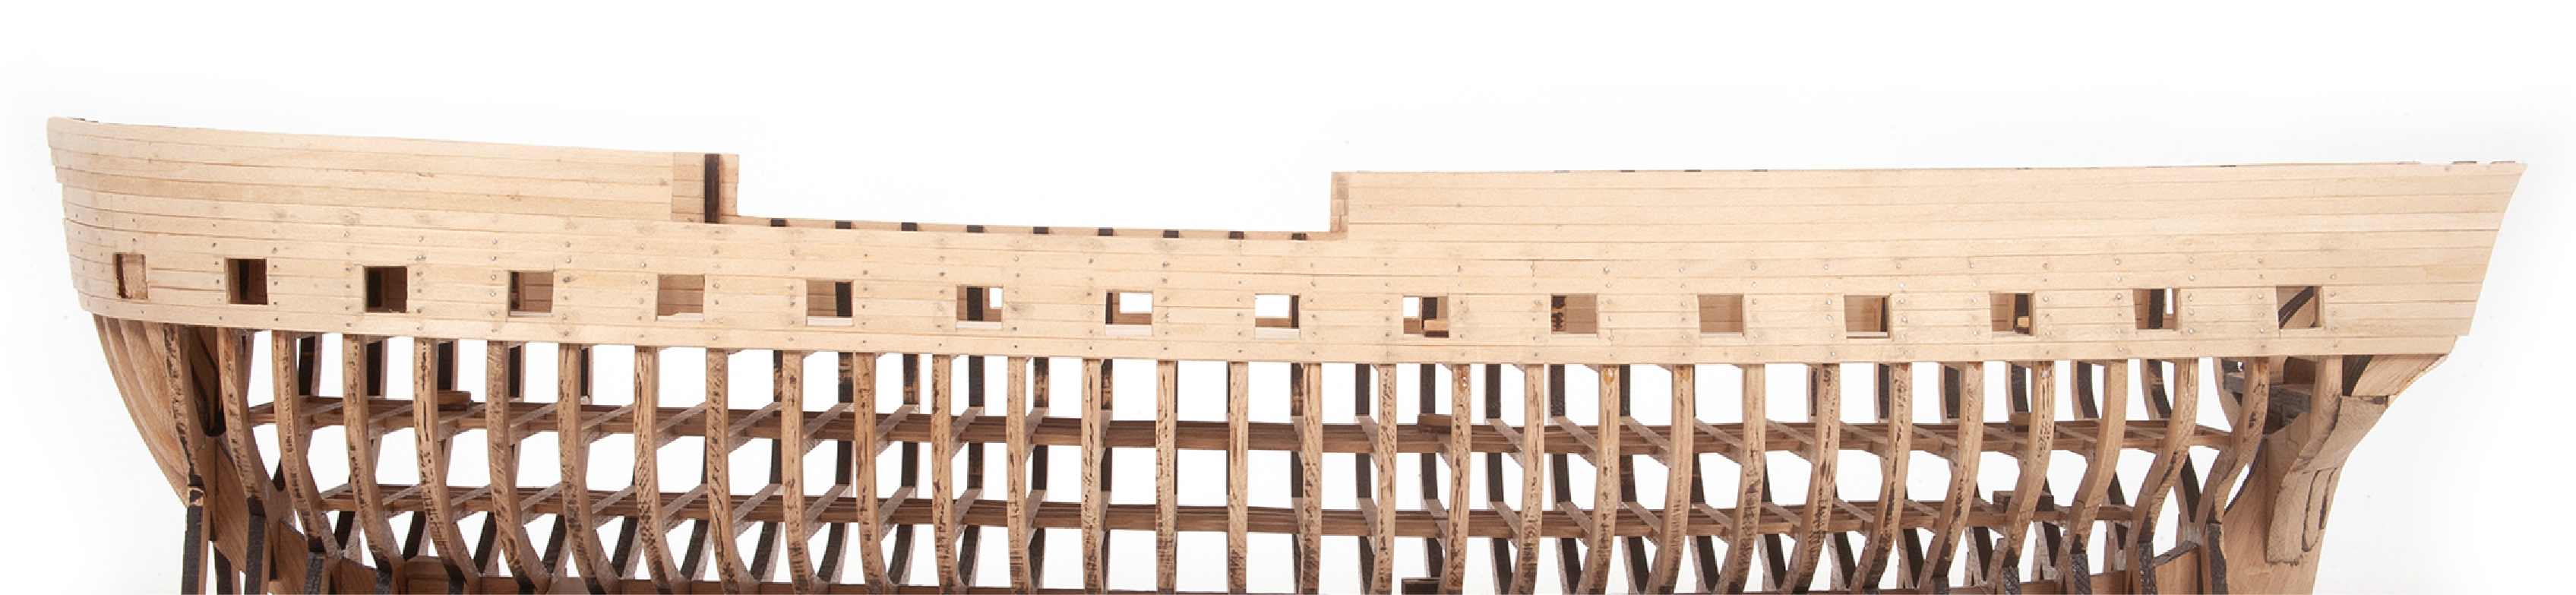
Step 9
Note in the picture how the gunports should look once opened.
Step 10
Repeat the same process on the other side of the hull with the PL-10 sheet templates to achieve a symmetrical finish.

Step 11
Fit and secure template C to the front of the hull. Align the lower recesses of the template with the gunports already cut out.
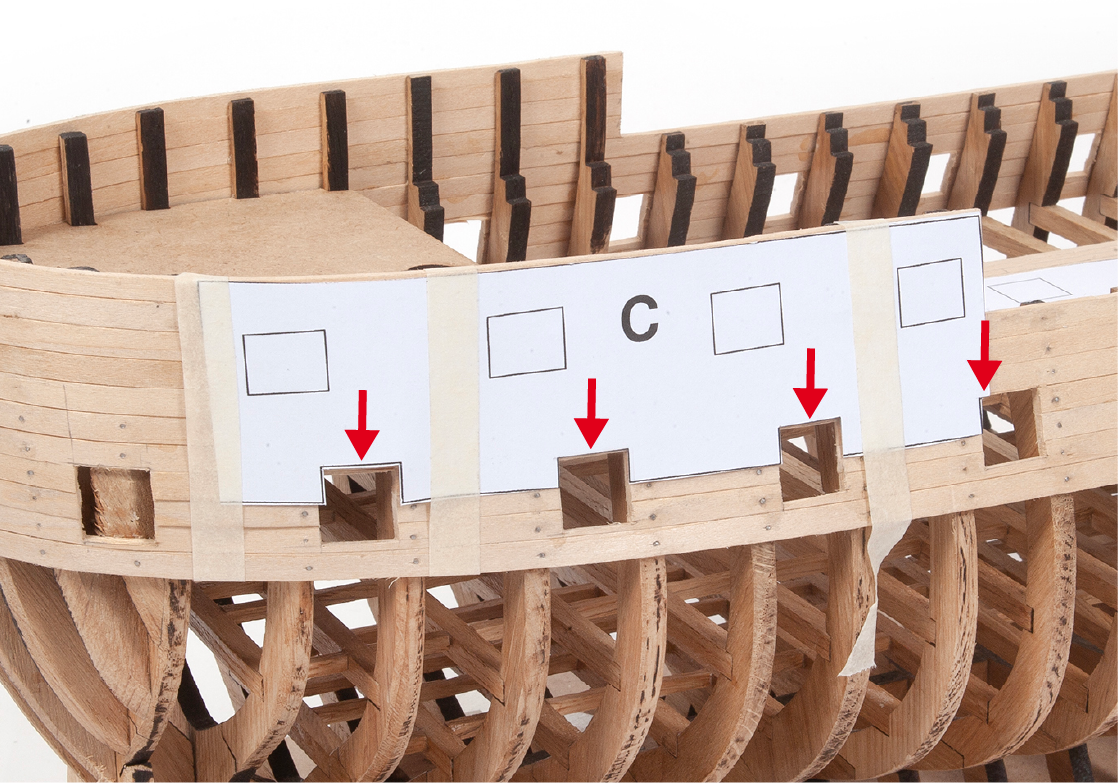
Step 12
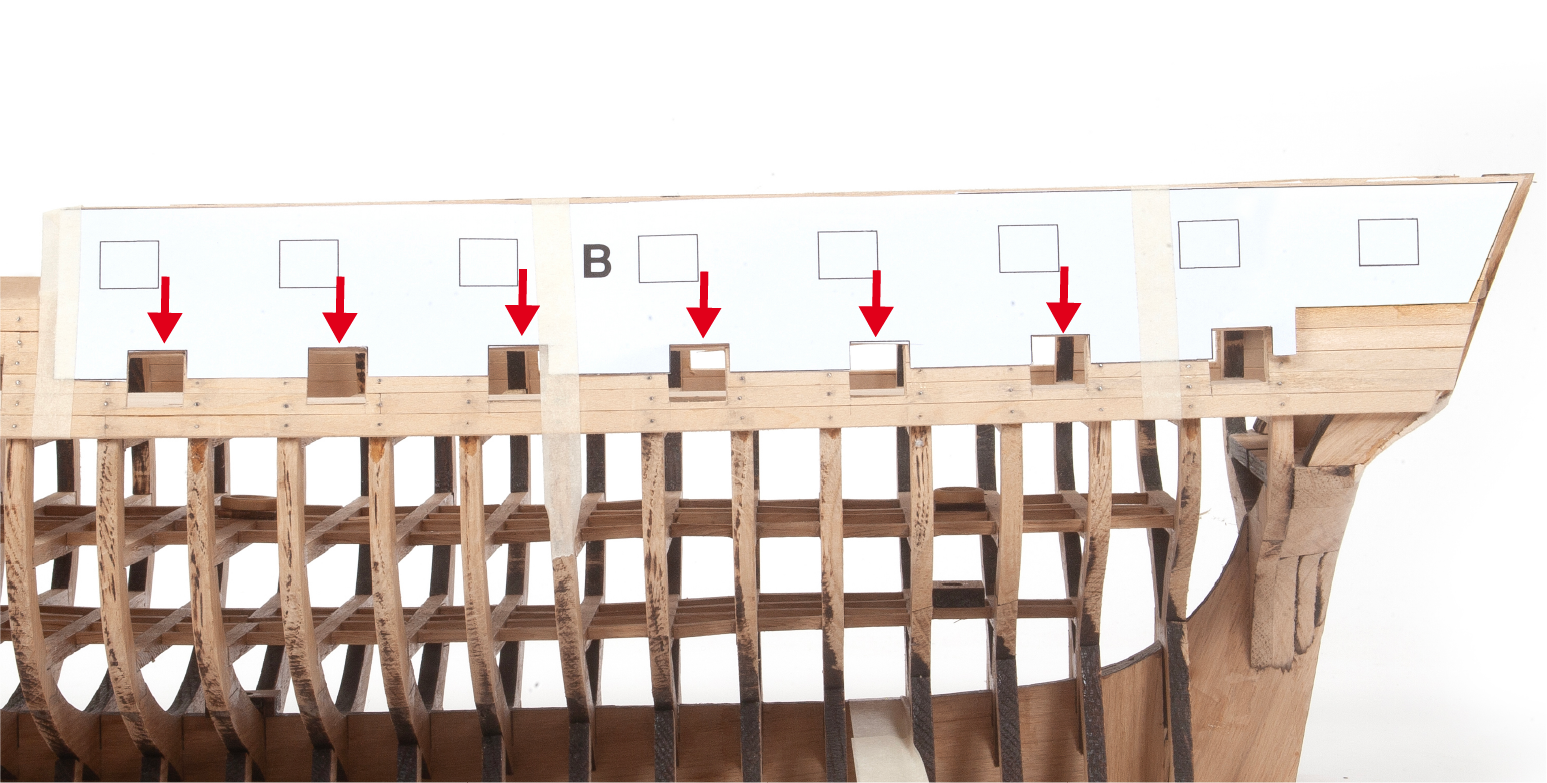
Proceed in the same manner to position and secure template B to the rear of the hull.
Step 1
Open the upper aft gunports using the template as a guide.
Step 2
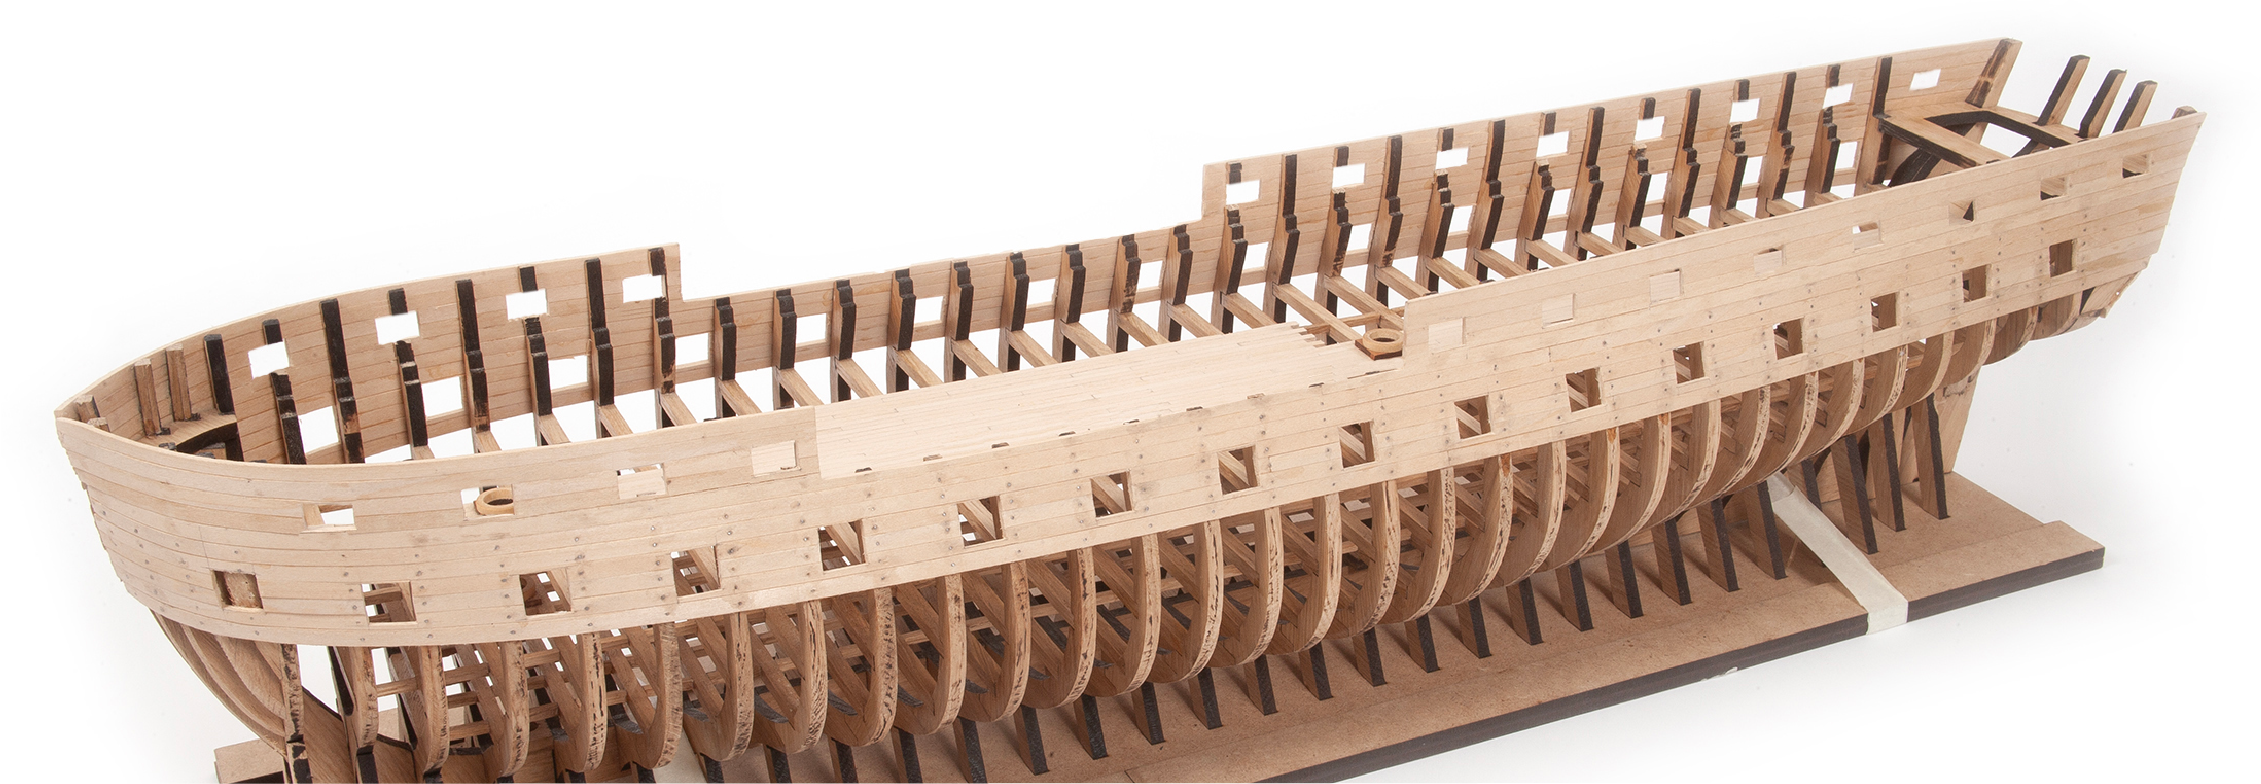
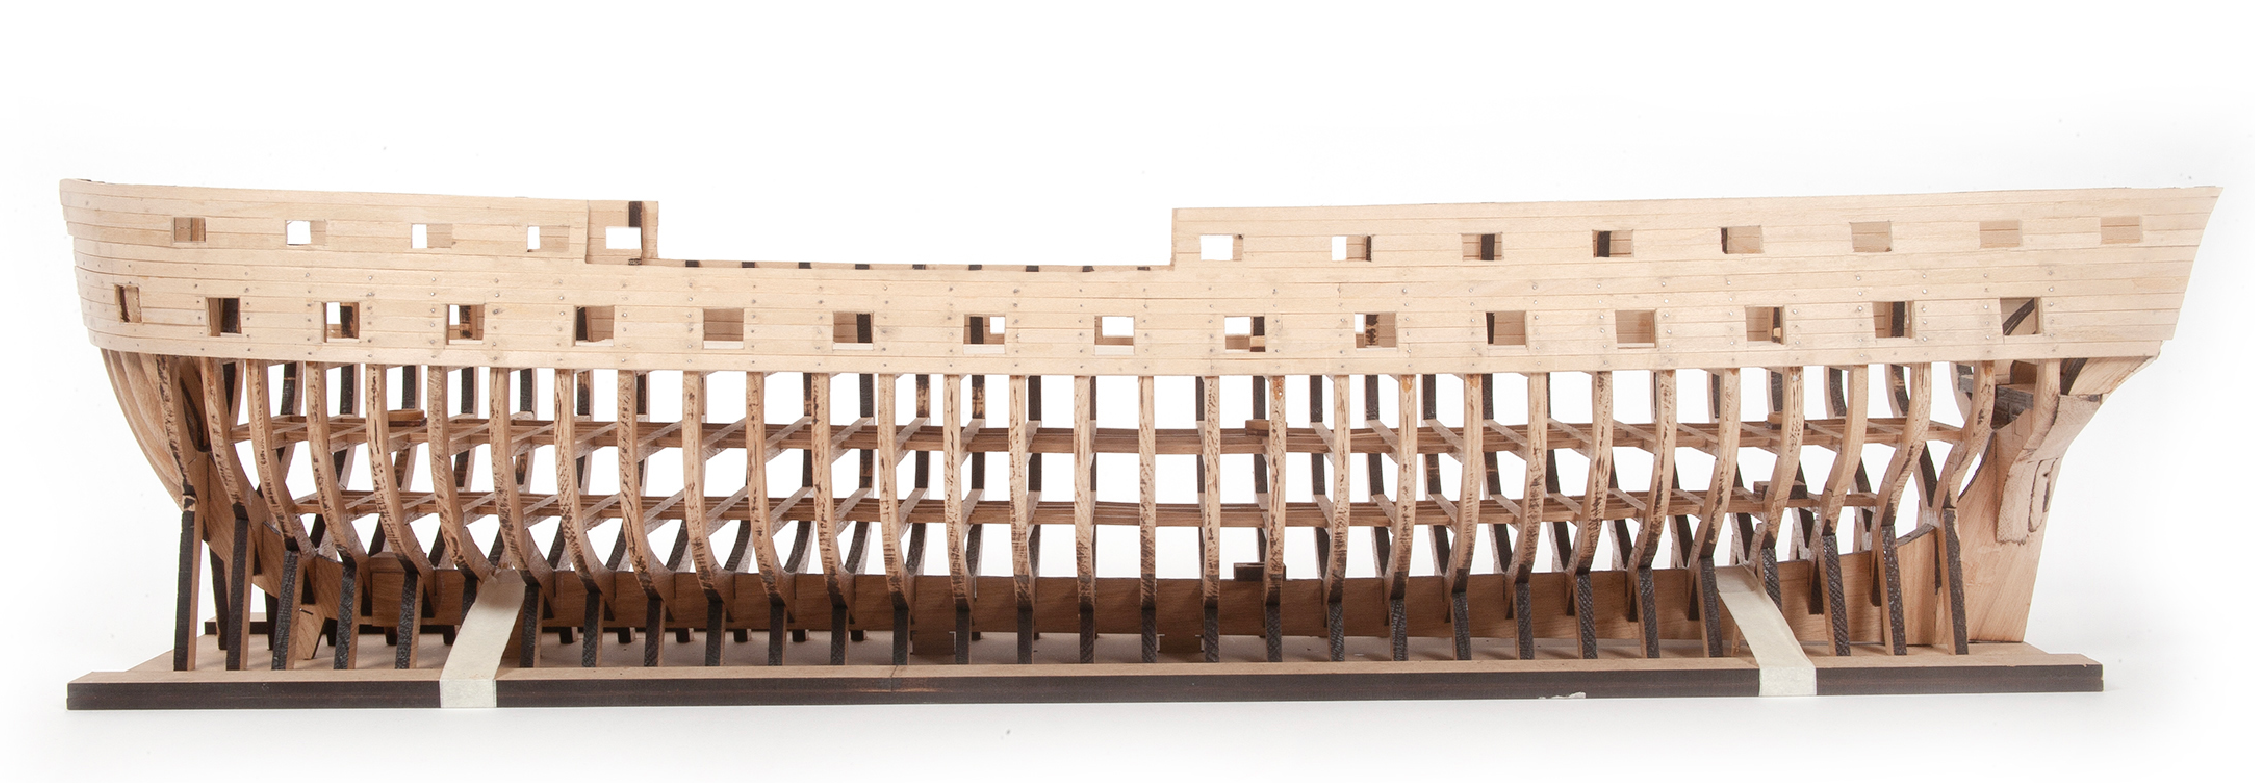
Note in the picture how the hull should look with all the gunports open.
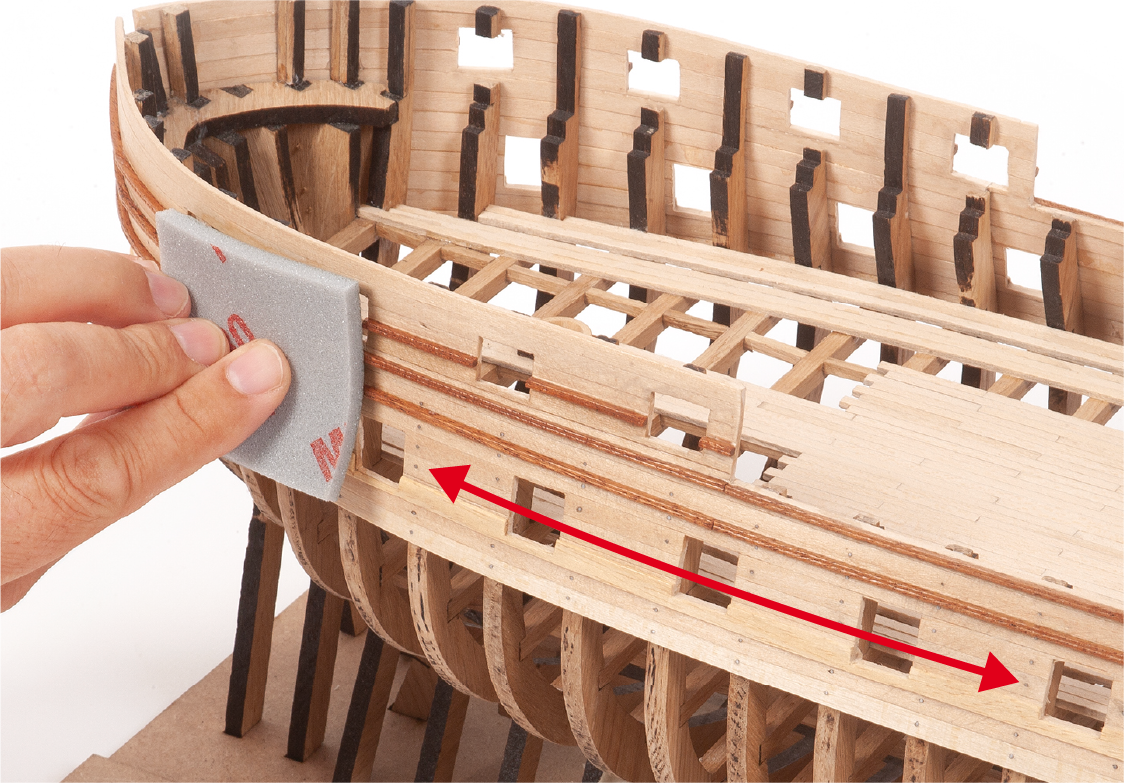
Step 3
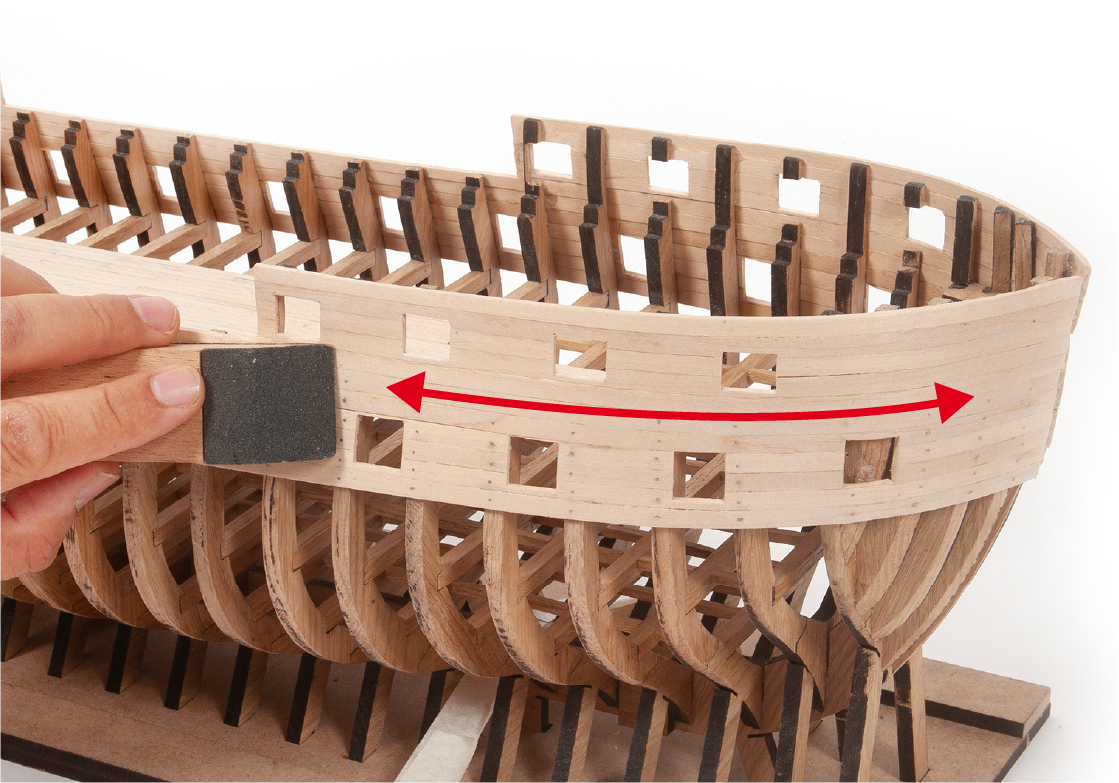
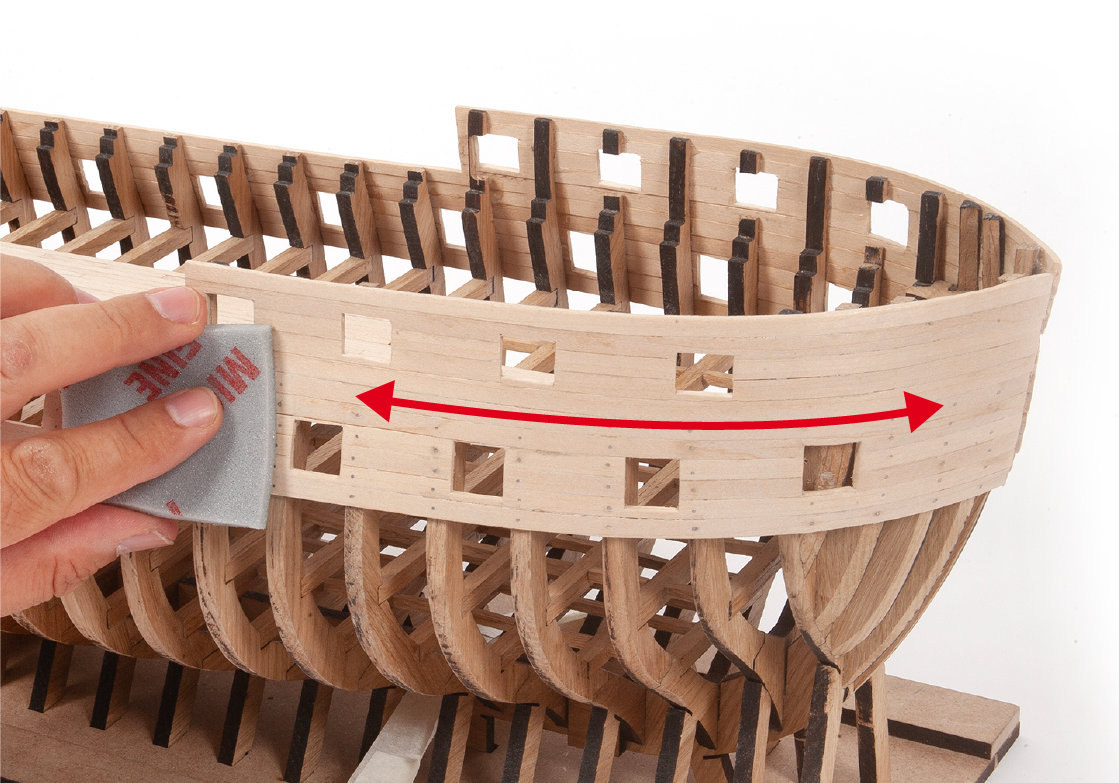
Use a sanding block with fine-grit sandpaper to go over the entire outside of the hull planking.
Step 4
Level the top of the planking with the ends of the frames.

Step 5
Then go over the entire outside of the planking with a very fine-grained sponge-sandpaper. It should be fine to the touch and there should be no unevenness between the battens.
Step 6
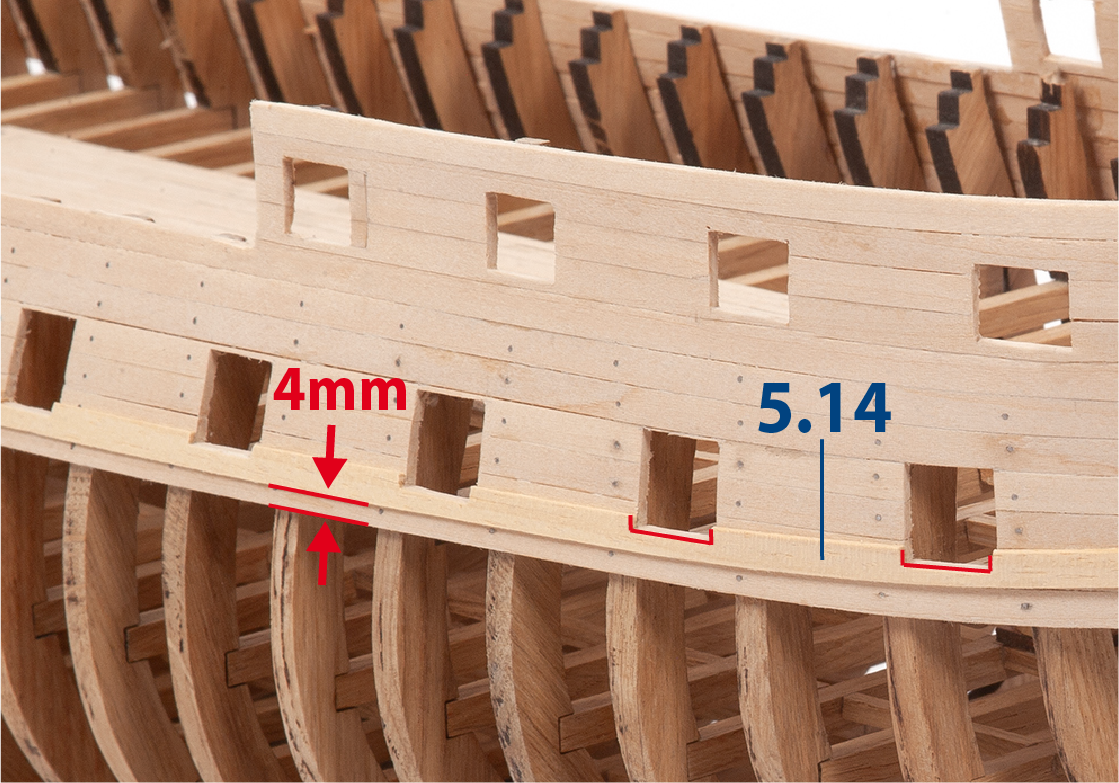
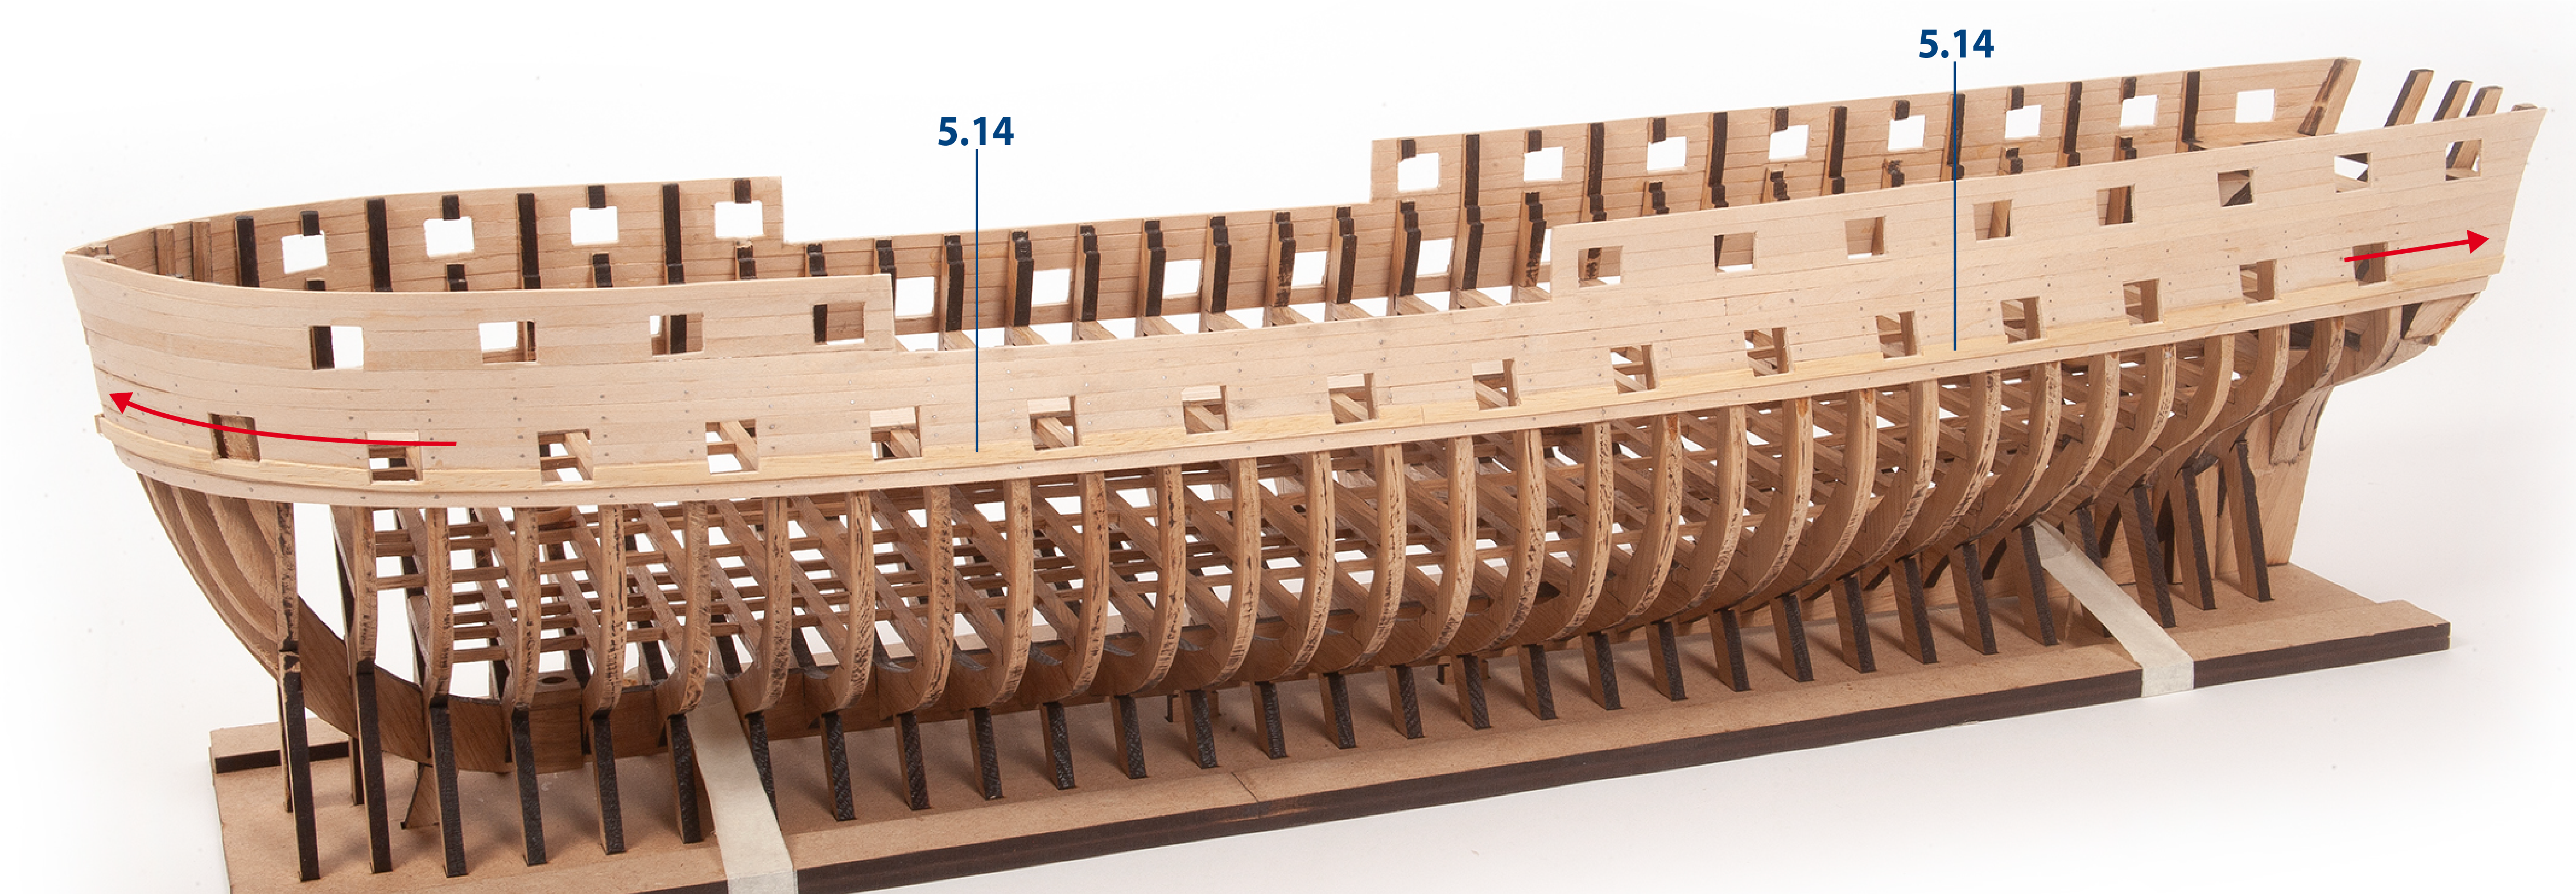
Glue parts 5.14 (1 x 5 x 600 mm lime wood) fitted 4 mm above the bottom of the hull planking. Then, using a cutter, cut away the sections of the strips covering the gunports.
Step 7
You will need to complete the length of the hull with another piece 5.14. Repeat the same process on the other side of the hull.
Step 1
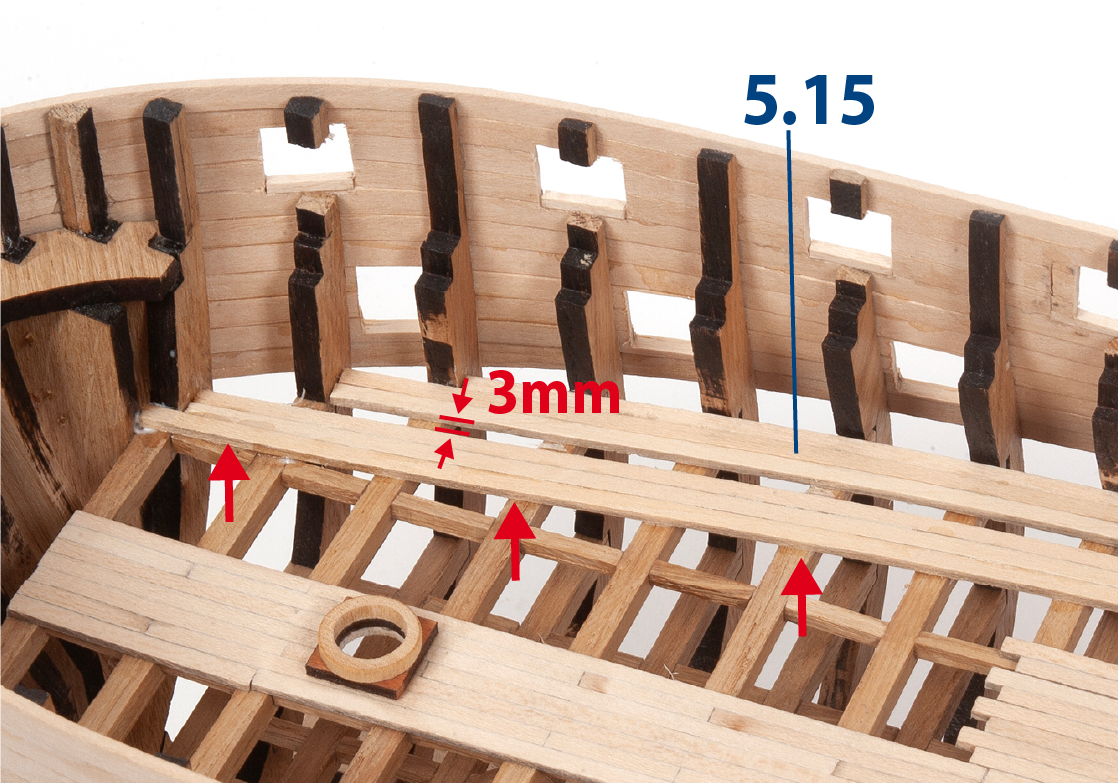
Shade the edges of parts 5.15 and glue them firmly in place as shown in the picture.
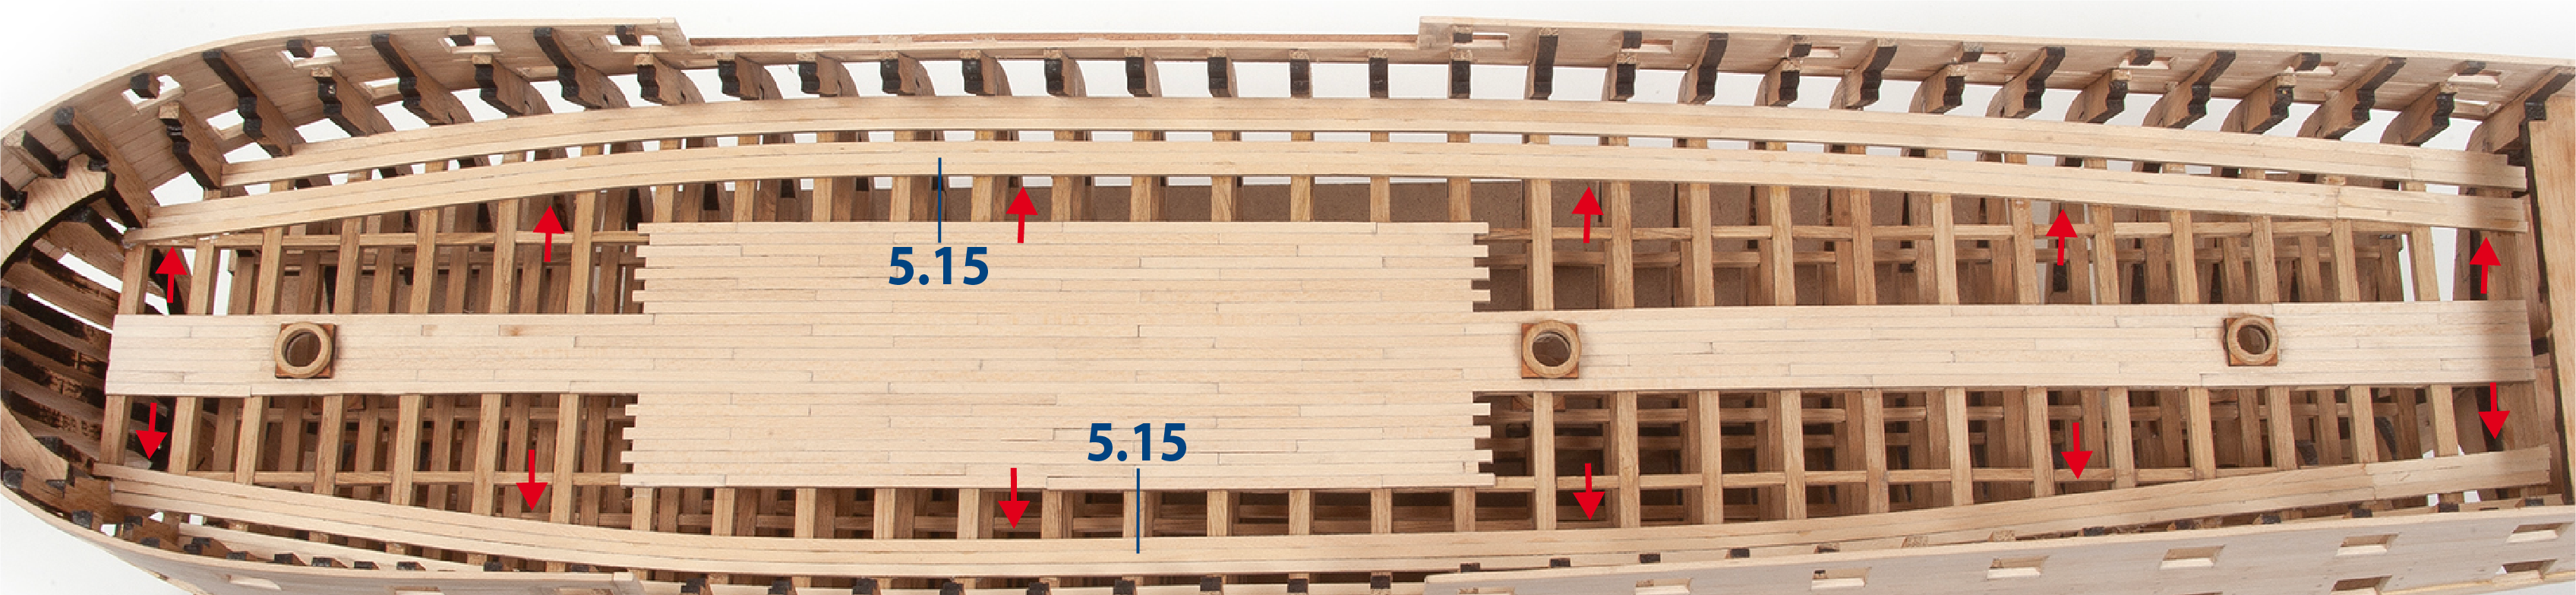
Step 2
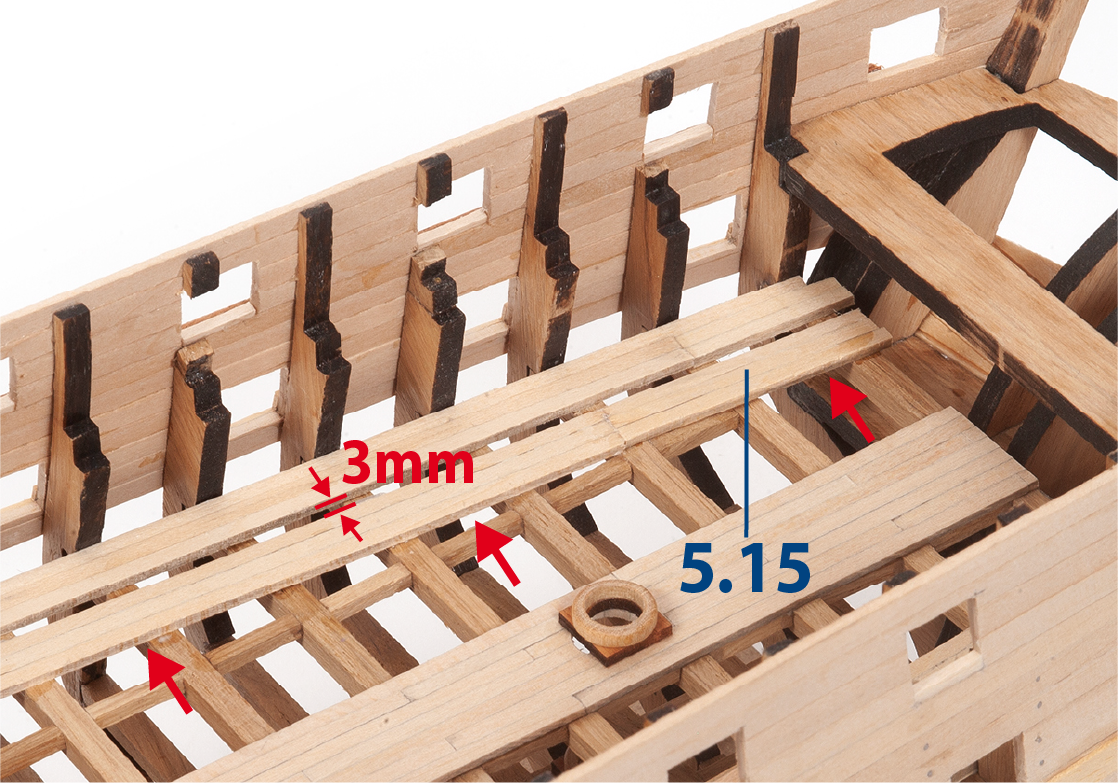
Note that you must leave a 3 mm gap between the two sections.
Step 3
Keep the same spacing in the stern area.
Step 4
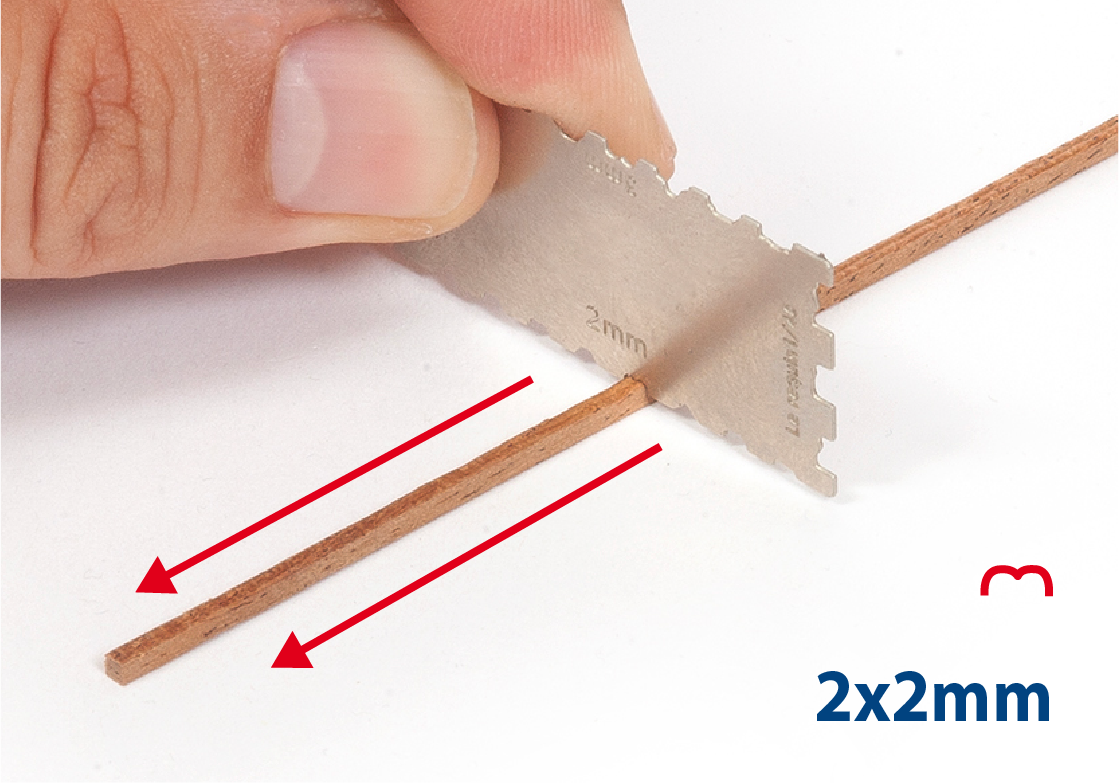
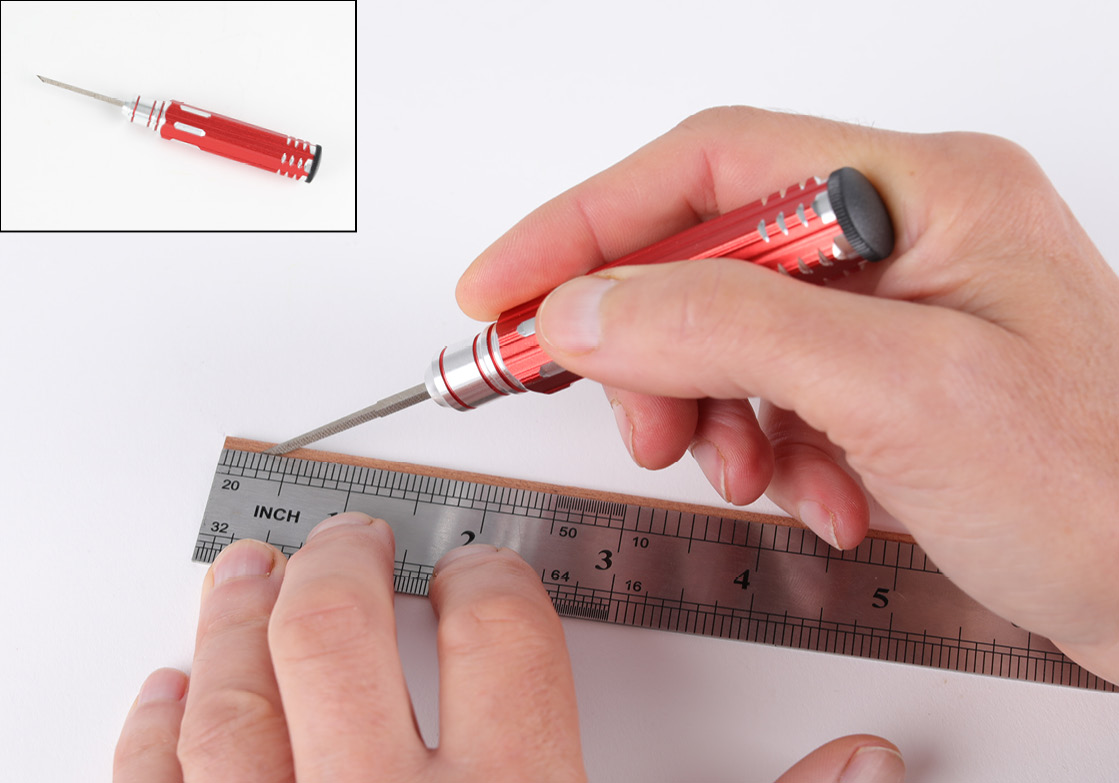
Sand a pair of 2 x 2mm mahogany strips. Use a moulding scriber tool to make a groove on one side of the strips.
There are different types of scriber tool available. Two different types are shown here.
Step 5
Use the elevation plan as a reference for positioning the parts 5.16. Then, cut the part of the battens covering the gunports.
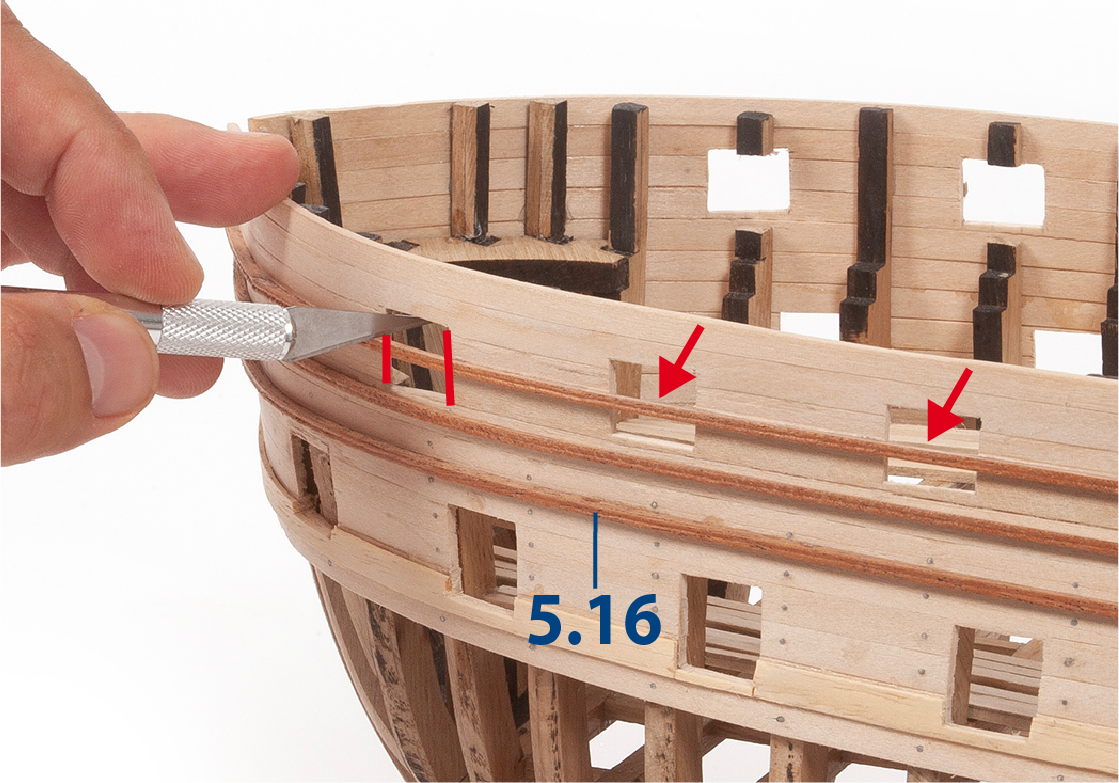
Step 6
Sand the ends of the battens to make them flush with the gunports.
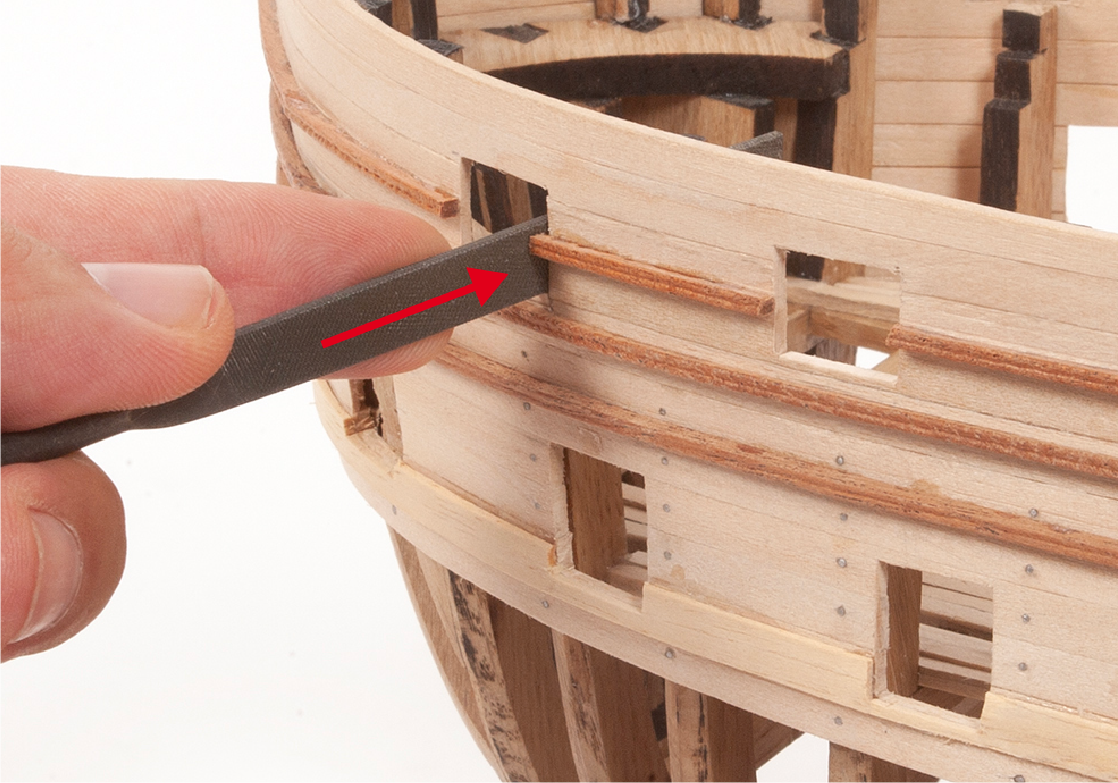
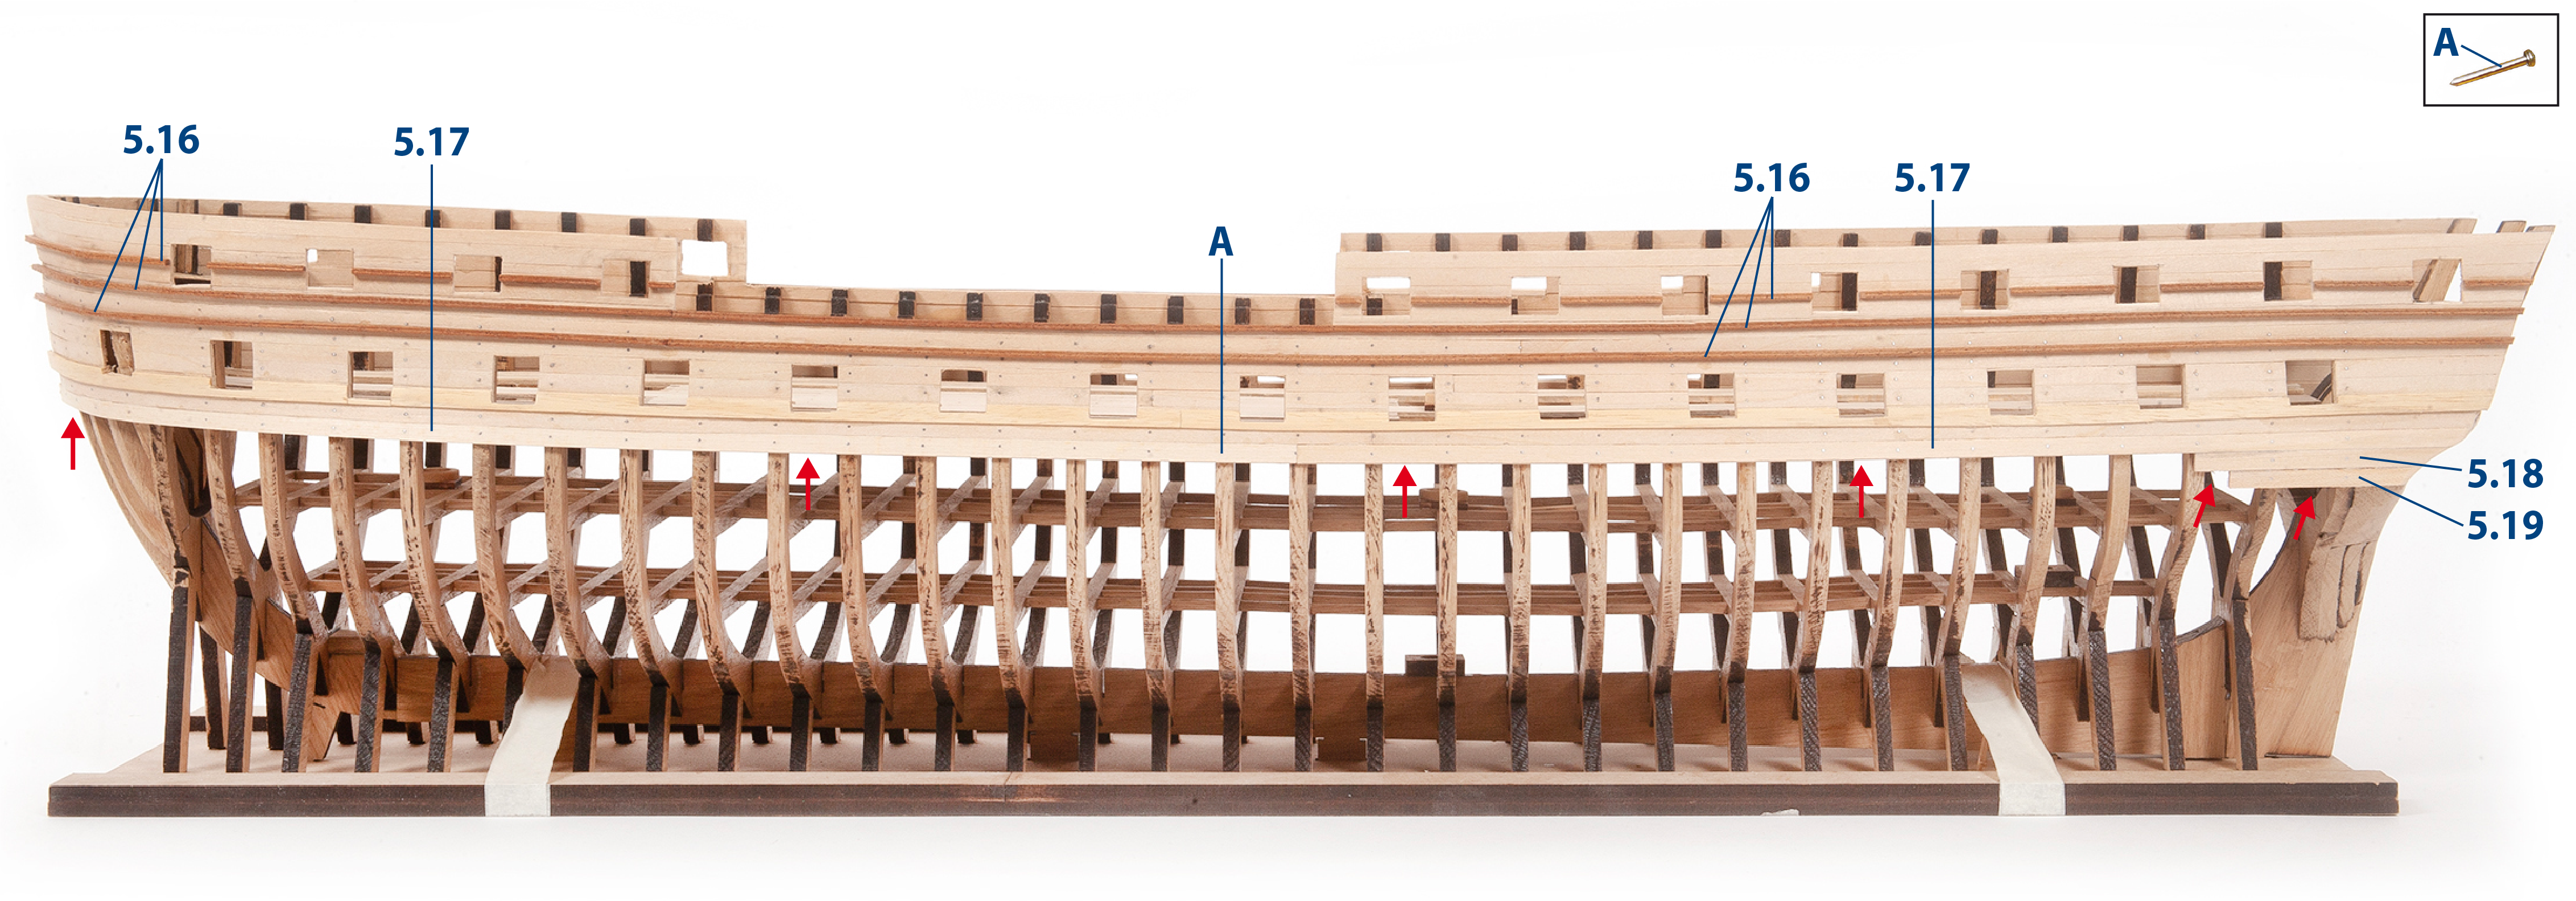
Step 7
Add the 5.17 battens fitted under the bottom lining strip. These battens should cover the entire length on both sides of the hull.
Attach parts 5.18 and 5.19, unless you are planking the lower hull (see pack 6, stage 28).
Step 1
At this point in the construction, you must decide whether you want to paint the hull of the boat in colour or simply leave it varnished. If you wish to varnish, apply clear varnish to the entire outside of the hull. Do not varnish the frames or the mounting base.
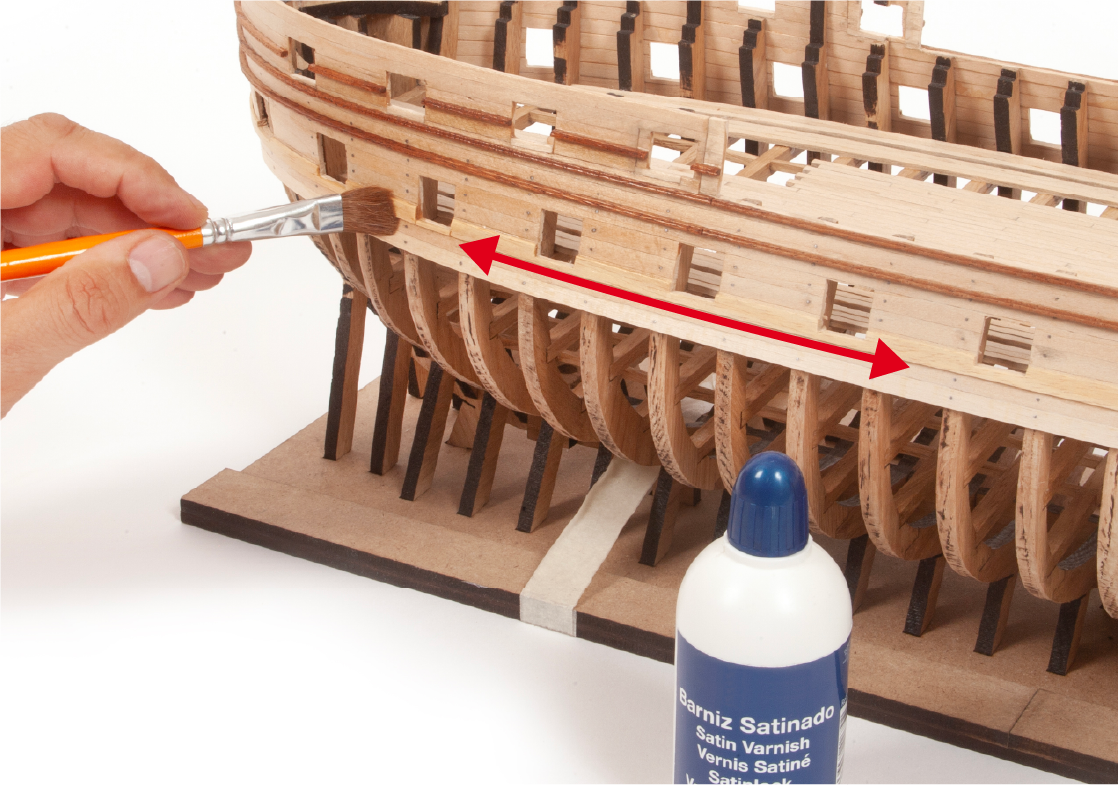
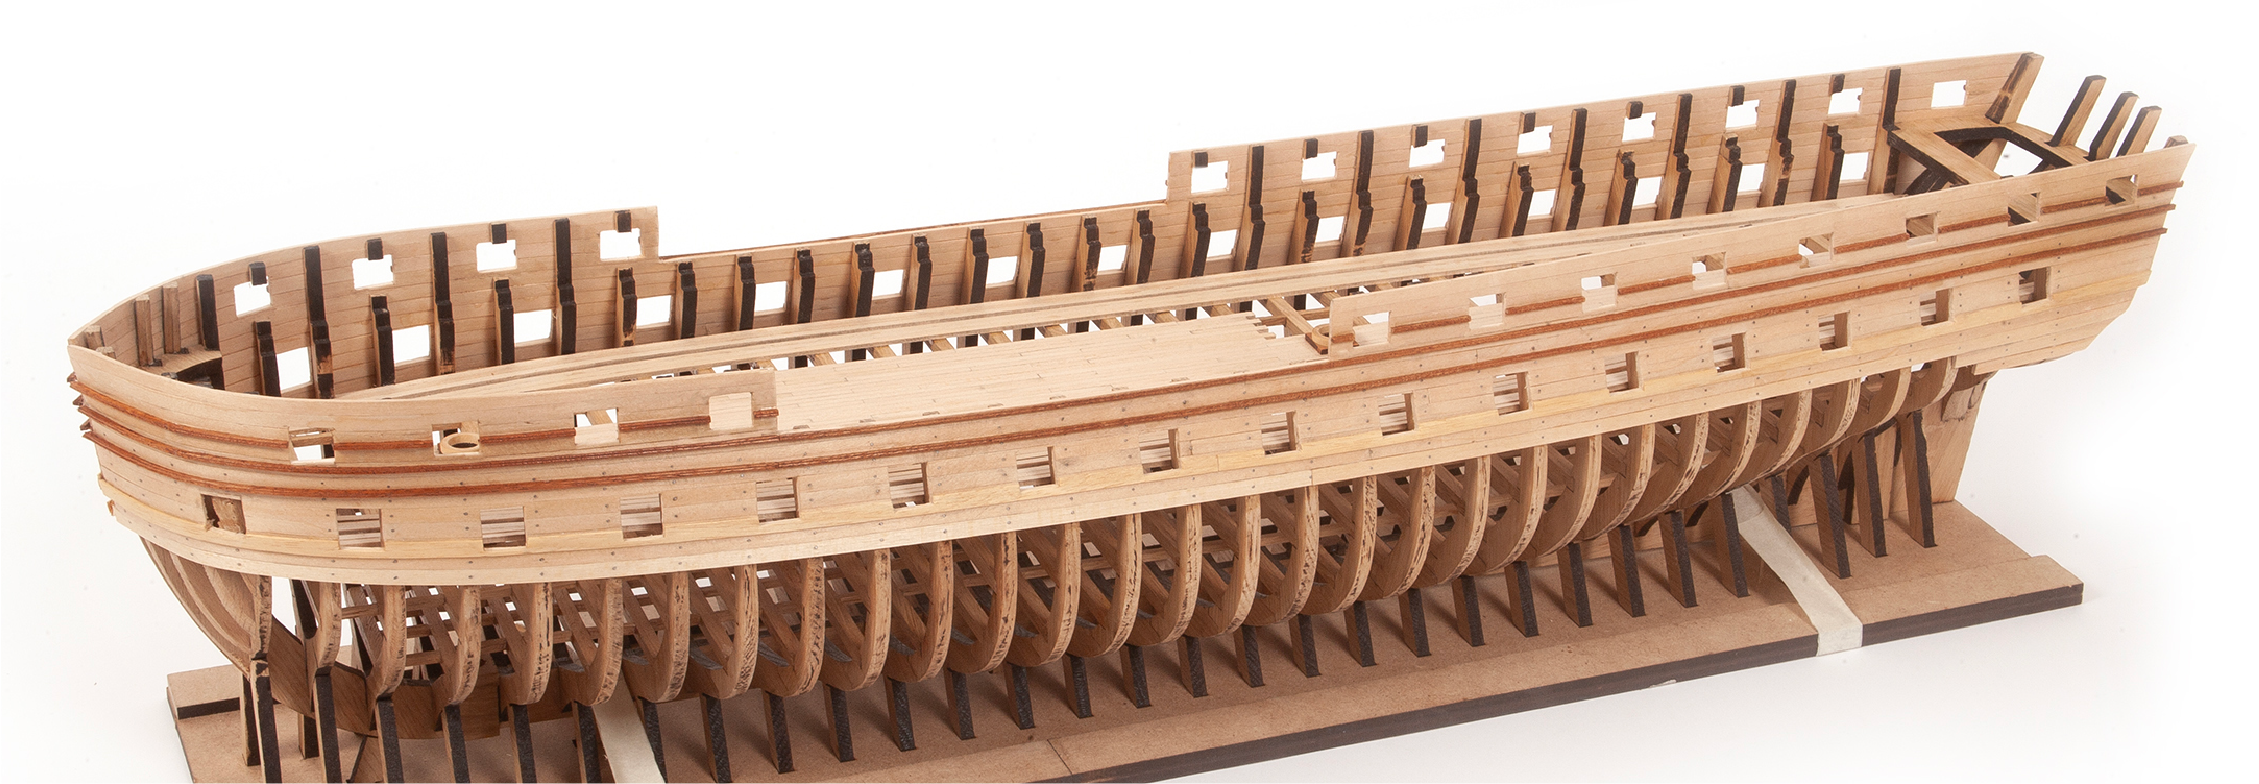
Step 2
The varnish will enhance the colour of the woods and will look as shown in the picture.
Step 3
If you wish to paint the hull, you must first sand the entire exterior of the hull with fine-grit sponge sandpaper. Then remove the dust resulting from sanding.
Step 4
Protect the frame area with masking tape.
Step 5
Then paint the entire exterior of the hull with black paint. You will need to apply a couple of coats of paint to achieve a uniform colour. It is not essential to paint at this stage, if you prefer you can delay painting until later when the hull is more advanced.
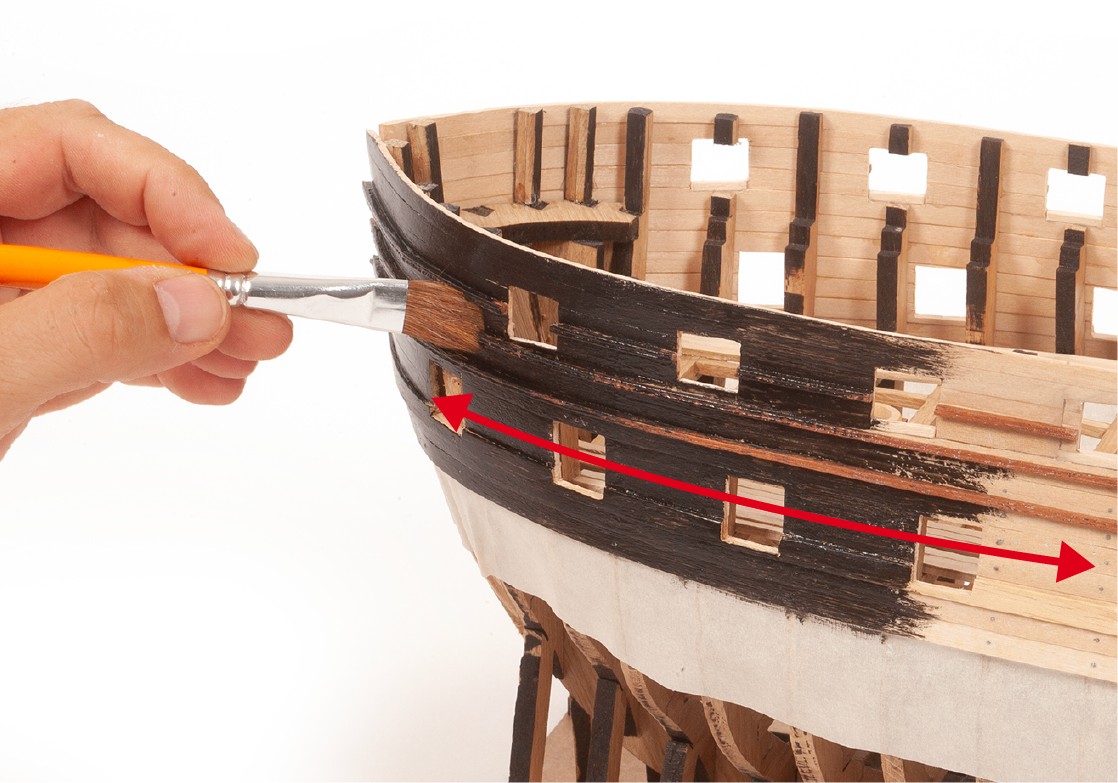
Step 6
Note the stern area should be left unpainted.

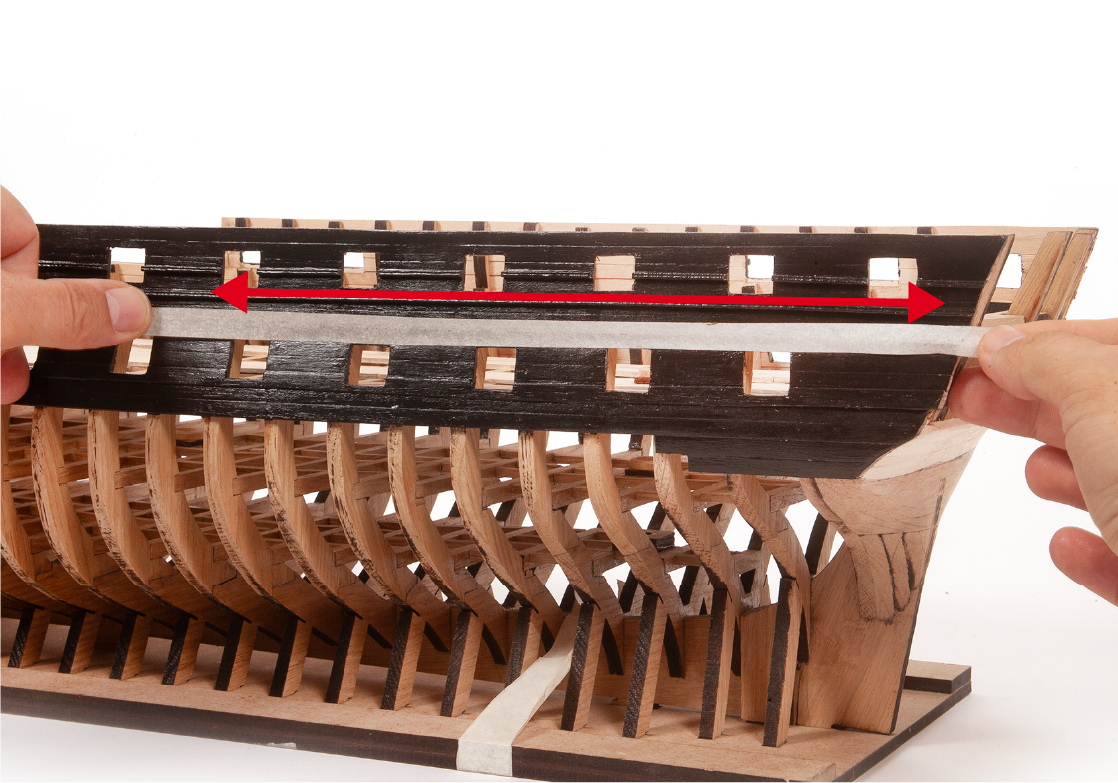
Step 7
When the paint has dried completely, apply masking tape to isolate the area of the gunports.
Step 8
Apply white paint along the entire length of the hull in the area of the gunports.
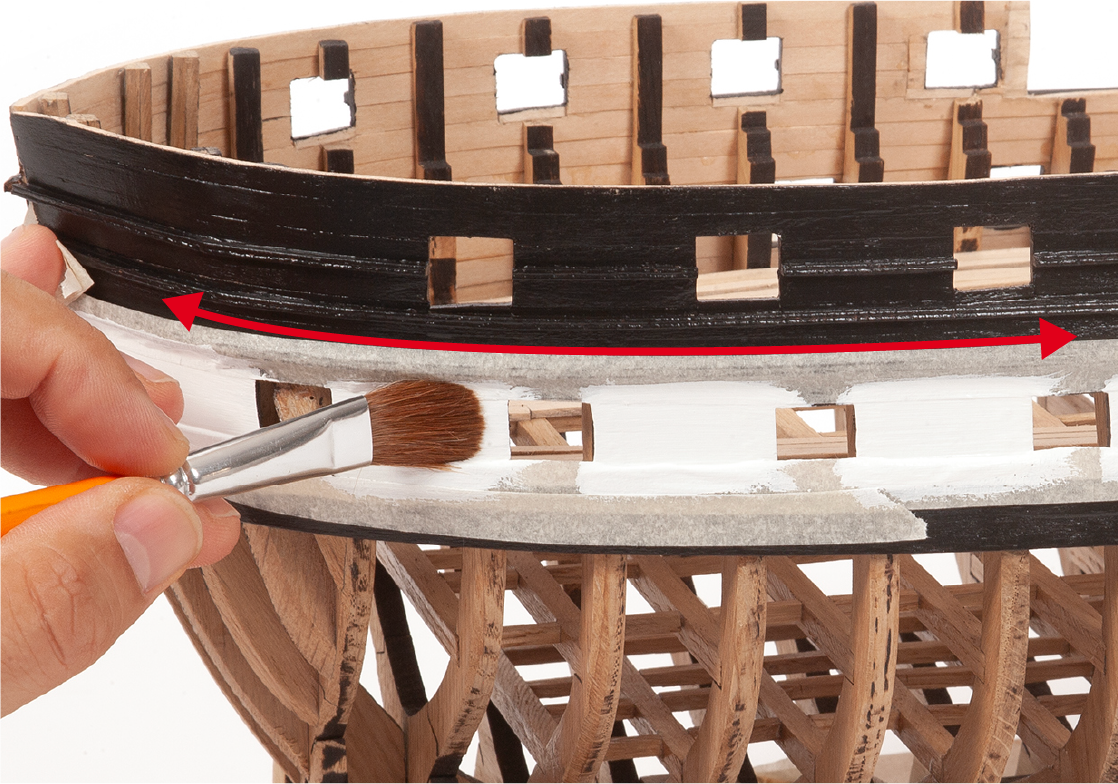
Step 9
When the paint has dried, remove the masking tape. In the picture you can see how the painted hull will look.