
The Sinking of Bismarck
Bismarck, the legendary Nazi German battleship, was sunk on the 27th of May 1941, days after setting sail on its first offensive operation. In this article, we’ll look at the series of events that led to its sinking.
The Bismarck was the first of two fast battleships built for Nazi Germany’s navy (Kriegsmarine) shortly before the outbreak of World War II. Construction began in 1936 before the ship was launched in February 1939. Final preparations were completed on the Bismarck by August 1940, when it was commissioned into the German fleet.
The Bismarck’s career lasted eight months ending with its one fated offensive mission; Rheinübung (“Exercise Rhine”). Accompanied by the heavy cruiser Prinz Eugen, the Bismarck would break into the Atlantic and tie down enemy ships, while the Prinz Eugen would target merchant ships in order to disrupt supplies to the Allied forces. The Bismarck was the Kriegsmarine’s largest battleship, displacing 41,700 t (41,000 long tons) as built and 50,300 t (49,500 long tons) fully loaded, with an array of gun batteries and a heavily armoured hull. What led to the sinking of this behemoth?
“The primary target in this operation is the enemy’s merchant shipping; enemy warships will be engaged only when that objective makes it necessary, and it can be done without excessive risk.”
– Grand Admiral Erich Raeder’s orders
Prinz Eugen set sail from Gotenhafen (now Gdynia, Poland) on May 18th, 1941, at about 21:00 and was followed by Bismarck at 02:00 on May 19th. The pair rendezvoued off Cape Arkona on Rügen Island in the western Baltic sea, then sailed under escort to the Skagerrak strait, where they were sighted by the Swedish aircraft-carrying cruiser Gotland on May 20th. Swedish aircraft also spotted the German vessels later that day and reported their sighting. The British Admiralty was alerted of the sightings the following day.
Two Supermarine Spitfires were dispatched to search the Norwegian coastline. At 13:15 on May 21st, Flying Officer Michael F. Suckling successfully spotted and photographed the German ships. To stop the break into the Atlantic, HMS Hood and Prince of Wales, with escorting destroyers, were sent to the Denmark Strait to reinforce the cruisers Norfolk and Suffolk that had been sent to patrol the area after the first reports had been received.
On the evening of May 23rd, Bismarck and Prinz Eugen were sighted in the Denmark Strait by the Suffolk, close to the Greenland coast. The British vessel immediately sought cover in a fog bank in order to alert command. Bismarck opened fire on Norfolk at a range of six miles but the smaller ship escaped into fog. No hits were scored, but the forward radar instrument on Bismarck had been disabled by the blast of her forward turrets. Because of this, Bismarck’s Admiral Lütjens ordered the Prinz Eugen to re-position ahead of his own battleship. Outgunned, the two British cruisers shadowed the German ships using radar.
In the early morning of May 24th, HMS Hood and Prince of Wales engaged the German ships. Bismarck was still trailing Prinz Eugen, but due to the similarity of their silhouettes Vice-Admiral Holland, aboard the Hood, ordered both British ships to engage the lead ship, believing it to be the Bismarck. The Battle of the Denmark Strait would last 15 minutes, but prove catastrophic for the British fleet.
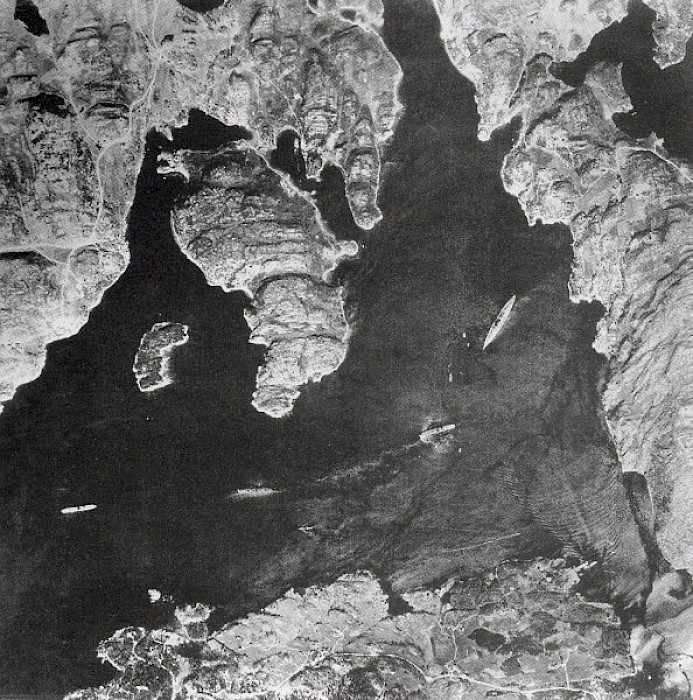
Photograph of the Bismarck (right) anchored in the Grimstadfjord near Bergen, Norway, with three merchant ships, taken by the British Spitfire (Suckling) on 21 May, 1941.
Source: www.kbismarck.com
In the exchange of fire, the Prince of Wales switched targeting to the Bismarck, while the Hood continued to erroneously fire at the Prinz Eugen. Meanwhile, Prinz Eugen would score a hit on the shelter deck of the Hood, causing a fire to break out.
At 06:00, the Hood was hit by at least one of the 38cm shells fired by the Bismarck, which penetrated the armour belt and reached an after magazine before exploding, tearing the battleship in two. Of the 1,418 crew aboard, 3 would survive the sinking of the Hood.
“At first the Hood was nowhere to be seen, in her place was a colossal pillar of black smoke reaching into the sky.
Gradually at the foot of the pillar, I made out the bow of the battlecruiser projecting upwards at an angle, a sure sign that she had broken in two.”
– Recount by Kapitänleutnant Burkard von Müllenheim-Rechberg of the Bismarck
Both German ships switched fire to the Prince of Wales. The bridge was hit by the Bismarck, killing everybody inside except the commander, Captain John Catterall Leach, and another member of the crew. With the distance between them closing and taking more hits, the Prince of Wales deployed a smoke screen and withdrew from combat. The Bismarck had suffered three hits from the Prince of Wales, causing a trail of oil to leak from the ship and several compartments to flood.
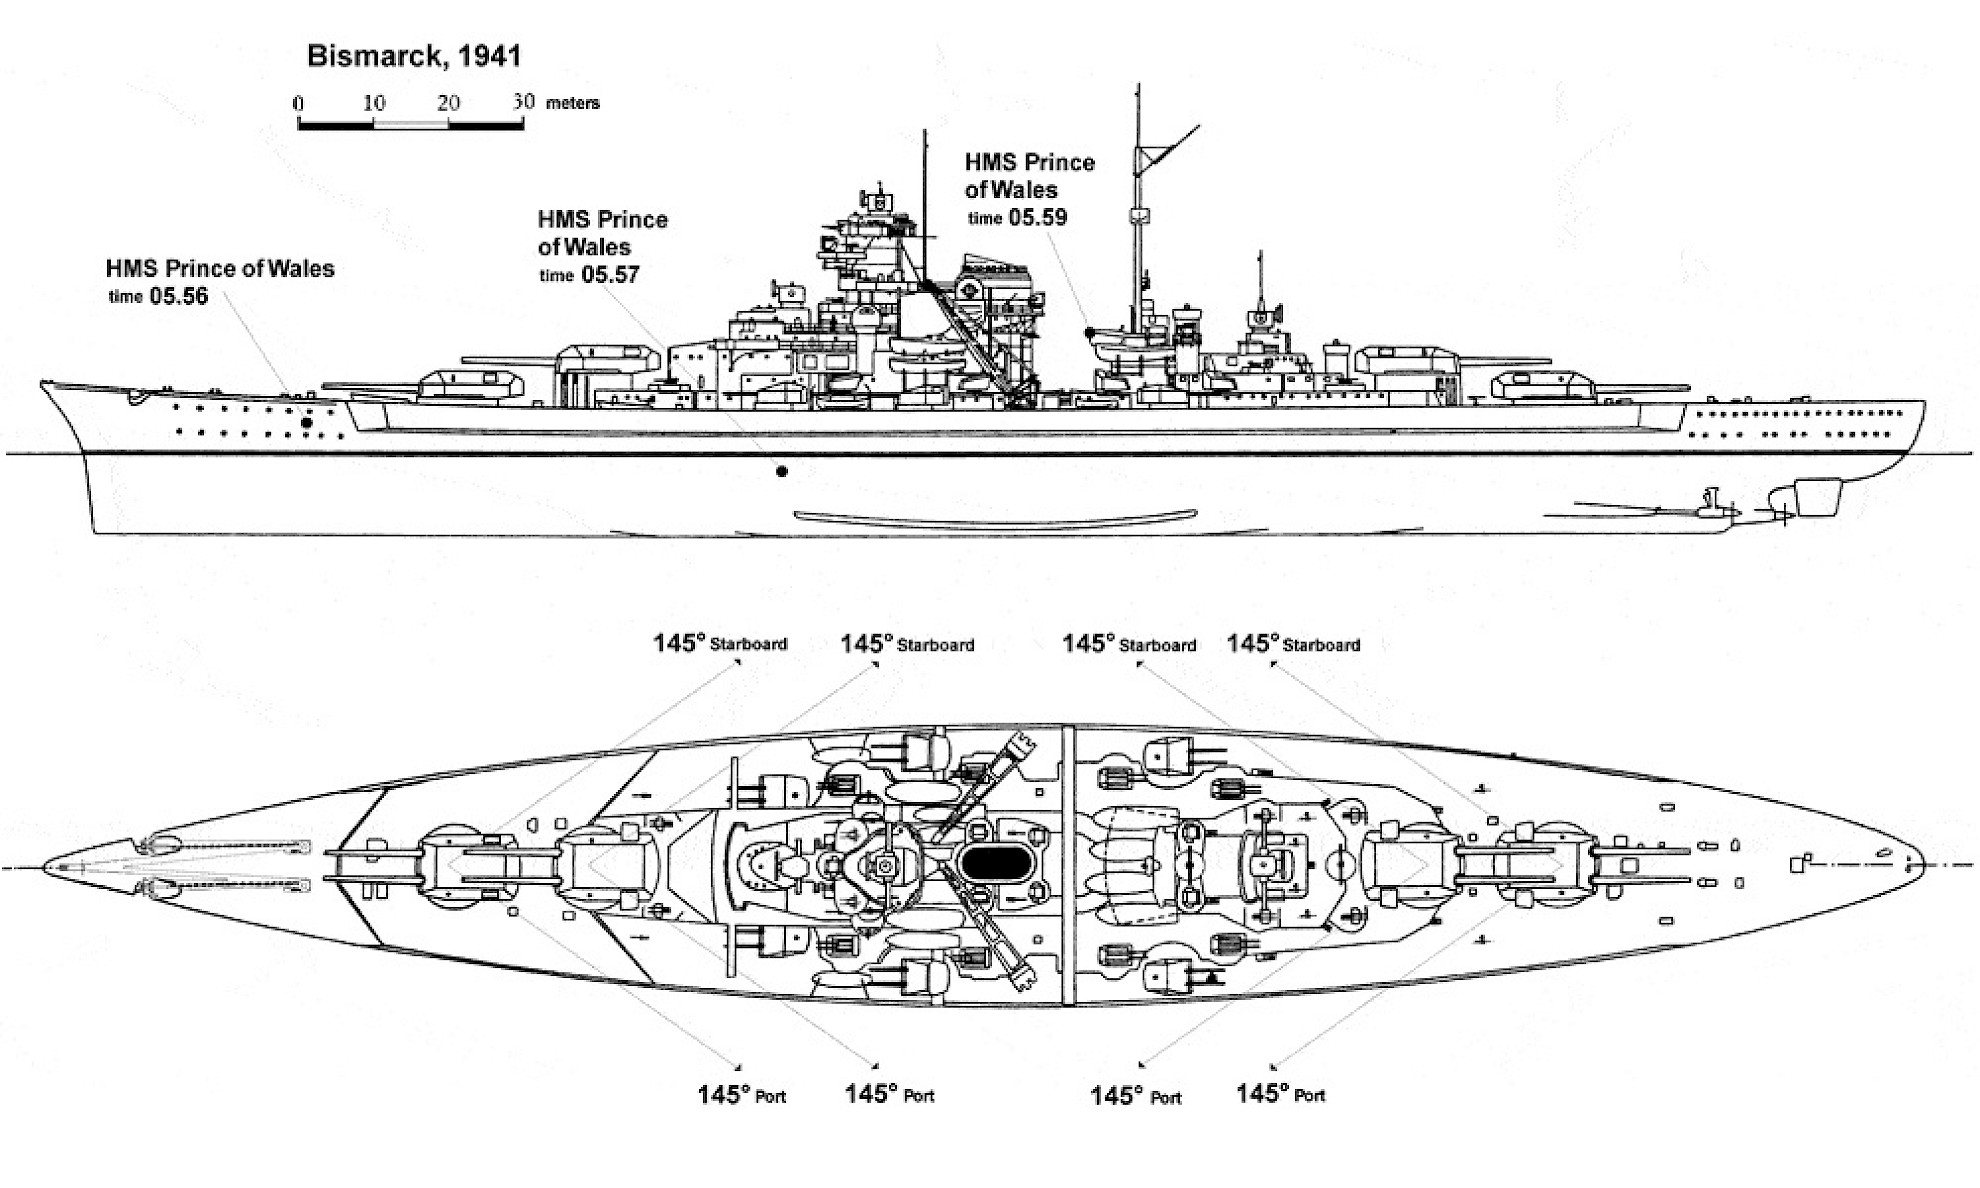
Approximate locations of shell hits inflicted by HMS Prince of Wales during the Battle of the Denmark Straight
News of the destruction of the Hood shocked the British public. The Admiralty, spurred on by Prime Minister Winston Churchill, launched a hunt for the ship responsible. Every available warship was mobilised, including some currently on escort missions. With the damage sustained during The Battle of the Denmark Strait, Admiral Lütjens decided the Bismarck would return to port for repairs while the Prinz Eugen would remain in the Atlantic and attack enemy convoys on her own. With the oil leak giving away the location of the German task force, the British ships continued to shadow their path. Eventually, the Prinz Eugen detached from Bismarck in the afternoon of May 24th.
Later that evening, nine Fairey Swordfish torpedo bombers took off from the HMS Victorious to attack the damaged Bismarck. The commander of the Norfolk provided the German warship’s current position, and the squadron of bombers began their attack.
Eight of the planes launched torpedoes at the ship, but one had lost its way on approach in the poor visibility. The pilot of Swordfish ‘5C’, J.C. Thompson, initially lost sight of the other two planes in his group and aborted his first approach.
On the second attempt, he caught the Bismarck side-on and released his torpedo into the 320-mm main armour belt on the starboard side between the forward command tower and the funnel.
The impact rocked the ship, injuring six crew and killing Oberbootsmann (boatswain) Kurt Kirchberg, who was thrown against one of the aircraft catapults. After the attack, the bombers returned to their carrier. Despite a heavy onslaught of anti-aircraft fire, all nine Swordfish had made it back, and had scored a huge hit on the Bismarck.
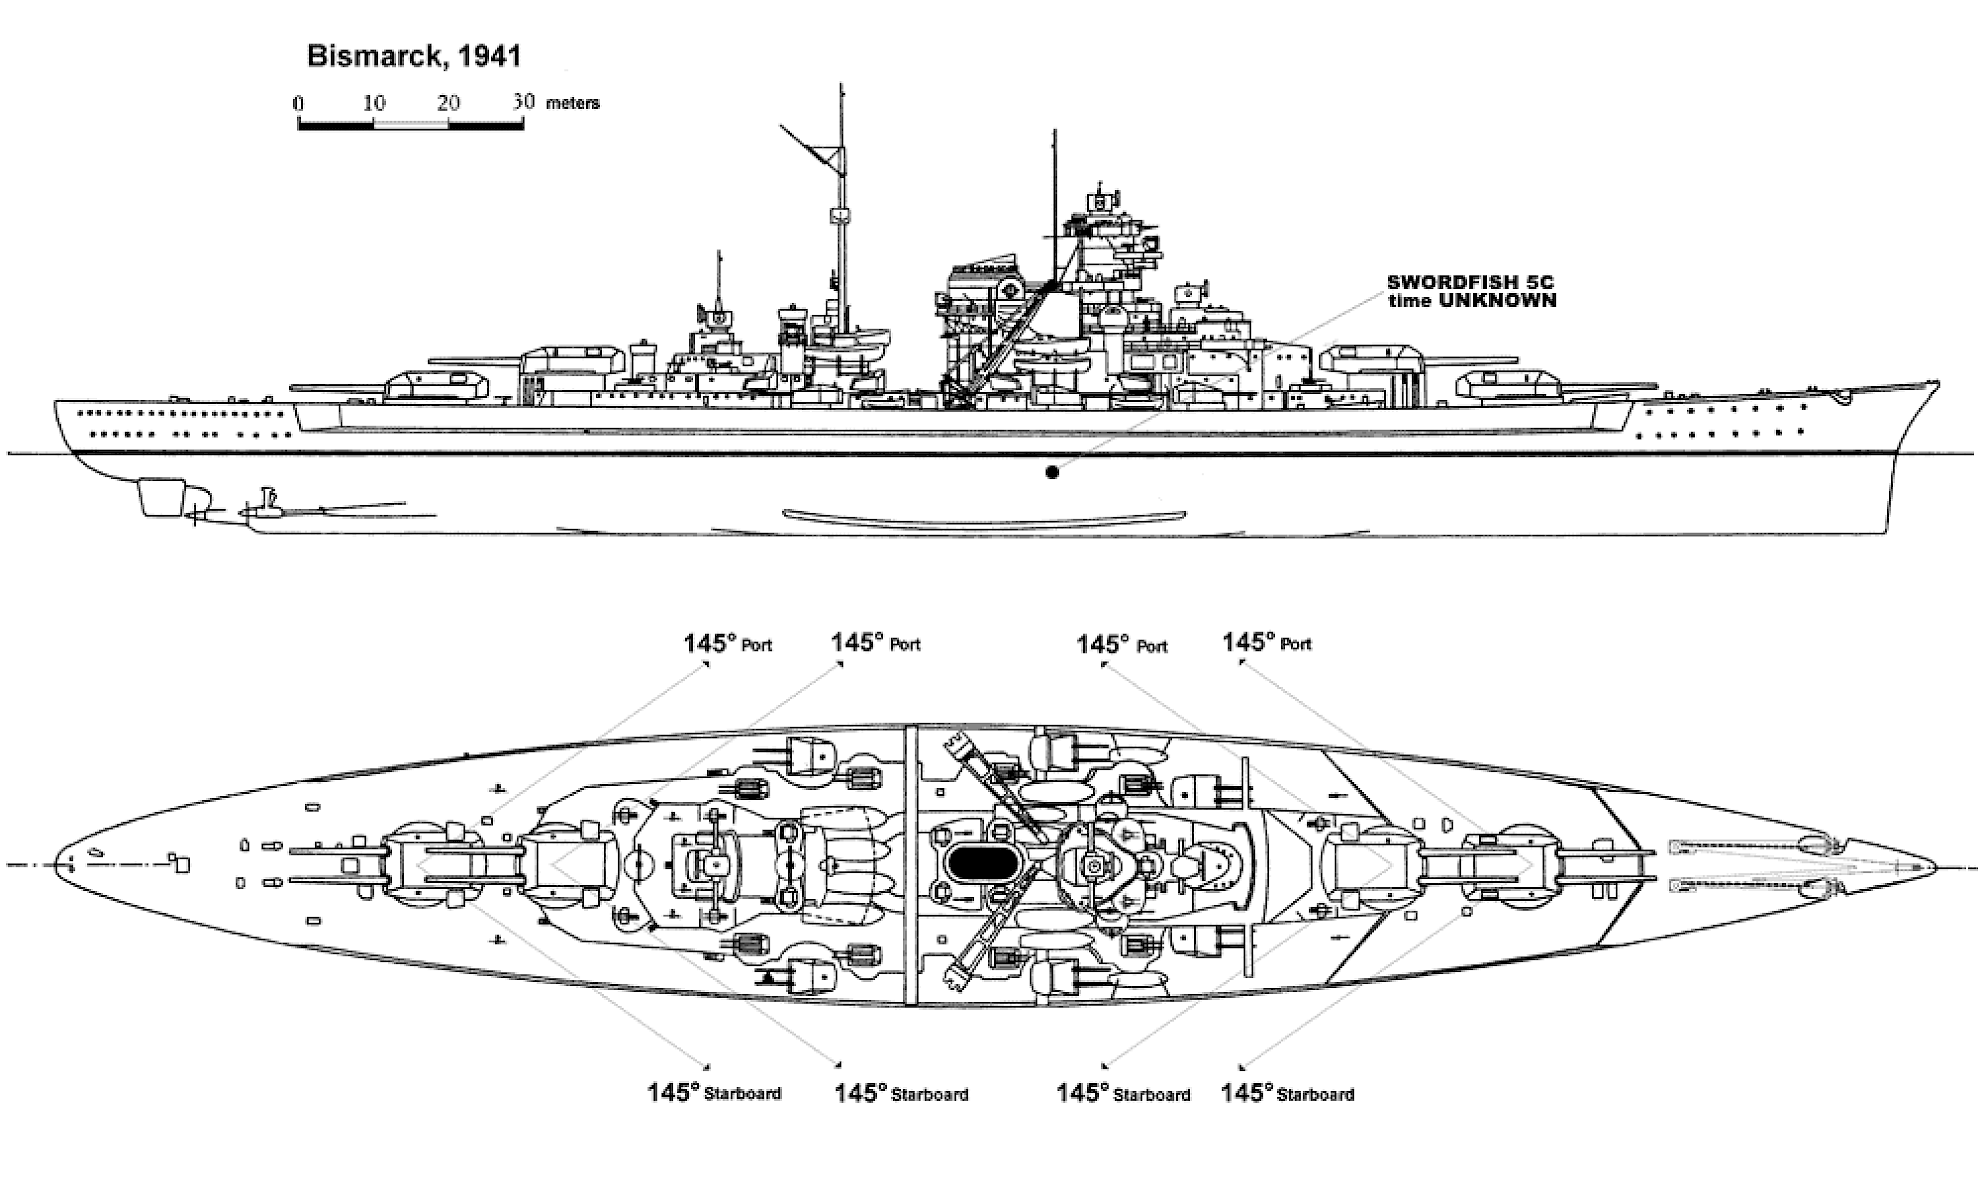
Approximate location of the torpedo hit inflicted by Swordfish 5C, piloted by J.C. Thompson
Along with the damage from the torpedo strike, the evasive manoeuvres the Bismarck had been forced to execute had undone much of the repair work to the damage sustained in its encounter with the Hood and Prince of Wales. This slowed the German battleship down considerably, which would allow the British task force to catch up. Designated “Force H”, it consisted of the aircraft carrier HMS Ark Royal, the battlecruiser Renown, and a light cruiser.
However, Force H needed to locate the Bismarck first. On the morning of May 25th, Admiral Lütjens broke radio silence at 07:00 to message Group West: “One battleship, two heavy cruisers keeping contact.” In reality, contact had been broken with the Royal Navy ships hours before. This message, along with another sent at 09:00, allowed the British to close in on the Bismarck.
By May 26th, Force H along with the HMS Sheffield destroyer had moved to a position where they could intercept the Bismarck. With the weather conditions restricting visibility, the Sheffield was sent ahead to shadow their target. However, Captain Maund and his officers aboard the Ark Royal failed to notice the departure of the other ship. When a Swordfish attack was launched at 14:50 that afternoon, the pilots were told that no other ships were between them and the Bismarck.
The 15 torpedo-bombers located the presence of a ship, and the planes descended. Only three of them would realise the ship they were targeting was the Sheffield and turn away without releasing their payload. Miraculously, the Sheffield escaped without any damage, as the magnetic detonators of the torpedoes proved to be faulty. The majority had detonated shortly after contacting the water. After returning from the mistaken attack, the crew aboard the Ark Royal replaced the detonators with contact fuses and prepared for another attempt. The Sheffield was now within 10 nautical miles of the Bismarck.
At 19:15 on May 26th, 15 Swordfish bombers took off from the Ark Royal. This time guided by the Sheffield, they launched their attack on the Bismarck at 20:55.
Approaching at low altitude from all sides in order to lessen the effect of the giant vessel’s anti-aircraft fire, the first wave of planes dropped their torpedoes. Two torpedoes found their mark, one from Second-Lieutenant Beale hitting amidships on the port side, another from Sub-Lieutenant Moffat striking in the stern area on the port side close to the rudder installations. This hit would prove fatal, as it jammed the rudders at a position of 12 degrees to port, leaving the Bismarck turning in circles. Damage control teams could do nothing to repair the ship as they were unable to enter the steering compartments. The Bismarck was now locked on a course to the northwest, heading directly towards her pursuers.
Stranded beyond the range of air support, the mighty battleship faced the inevitable.
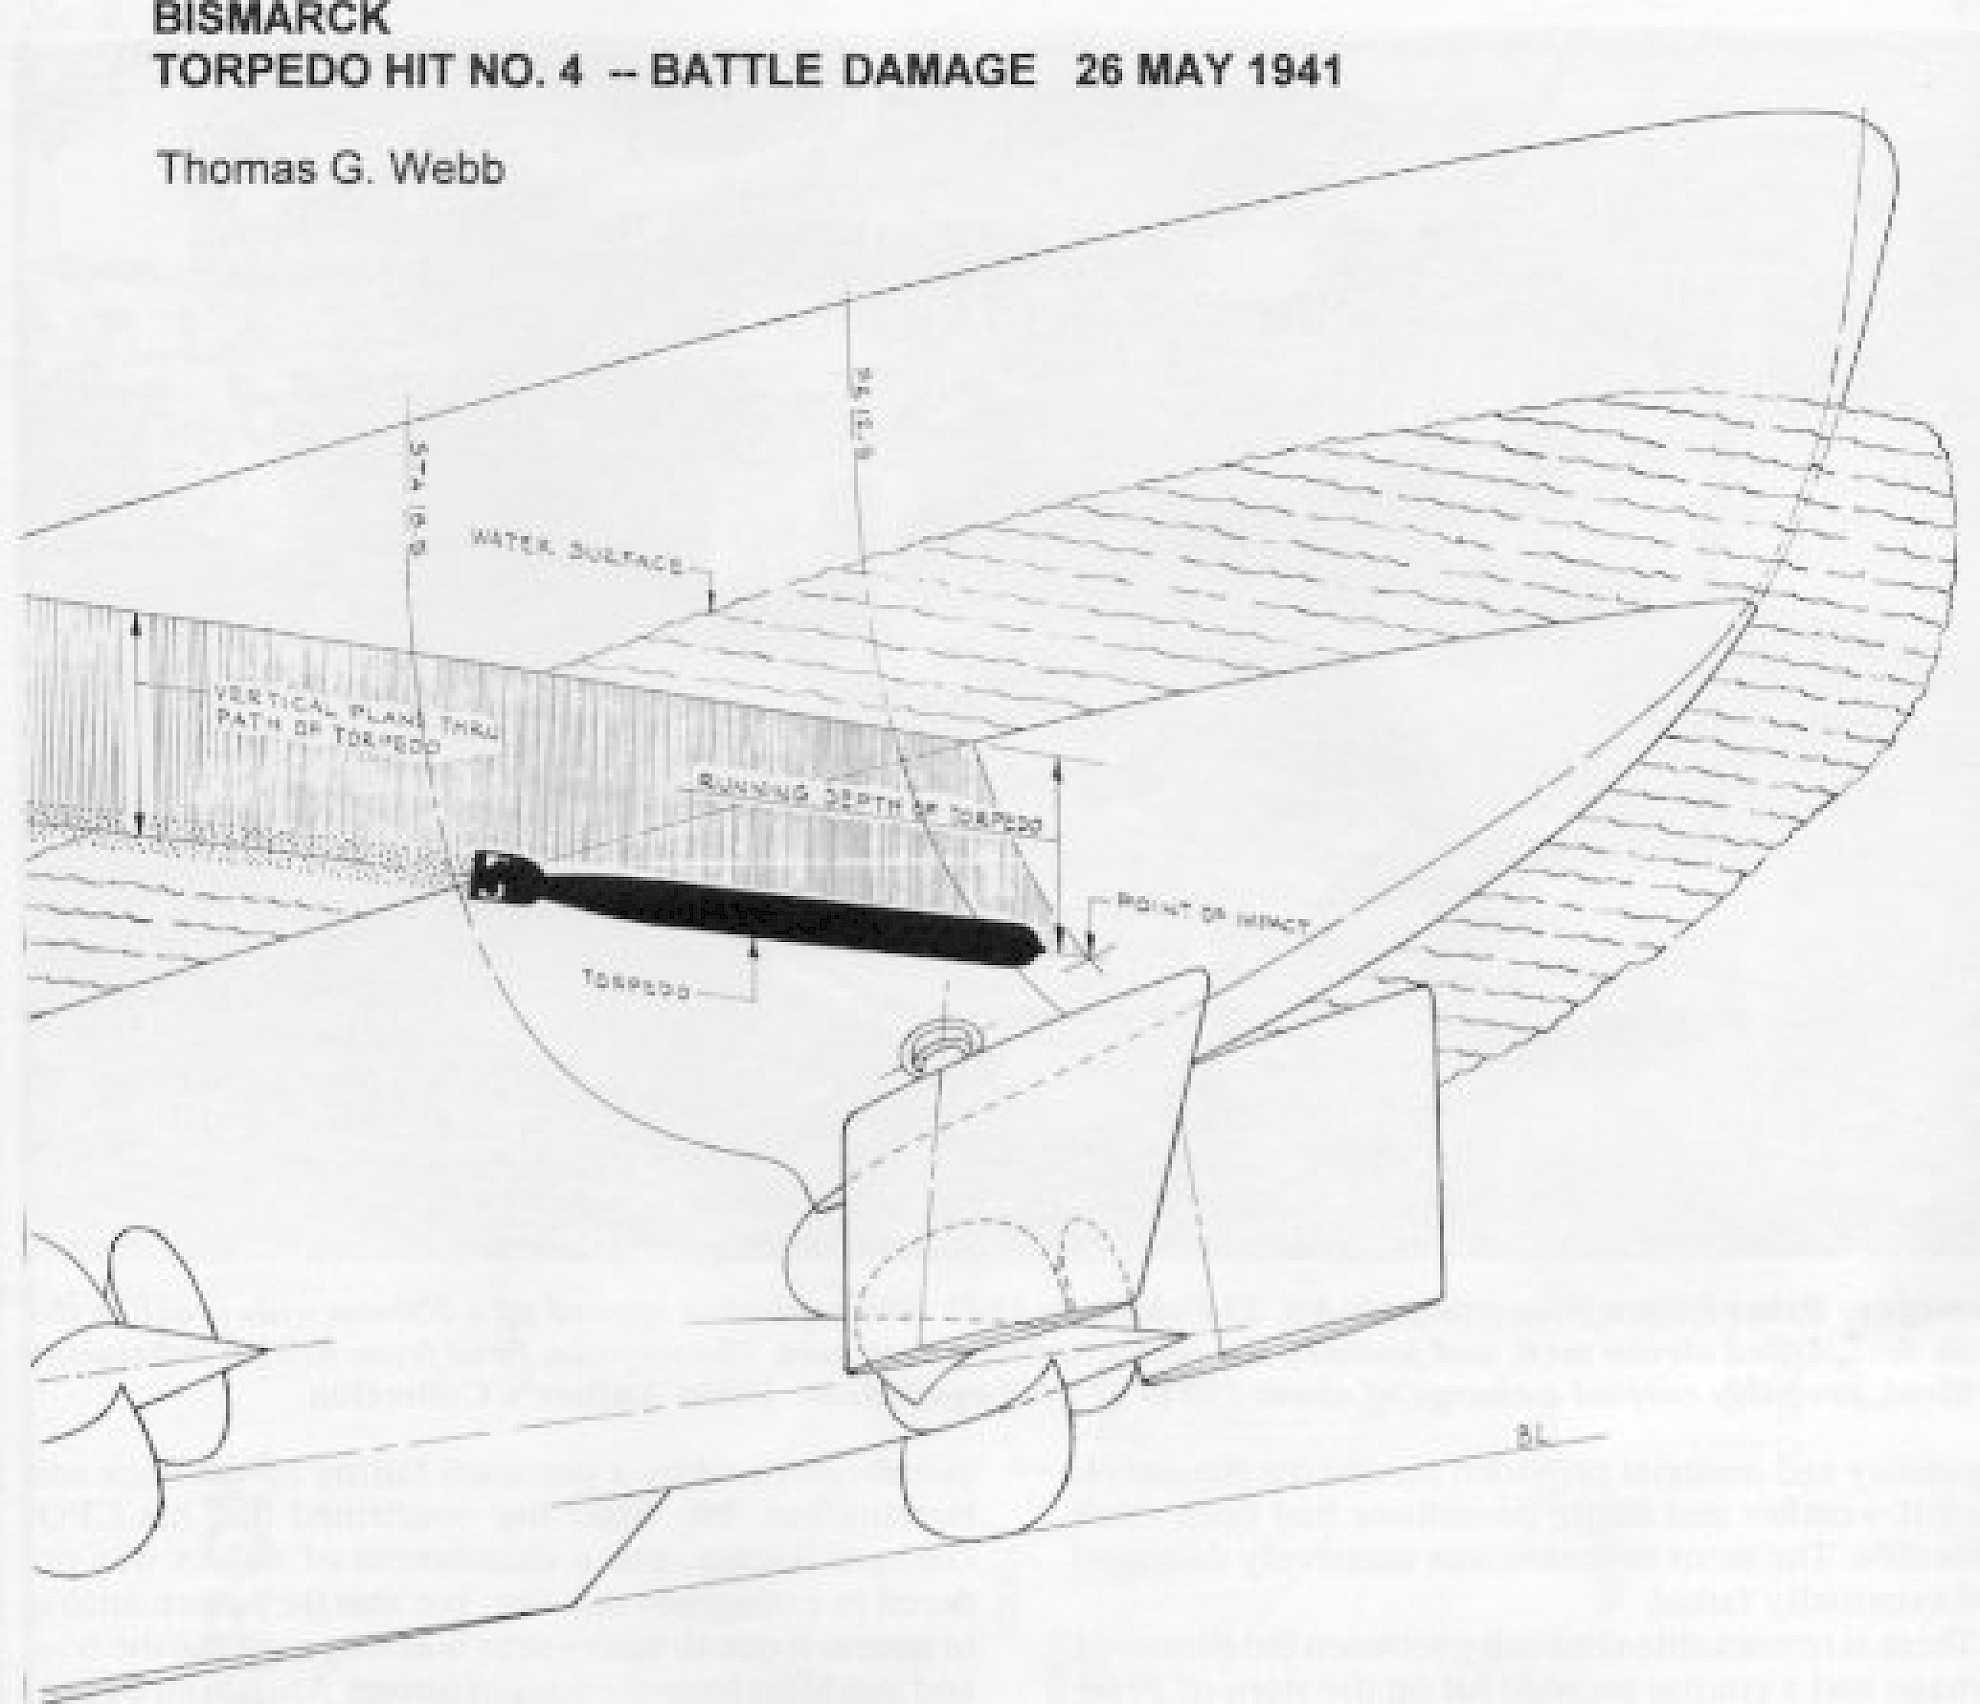
Diagram of the torpedo hit that disabled the Bismarck‘s rudder.
Illustration by Thomas G. Webb
Source: www.navweaps.com
Meanwhile, the pursuing British ships had been spotted by Kapitänleutnant Herbert Wohlfahrt aboard the U-boat U-556 at 19:48. Seeing two faint warship silhouettes, the Captain immediately ordered his U-boat to dive to periscope range. As the ships came closer, they were identified as a British battleship and an aircraft carrier. The U-boat was ahead of the ships, in the perfect position to attack. However, the U-556 had been in a major engagement days earlier, and had no torpedoes to fire. Submarines played an effective role in naval warfare during the war, but the only one capable of aiding the Bismarck was unable to engage.
“Without destroyers. Without zig-zagging! I could have placed myself between them and finished them both off. The aircraft carrier has torpedo aircraft onboard. I could have helped Bismarck.”
– Kapitänleutnant Herbert Wohlfahrt
With the Bismarck unable to escape, the British forces moved in to sink her. On the morning of May 27th 1941, Bismarck was surrounded by the battleships King George V and Rodney, battlecruiser Renown, aircraft carrier Ark Royal, heavy cruisers Norfolk and Dorsetshire, cruiser Sheffield, and nine destroyers.
Between 08:47 and 10:19, a total of 2,876 shells were fired at Bismarck, with an estimated 300-400 hits. Of the 2,200 crew that set sail on the Bismarck, 115 survived.
Her wreck rests on the Atlantic seabed, a memorial to the valiant sailors of the Second World War.
| Ship | 16” Shells | 14” Shells | 8” Shells | 6” Shells | 5.25” Shells | Total Shells |
| King George V | – | 339 | – | – | 660 | 999 |
| Rodney | 380 | – | – | 716 | – | 1096 |
| Dorsetshire | – | – | 254 | – | – | 254 |
| Norfolk | – | – | 527 | – | – | 527 |
Table showing the shells fired by the British fleet at the Bismarck on the morning of May 27th 1941
For a more information on the Bismarck’s final battle, take a look at the article by William H. Garzke, Jr. and Robert O. Dulin, Jr. on Navweaps.com:
International Naval Research Organization – Bismarck’s Final Battle
Header image: “Bismarck’s Final Battle”, painting by Olaf Rahardt